|
Recently I was commissioned to make baby quilts for boy-girl twins! The twins' dads live in CA and have pretty modern taste. My first thought was to go minimalist, abstract, improv modern with my quilt design. I worked, with my quilty friends' feedback, to pull together a palette from my stash and then I started working. My design evolved and I simplified & tweaked. I stared at it on the design wall....and I didn't like it. Yuck. The problem with doing commissions, and working closely with your buyer during the process, is that you can sometimes find yourself creating things that you don't like. Conversely, sometimes working for a client with taste that is different from yours can push you out of your comfort zone to try new designs or palettes - and it's a good thing. In this case it was the former. I didn't like the quilt that was looking at me from my design wall, and I couldn't keep working on it.
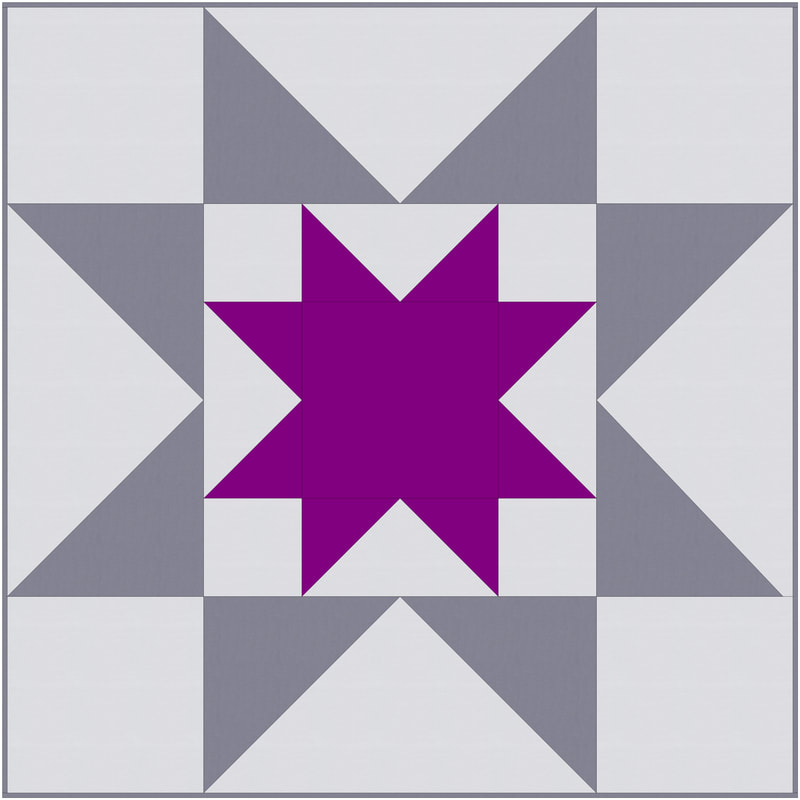
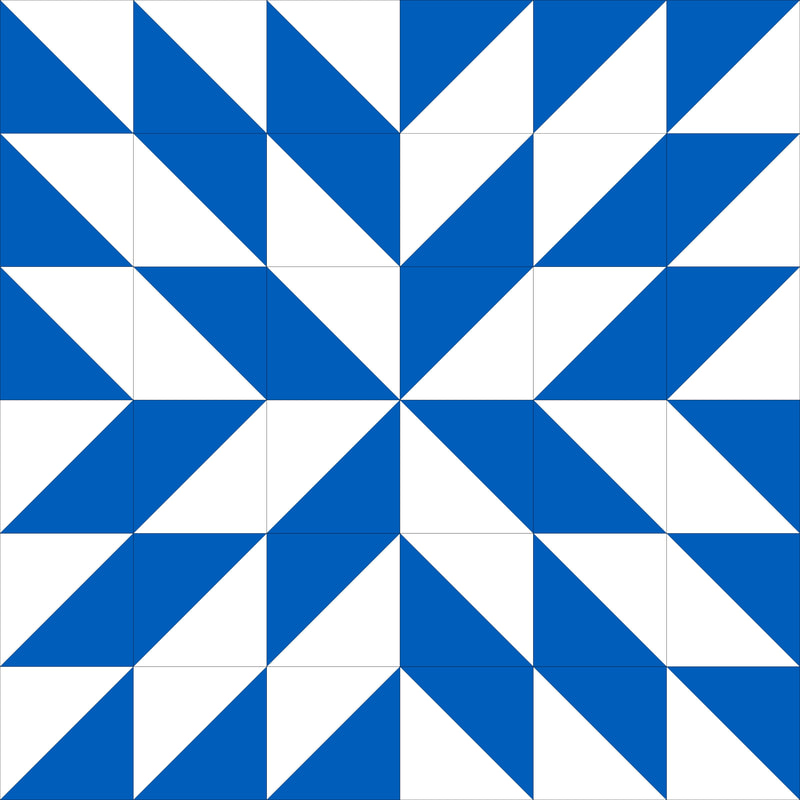
Once I made the decision not to move forward with those first attempts, I quickly settled on a simple single large-scale star-in-a-star block in two different, but similar, color-ways. I have been wanting to make a quilt using this block ever since I made these three blocks for a traveling quilt project. At the end of this post I will include a link to a tutorial for this quilt. 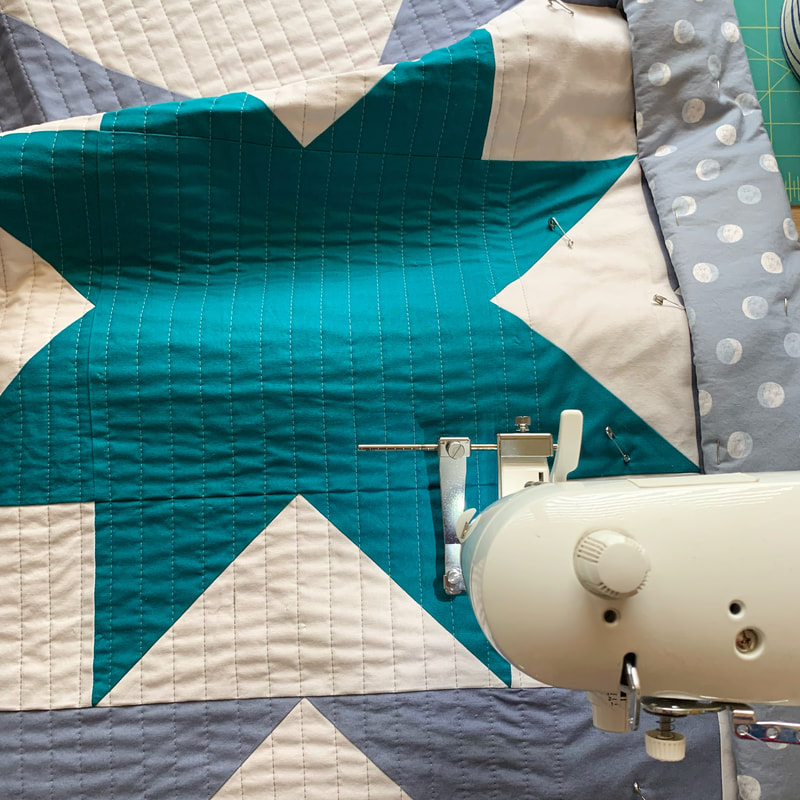 I quilted straight lines on my Juki with a 1" separation. You can see more on how I sew my straight lines by visiting my Instagram page (HandmadeMyrth) and watching my "sewing tools" highlights. I love the texture that straight-line quilting adds to a quilt. 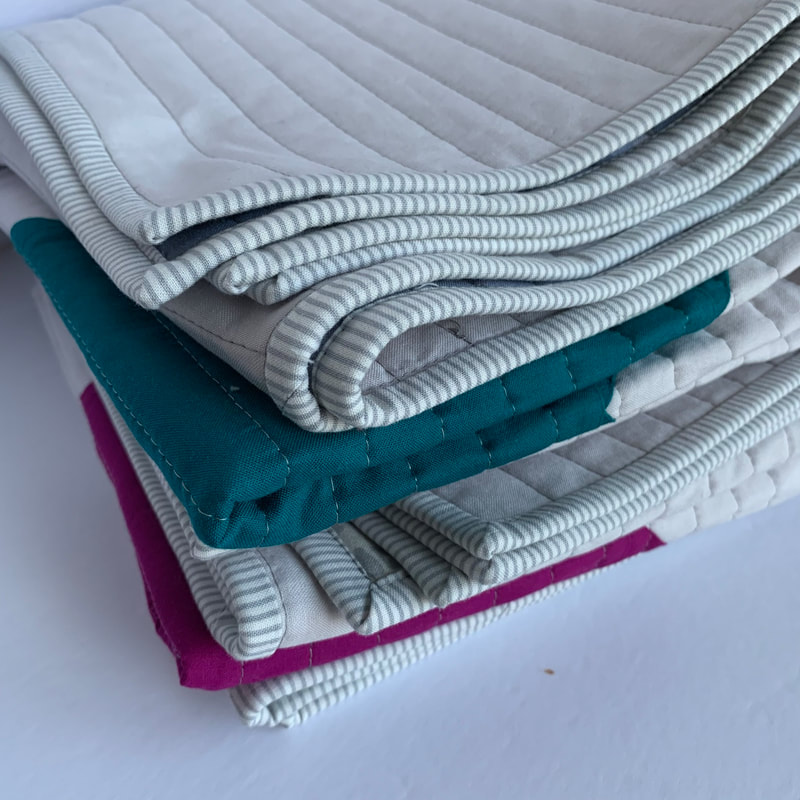 I had a mini gray and white stripe fabric on hand (Figo fabrics by Ghazal Razavi) that I used to bind both of these quilts. I backed them in two different gray prints. The moon phases print is another one from Figo, while the other is from Cotton + Steel (or maybe it was when they were Ruby Star - same designer, different company). 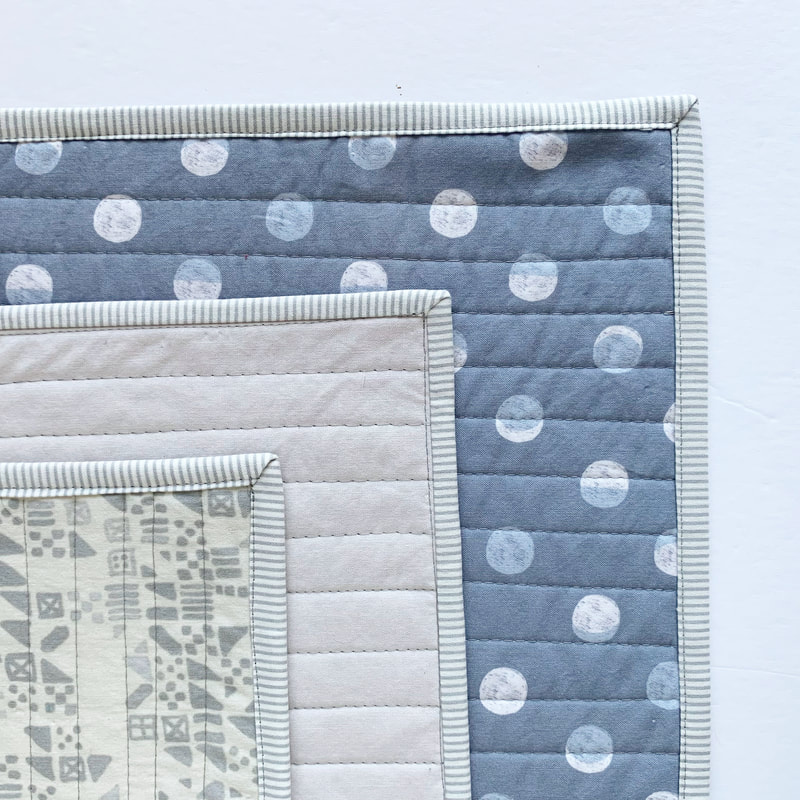 Solid fabrics used in these quilts: Kona Silver for the background of both quilts (lt gray) Kona Slate for the dk gray star in the teal quilt Kona Glacier for the teal star Michael Miller Jewel for the magenta star Michael Miller Clay for the dk gray in the magenta quilt Thanks for stopping by. Click here to be directed to the tutorial for this quilt. 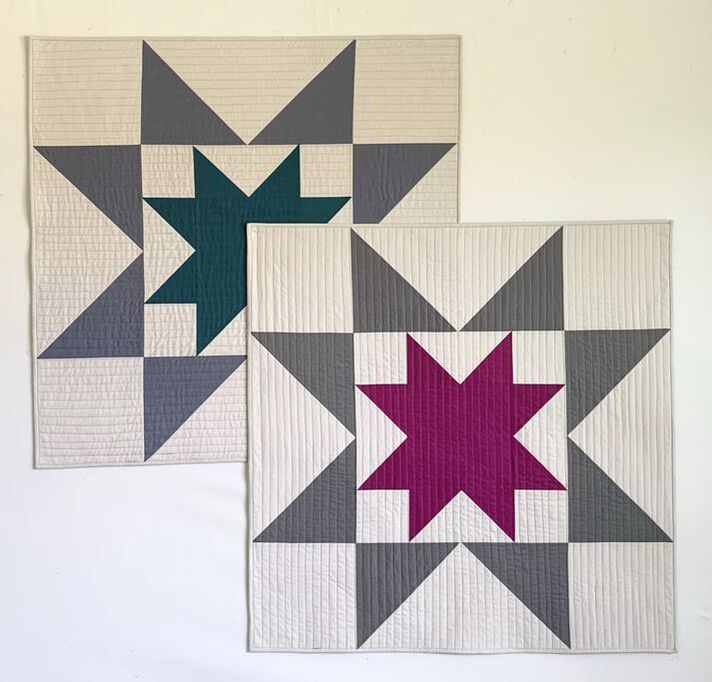
2 Comments
On Valentine's Day this year, I was supposed to be quilting that blue log-cabin baby quilt in my last post, or maybe I was supposed to be quilting some commissioned place mats. I just really didn't want to though, so I got out all of my red, pink & purple scraps & strings and started playing around with some new log-cabin blocks. I started off with the idea that I wanted to make a quilt with alternating light and dark pink/red log-cabin blocks. I used 12" blocks in all of the log-cabins quilts that I've made so far. This time I wanted to try making smaller blocks: 8" blocks. HOWEVER: I quickly discovered that I really didn't like all of the contrast with the light and dark blocks. I didn't take a picture of that stage in the evolution of these quilts - it really wasn't pretty. 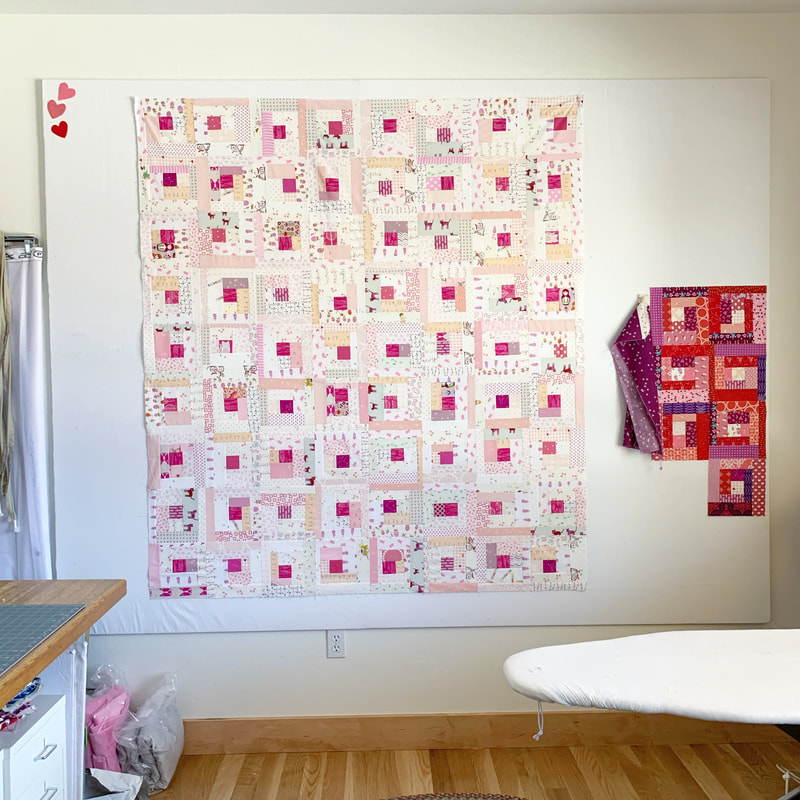 I made plenty of blocks in both light and dark before I decided that I didn't like them together. So I separated them and started on the light pink version first. This one has mostly low-volume prints with little bits of light pink fabrics. The center squares are magenta and I love how they pop. 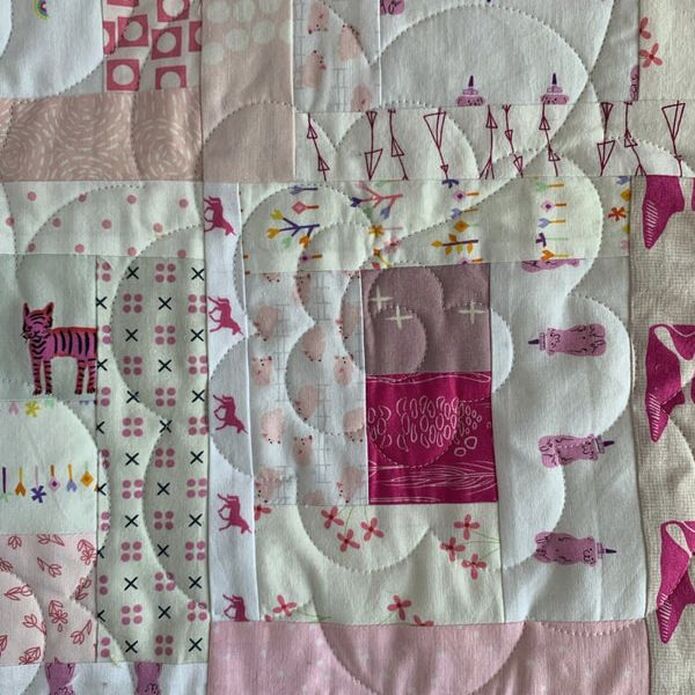 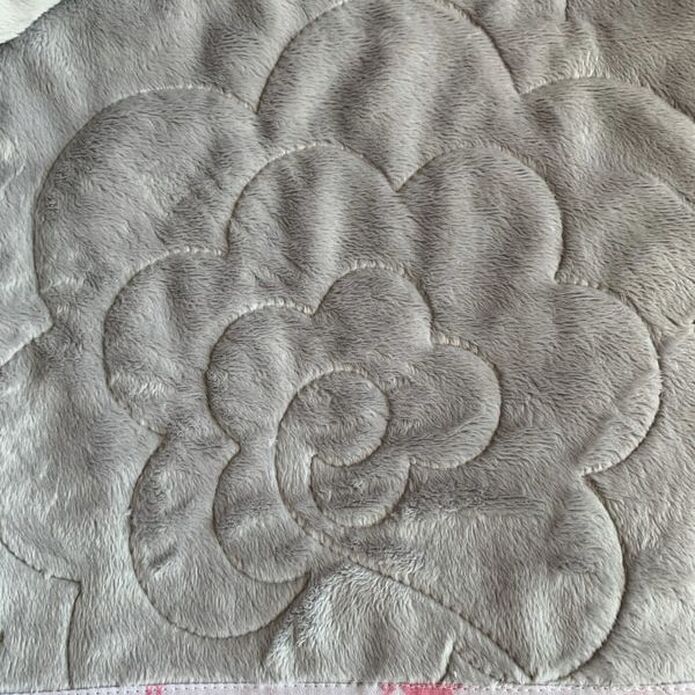 I backed this one in platinum wide-back minky and had it quilted with the Urban Elementz Rhododendron pattern. I wanted something loose & loopy with a large scale. For binding, I used the last pink low-volume fabric in my stash: tossed pink piggies. 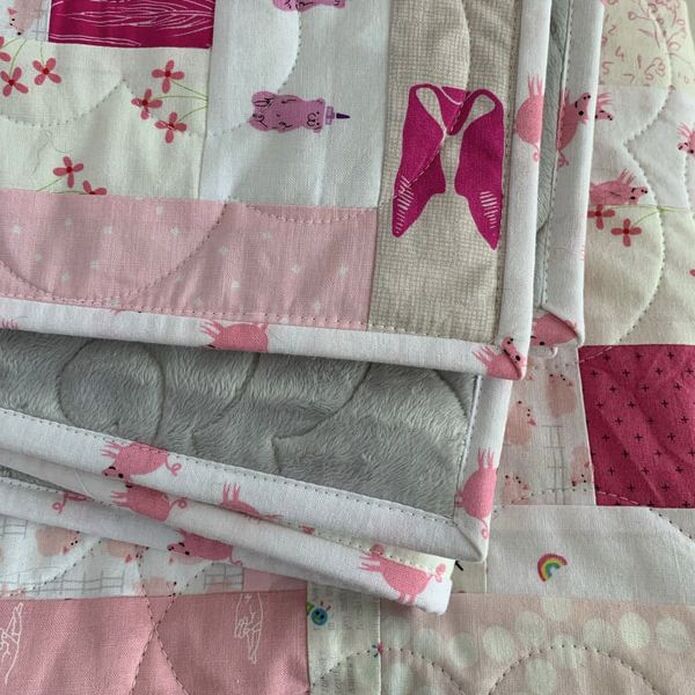 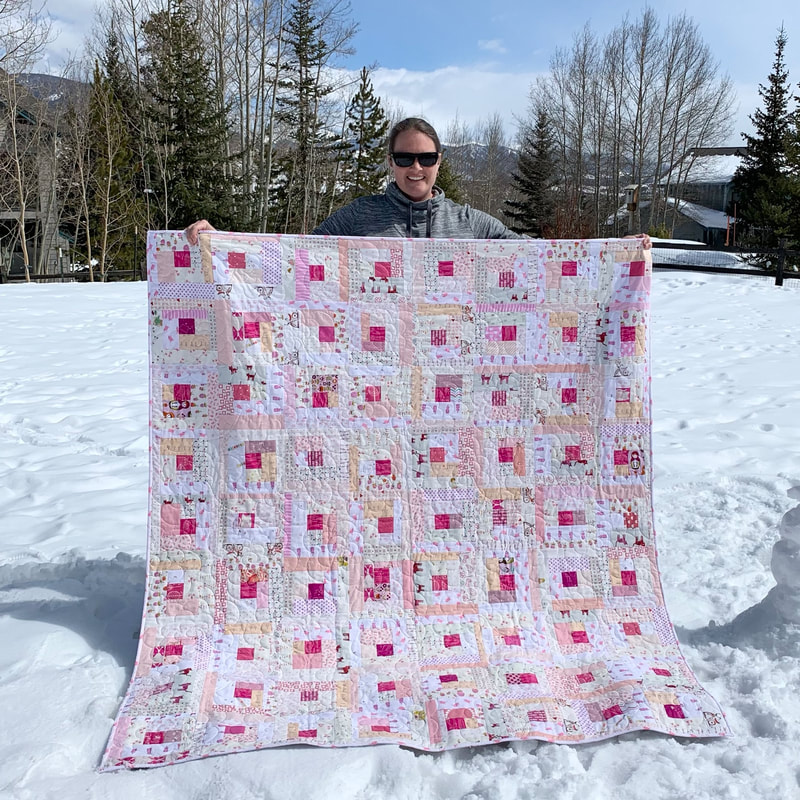 This quilt has 72 of those little 8" log-cabin blocks and finishes at 64" x 72". You ready for the next one? When I was done with the light pink version, I picked up the super saturated 8" log-cabin blocks and made some more of those. These guys have low-volume centers with dark pink and red logs and shots of medium & dark purples. 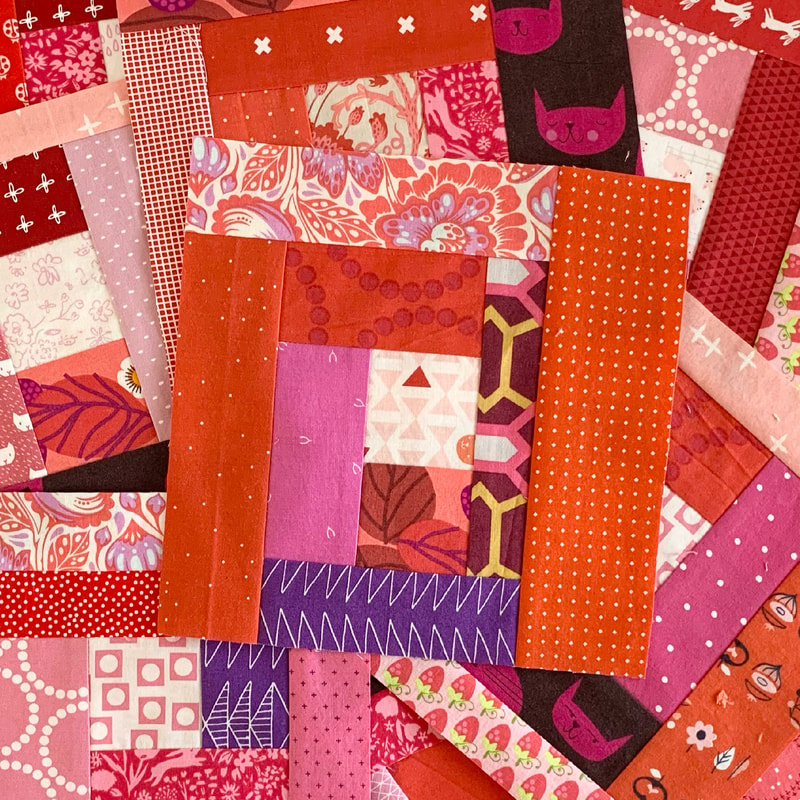 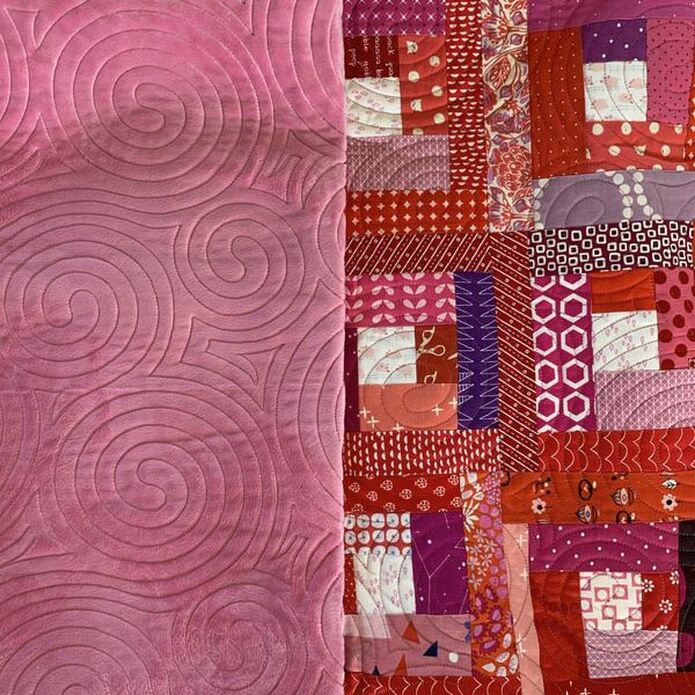 I also backed this version in minky: bubble gum pink this time. I had my quilter quilt this one with the Dizzy Izzy pattern that I also used for my "Bee Wild" log-cabin quilt. I can't wait to wash this one and see the crinkle and drape. I bound this quilt with a orchid Halloween print that isn't super Halloweeny. 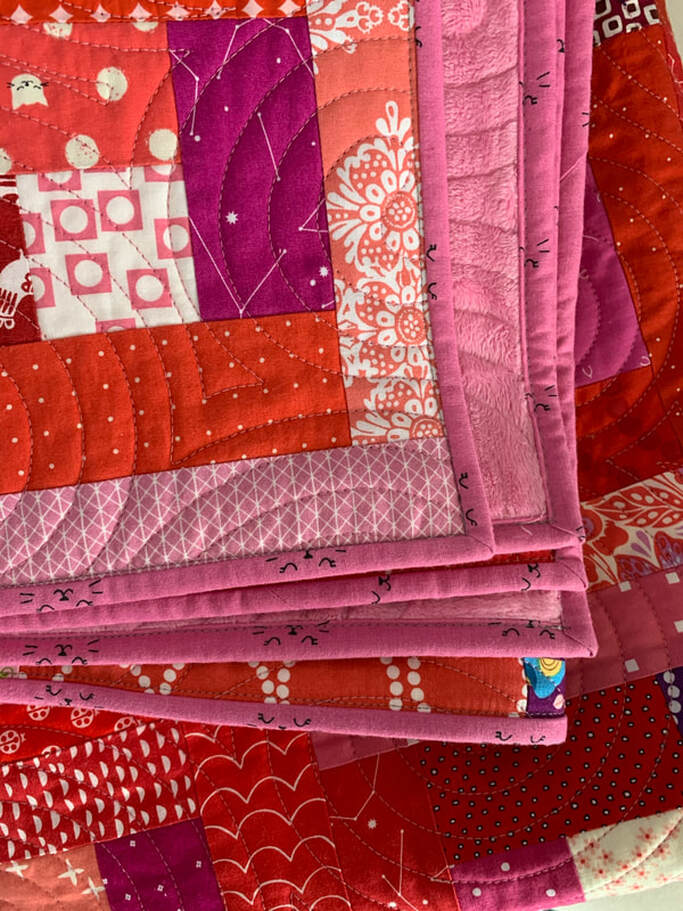 This quilt also has 72 blocks and finishes at 64" x 72". 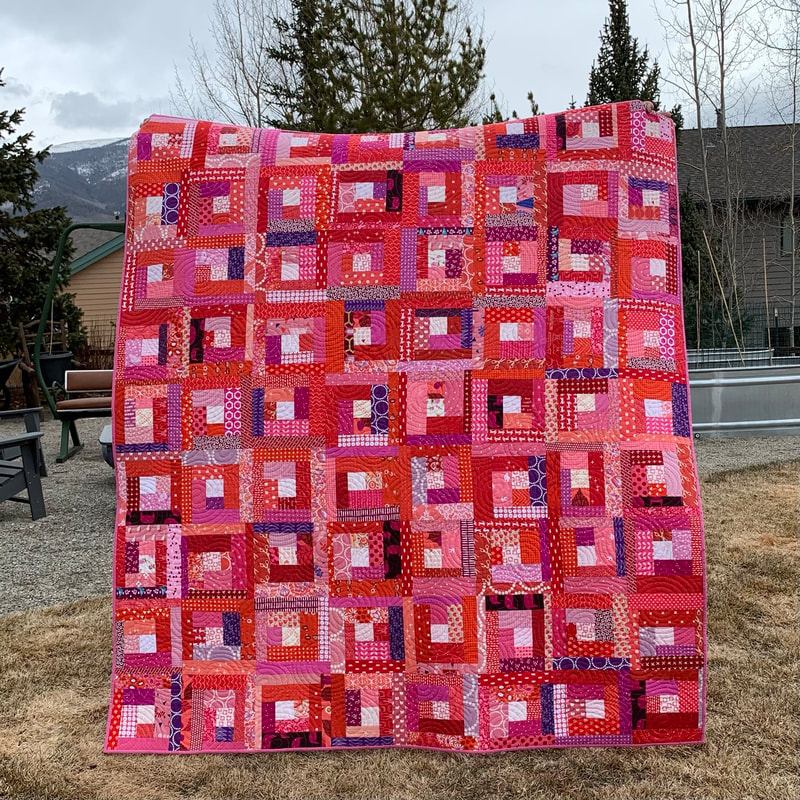 As I was sewing along on these blocks, my mind started to wonder and I began to wonder what super LARGE log-cabin blocks would look like. Along with that thought, I also started to look the little bits that were left over from ends of strips and I wanted to try using them somehow. My first thought was so sew the "crumbs" in to strips and use them to make a round of logs in my blocks. 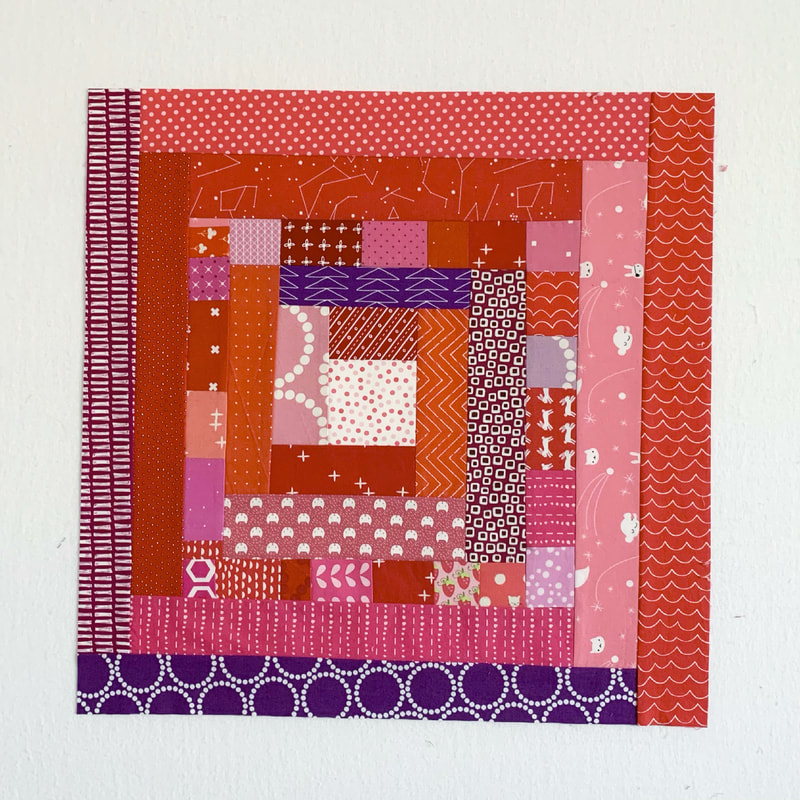 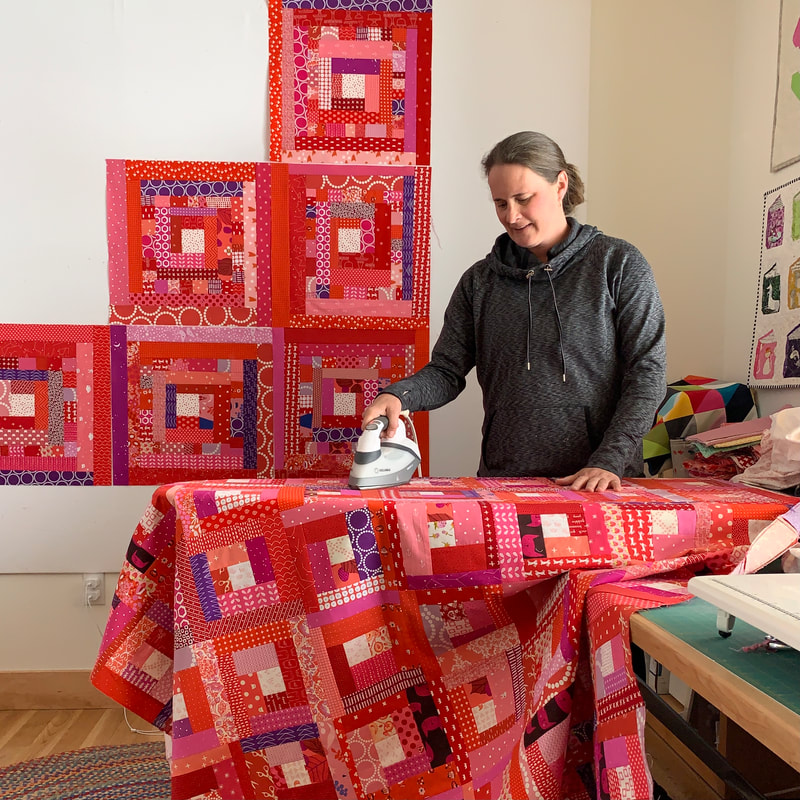 I liked how the fabric crumbs looked (see above on my design wall), but it wasn't ENOUGH. You know? They didn't pop enough. They weren't noticeable enough. My next thought was to sew strips that were now too short to use on my growing blocks in to sashing and boarders. I sewed them in 6" lengths, and then cut them to be 3". 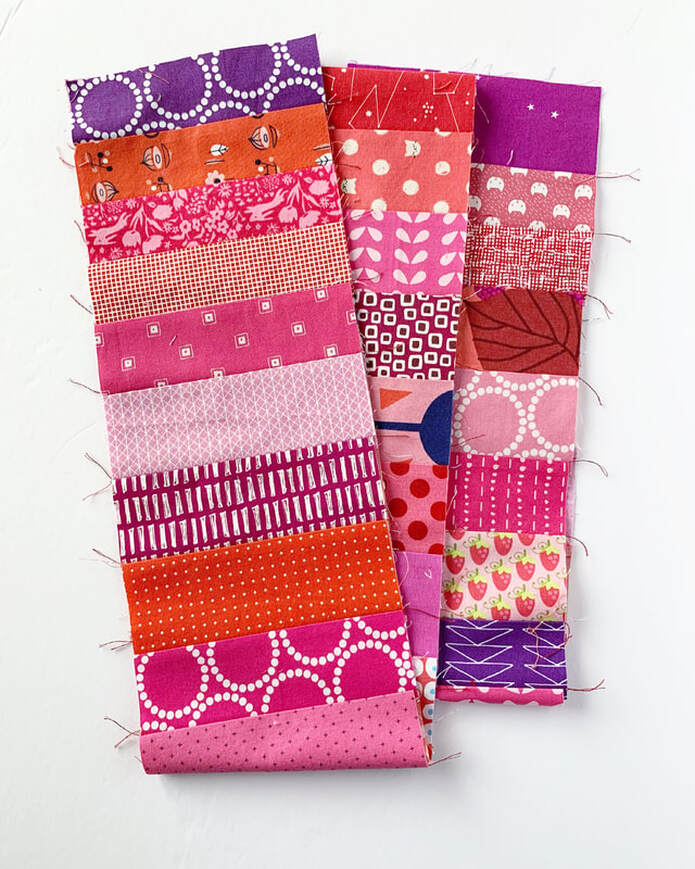 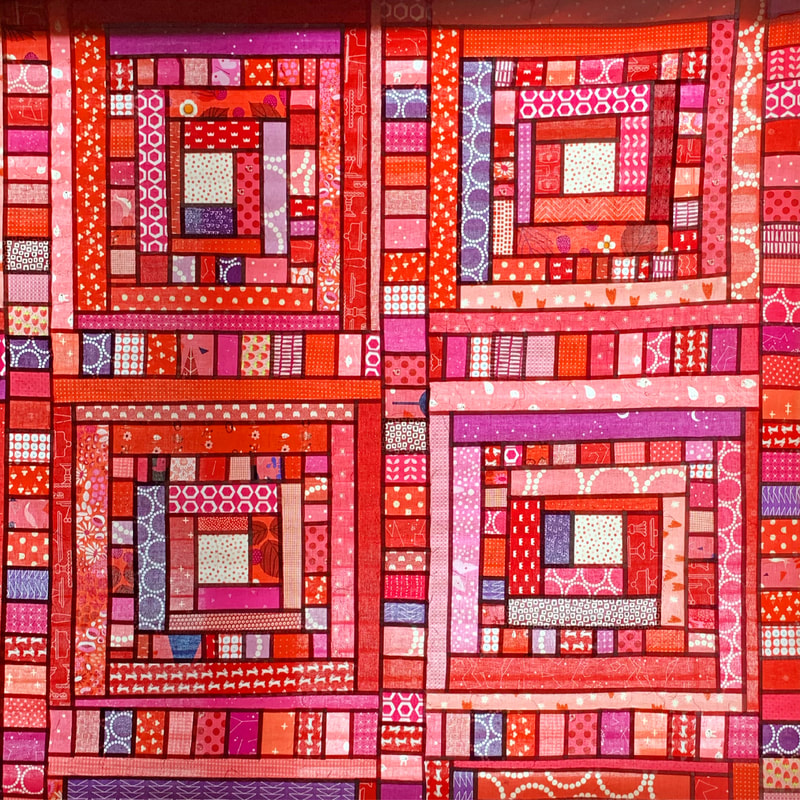 This stained glass window shot of the quilt top hanging in front of my window shows you the "fabric crumb" sashing and logs. These blocks are 20" with 3" sashing. 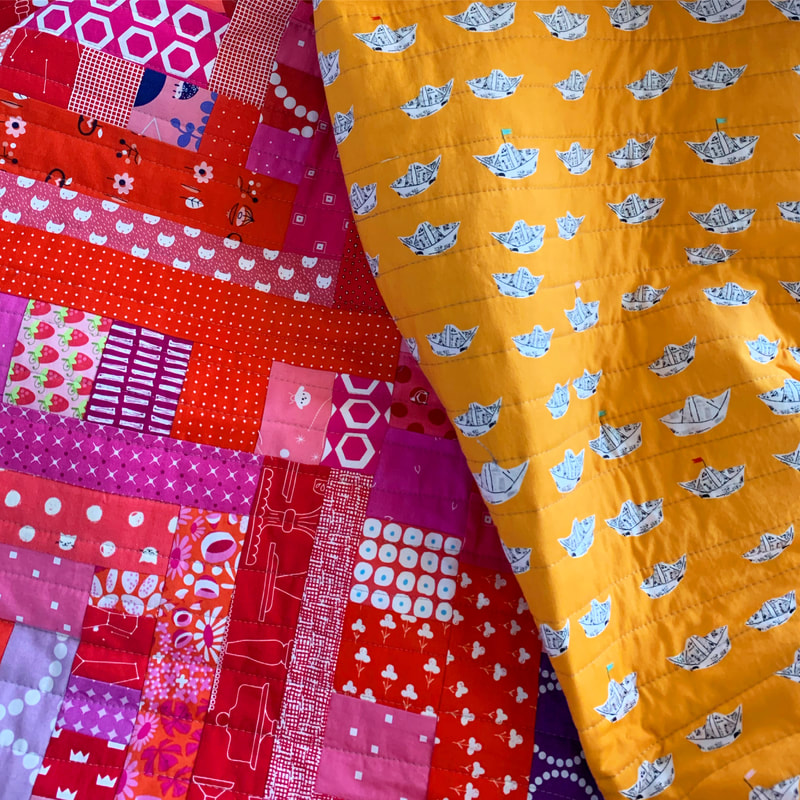 My mom wanted this quilt (which makes me happy because then I can visit it), so together we chose this paper boat backing fabric and I quilted it with straight lines in my machine. This one has 9 blocks and finishes 72" square. I had such fun with this quilt: making design decisions as I went along, and letting myself explore new ideas as they came to me. This one is truly improv and I love it the most right now! 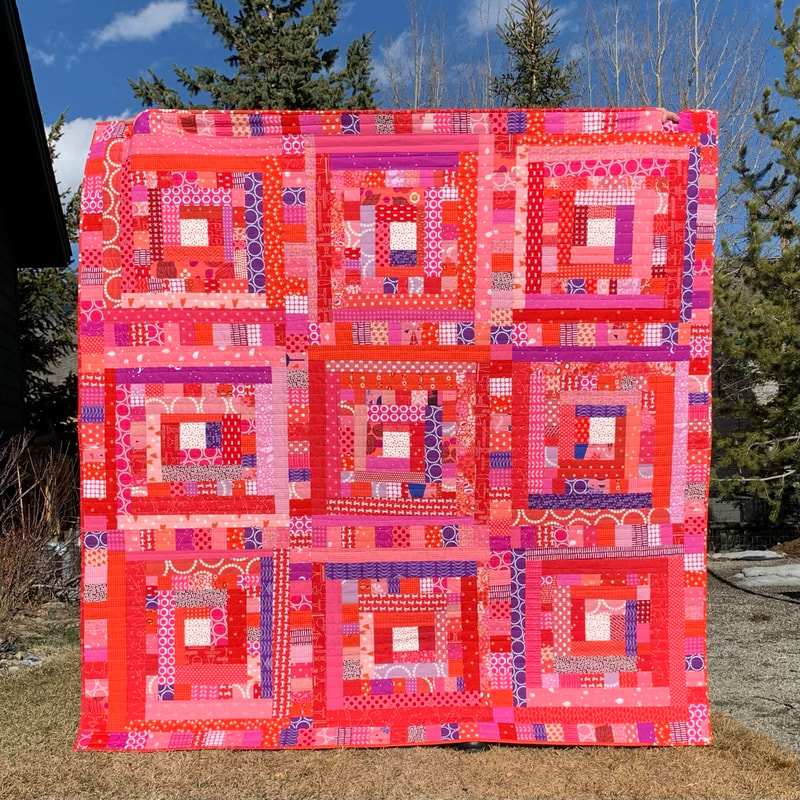 Thanks for reading along. If you'd like to see lots of pics of all of my log-cabin quilts check out #myrthslogcabins on Instagram.
This is my 6th baby quilt commission in less than 6 months. And you know what? Each time I am faced with designing and making a baby quilt, I go about it differently. Sometimes I go through my sketches, sometimes I look at old quilt books, and sometimes I look at quilts that I've recently liked on social media. For this one I literally opened the curtain on the closet where I store my fabric and began going through my larger cuts of fabric...looking for potential pieces for a quilt backing. I fairly quickly settled on the low-volume pirate print (see below). 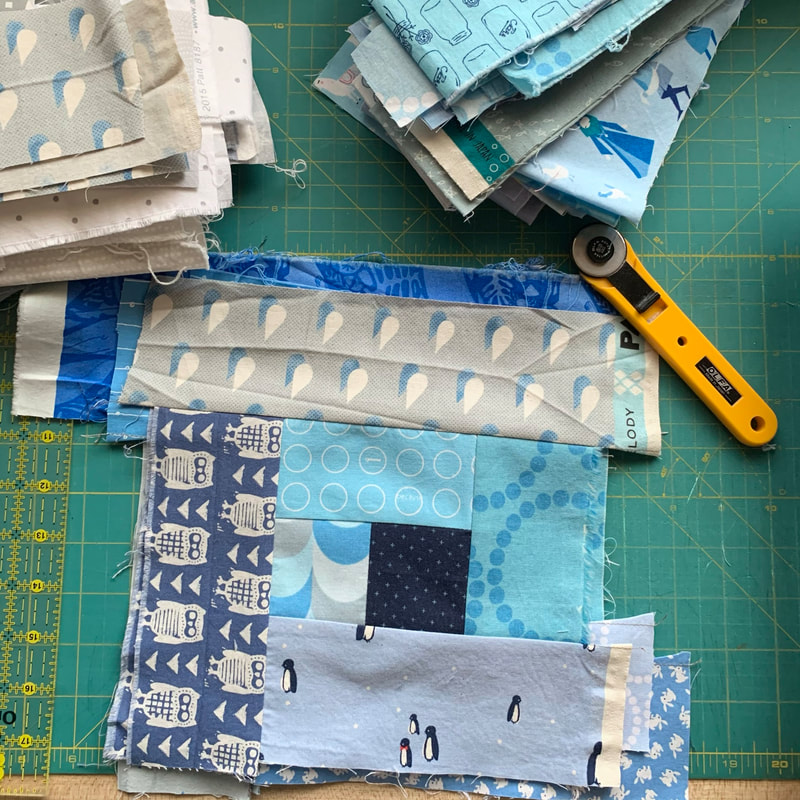 The person commissioning the quilt mentioned that the baby's room was blue. I looked in that section of my stash first, and my eyes fell on all the blue scraps and strings that were left over from my numerous recent blue quilts (see here, here, and here). It didn't take long for me to decide on some blue log-cabin blocks. I toyed with the idea of using yellow or red center squares, but abandoned that idea and went with navy blue centers and accents of darker blues in the blocks. I've been making my log-cabin blocks 12" square, and kept with that plan for this quilt. I did 9 blocks total in a 3 x 3 layout. I quilted straight lines roughly 1" apart for this project. I like how the straight lines don't compete with or overwhelm the scrappy blocks. 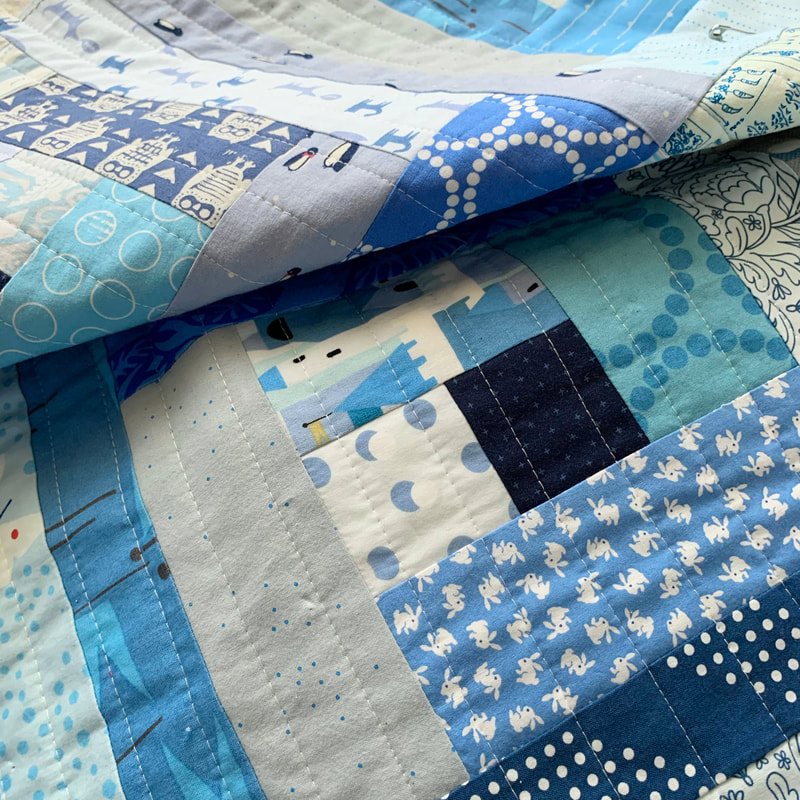 I had just enough of my penguin scraps to bind this guy (also bound this quilt with them). These penguins backed my Magnolia Mystery Quilt, so I'll always have them there, but let me tell you: make sure you love every fabric that you use to back a quilt! Why? Because when you trim your quilt, you'll have a significant amount of scraps left over from trimming that backing. Sometimes it feels like those scraps from backings go on and on forever. I'll be a little sad to have them gone from my stash (both yardage and scraps), but it also feels good to have used them up. 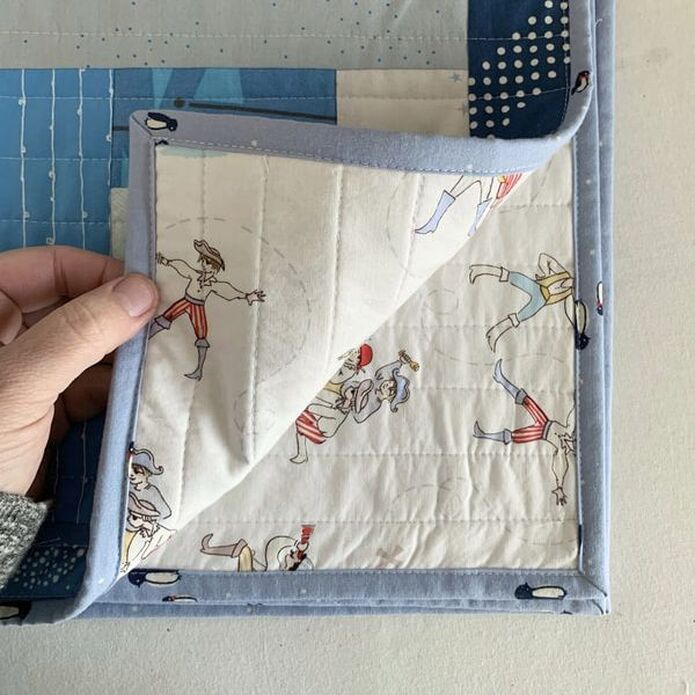 This quilt finishes at 36" square and will make a nice floor mat or stroller quilt. I hope that it gets lots of use and love! 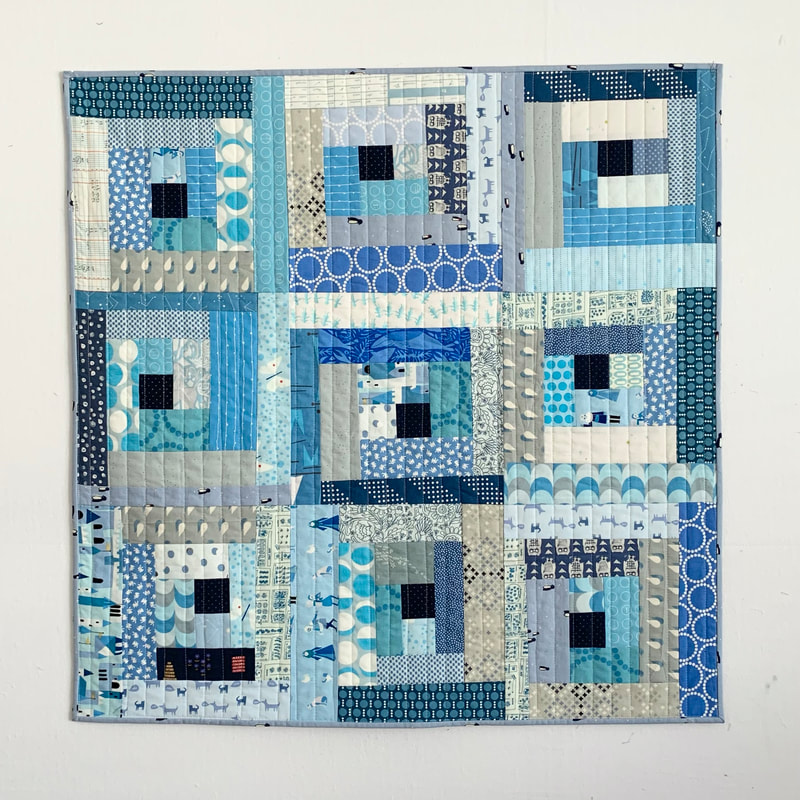 Back in 2013 I finished a "value diamonds" half-square triangle quilt in turquoise and gray. It was one of a couple of turquoise quilts that I made between 2012 - 2015. After that series of 6 quilts, I was tired of looking at and working with turquoise so I avoided it for 9 years or so. That original HST diamonds quilt was the first quilt that I entered in a quilt show (a small local one), and was one of the first that I ever sold.
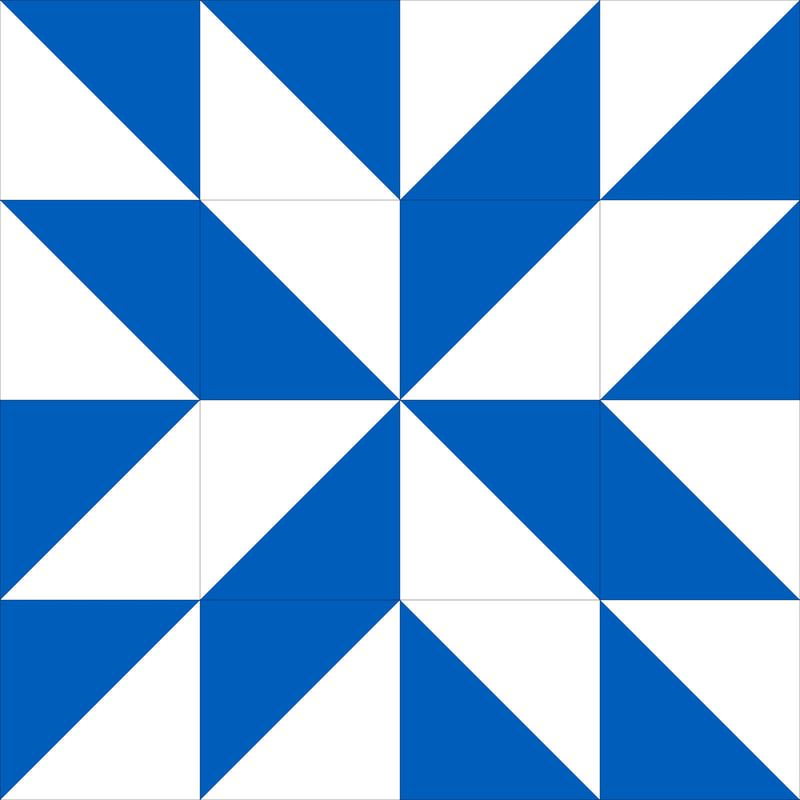
Recently, the buyer for that quilt reached out and asked if I could make another one! I think it's fun to revisit a past project and make slight tweaks. For my 2021 version I stayed with the same turquoise + gray + low-volume fabric palette, but tweaked the border design.  I quilted this quilt on my home machine and took the opportunity to do more orange-peel quilting - but this time I quilted through every-other diagonal. I talk about orange peel quilting more in my blog post for my Ocean Waves Quilt. For this quilt, I love how the circles are so much more clear. You can really see the quilting on the back of the quilt too! 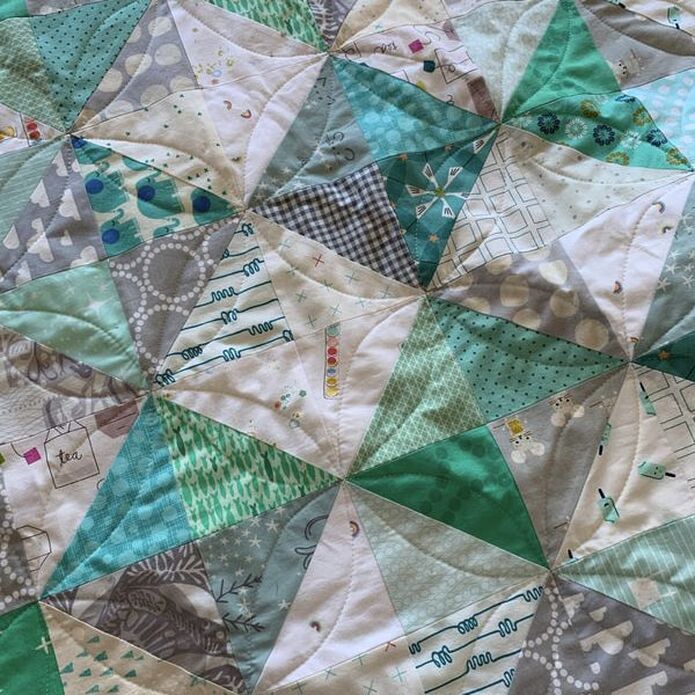  I bound the quilt with another two-tone stripe binding. I attach binding using my machine, and below you can see that sometime it isn't quite perfect (I went over the binding on the front in the corner there). Oh well. I love how it looks on the back, I love how quick it is, and I love how it lasts. I used to finish the binding on my quilt by hand and I do have one or two old quilts where the binding has come un-sewn.  Quilt Details: This baby quilt finishes at 36" square. I made the border out of 2" x 4" (finished) rectangles this time, and 2" finished corner squares. I used 32 pairs of fabrics to make my half-square triangles, and they finish at 4" square. You can see all of my turquoise quilts at #myrthdoesturquoise. Thanks for stopping by! 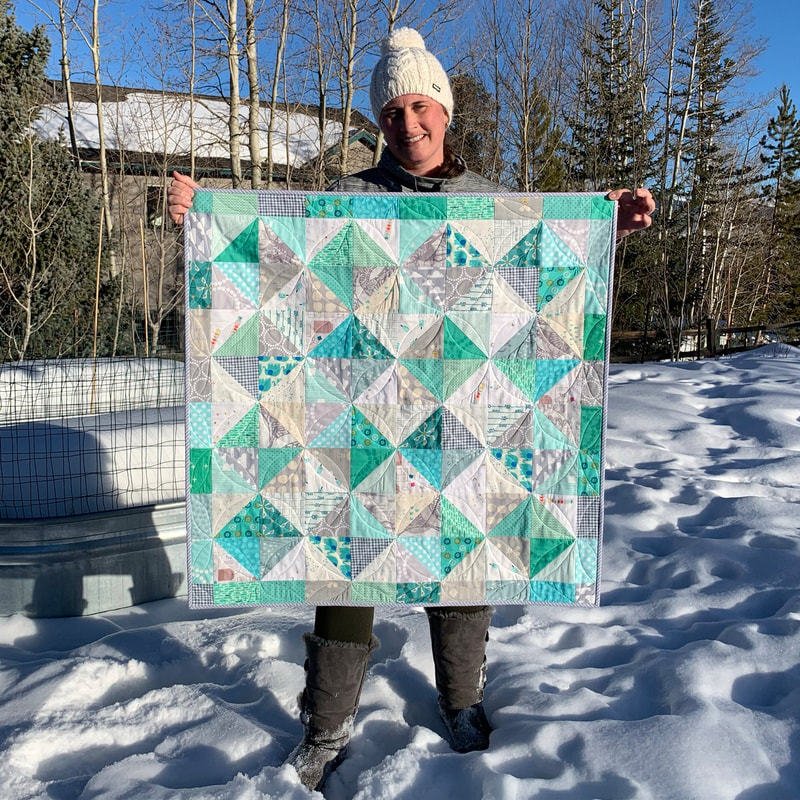 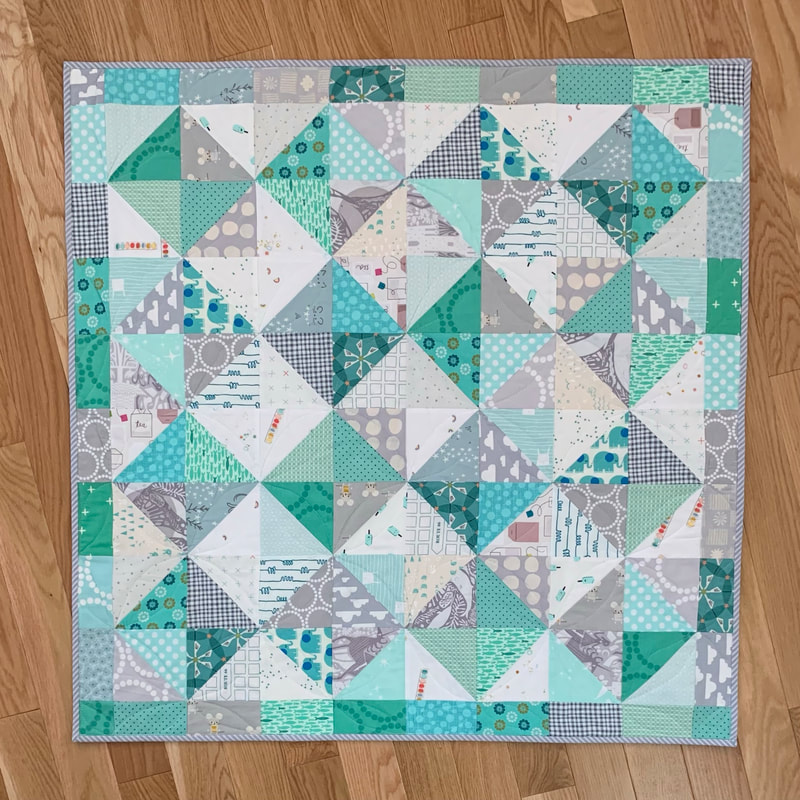 This is my second commissioned baby quilt for 2021, and my second sawtooth star baby quilt in a year. I had every intention of making a very different quilt, but I found my way back to this scrappy goodness. The person commissioning the quilt wanted scrappy, so that is what I did!! I did another version of the 12" floating sawtooth star block - this time with all miss-matched scrappy backgrounds.  All of these fabrics came from my stash, with the exception of the darkest blue fabric. I decided to go with predominantly blue low-volume fabrics for the stars - I have quite a few of those in my stash, but I rarely use them because I prefer black or gray low-volume fabrics when I'm doing a scrappy low-volume quilt. 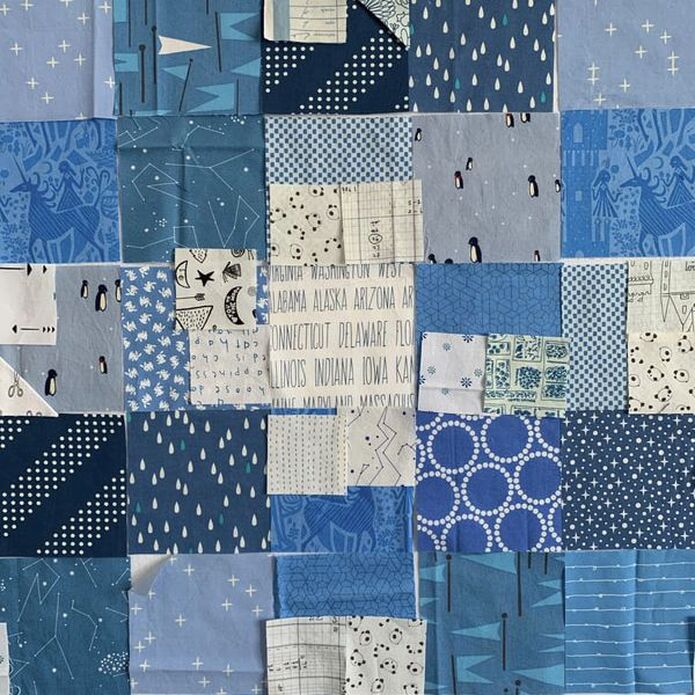 I quilted straight lines on this quilt on my home machine. I think that curvy quilting (like my last Ocean Waves quilt) would have been too flowery and feminine for this litte-boy quilt. Straight lines can provide good texture with out being too much of a distraction from a scrappy pattern. 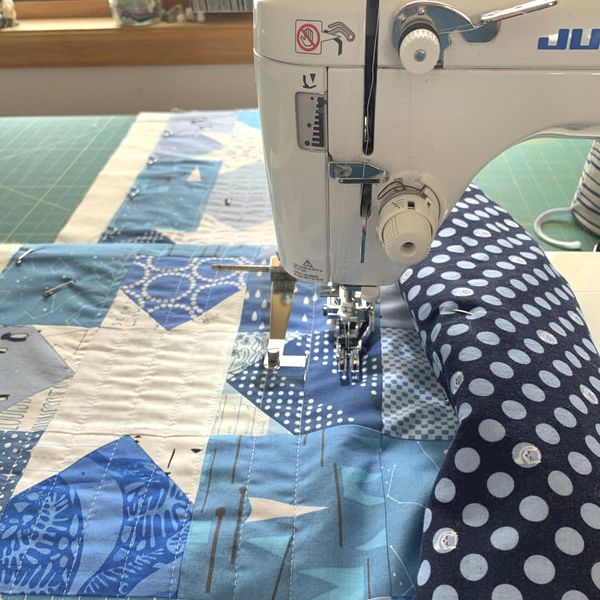 The backing is a directional (see the foxes!) lt. blue on navy polka-dot fabric from Riley Blake and really was the inspiration for the whole color-scheme for this quilt. Some of my pattern-matching for piecing the backing was a little off - but nothing you could notice from the back of a galloping horse! 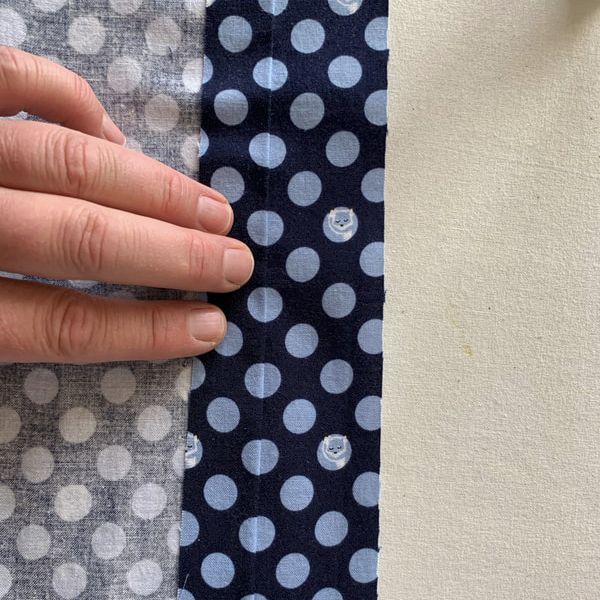 I had enough of the blue penguin fabric to bind this quilt and I love the little penguins that peek out. 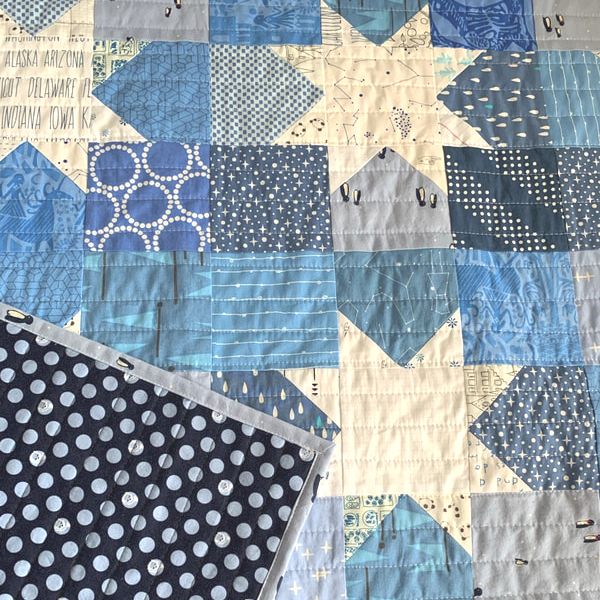 Quilt Details: 16 blocks that are made of 4" finished squares and themselves finish at 12." The quilt finises at 48" square. This quilt is very similar to my Pink Saw-tooth Star Baby Quilt. You can see more pictures of this quilt on my Instagram account @handmademyrth 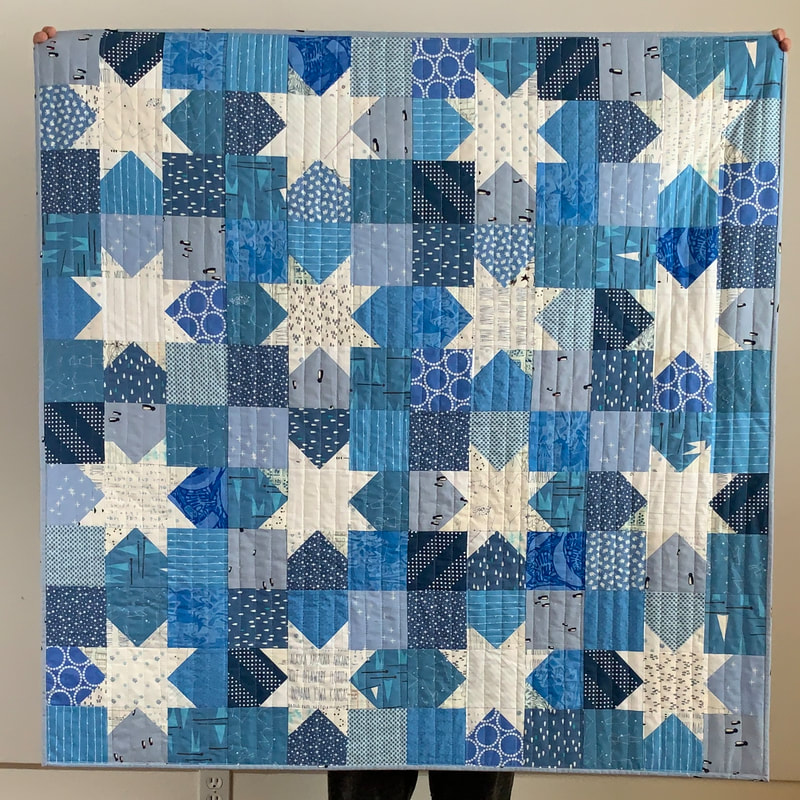 I was commissioned to make a baby quilt for a little girl who was born to parents with very traditional taste. After a little research on quilt designs that were popular at the turn of the century, I settled on making an Ocean Waves quilt using scrappy pink half-square triangles. My research turned up Ocean Waves blocks with different sizes and numbers of squares in each block, but the design below is the one I liked best, and went with for my quilt. 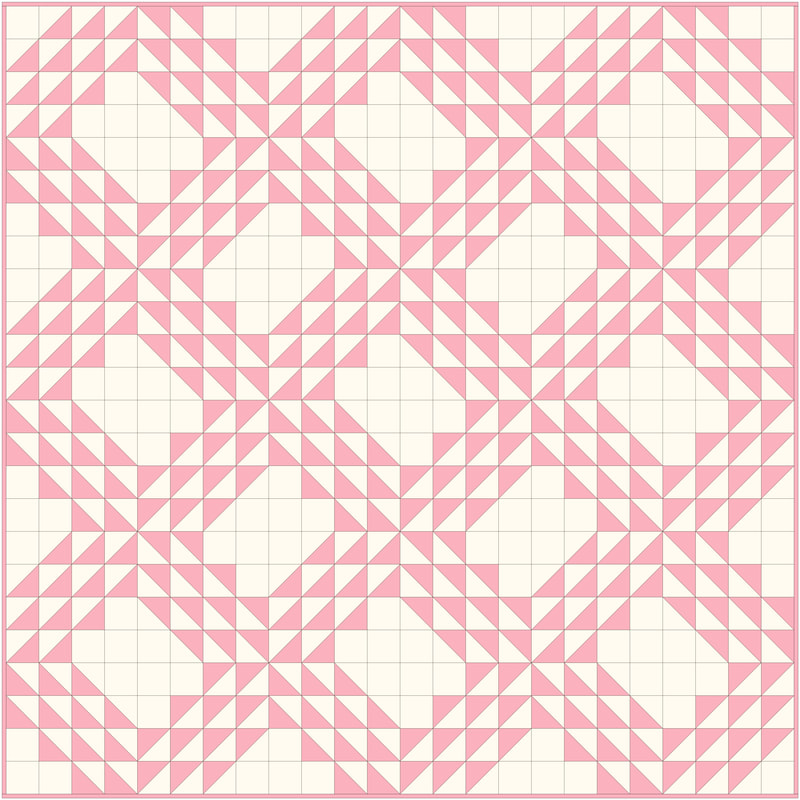 I pulled scraps from my bins, some orphaned blocks from earlier projects (namely my HST Chaos quilt), and finally rounded it out with some stashed fabric. I went with Kona Snow for the background. Some of the orphan blocks had low volume fabrics for the "background," but it is such a subtle difference that I had to mark them with a tiny green clothespin when I was laying them out on my design wall. That allowed me to be able to see their location more easily and make sure they were evenly spread over the whole quilt top. 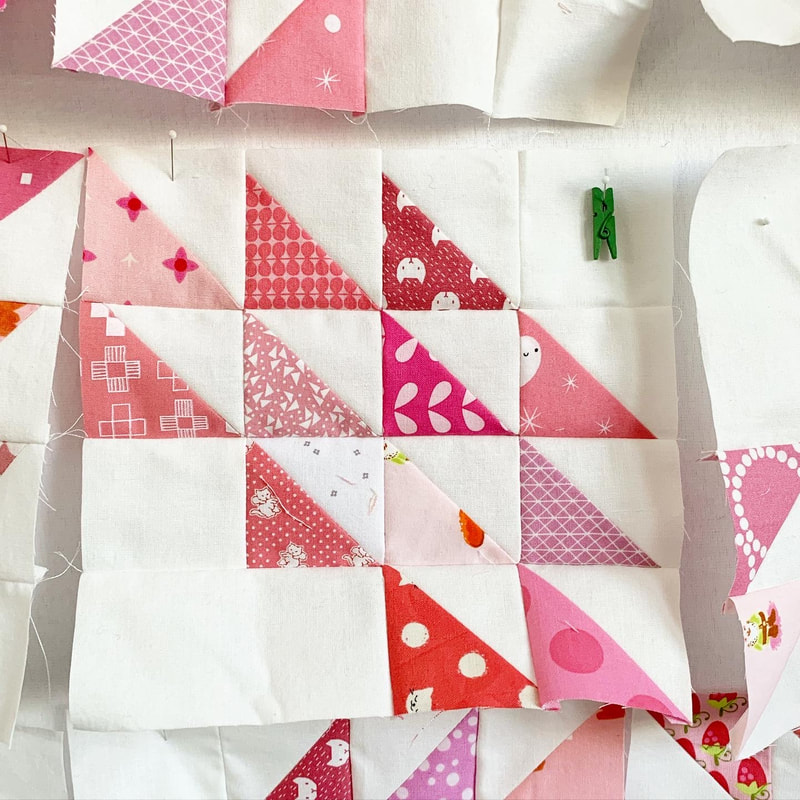 I kept the blocks themselves unpressed in the hopes that when I assembled the whole quilt top, I could nest the seams. I did end up nesting the seams in the end, but in one block a seam might have been pressed up on one side of the block, and down on the other. It wasn't perfect, but it worked out all right in the end. 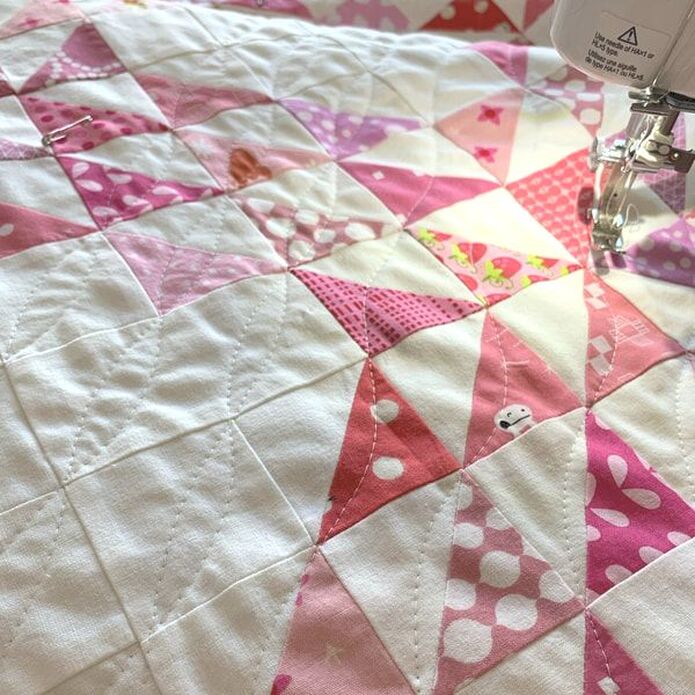 Straight line quilting didn't seem right for this traditional baby quilt, so I made the decision to try "orange peel" quilting diagonally through every square. In the picture above, I'm working on the diagonal wavy lines. It was a lot of quilting on such a small quilt, but the texture was amazing! 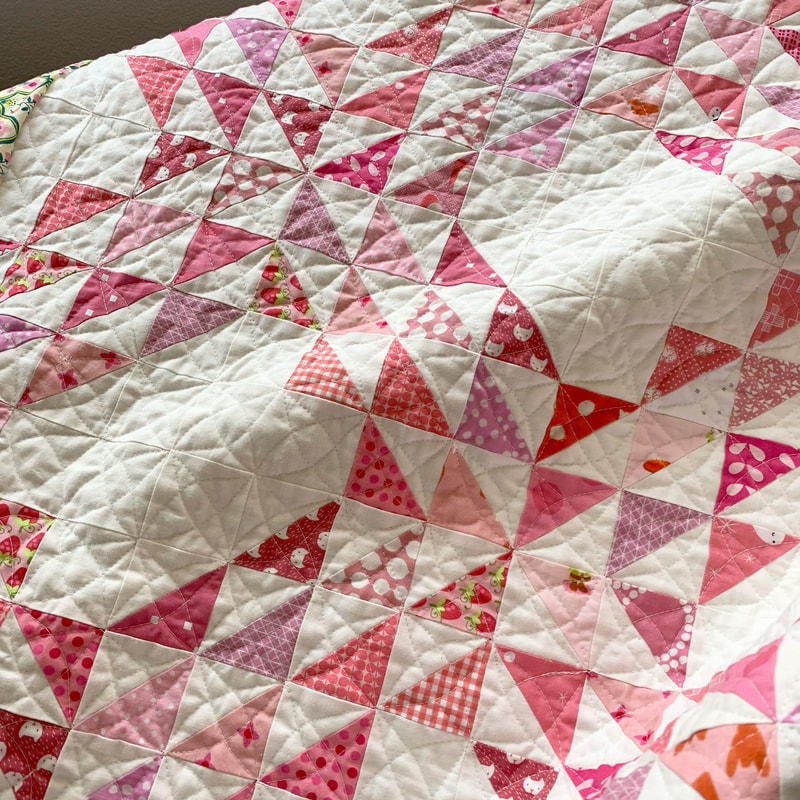 I did all of the quilting myself on my "home machine," and Jacquie Gering has a great lesson on how to quilt this pattern in her book, "Walk." It looks complicated, but is really just sets of wavy lines. I usually only do this type of quilting on smaller projects, because it is more time-consuming, but I am so happy that I challenged myself to use it for this quilt. The result was a baby quilt that was more heavily quilted than I am used to, and I debated about washing it to soften things up a little (imagine the crinkle!), but in the end, I wanted the recipient to see it before it was washed. 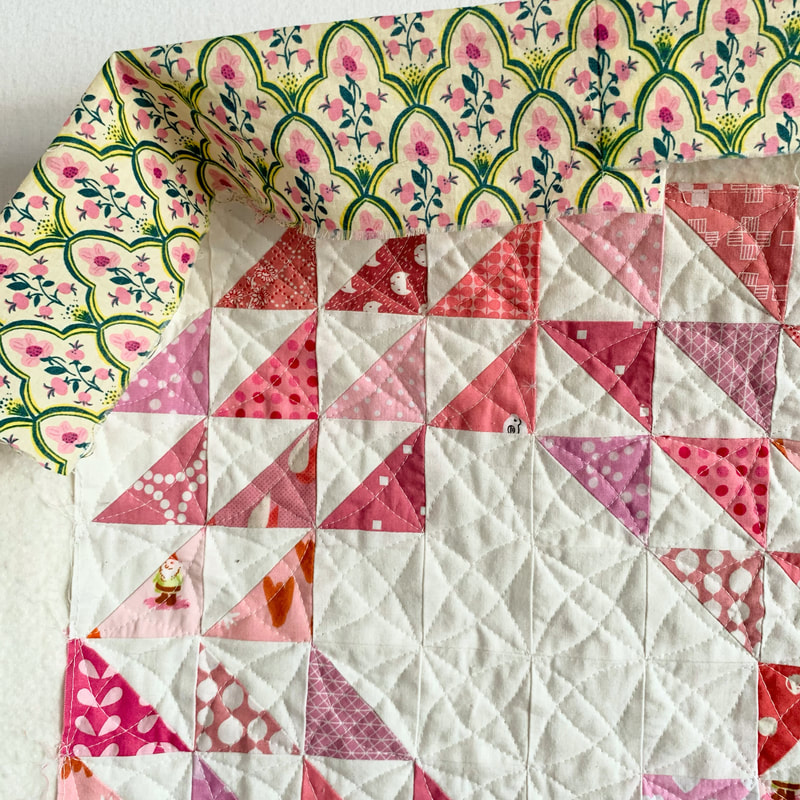 I chose a lawn fabric from Heather Ross's new collection for the backing. The pattern is more floral than I usually do, but I love how it looks with with the quilt - and it is so incredibly soft. When I posted about my backing fabric on Instagram, someone asked about lawn fabric, so here is a link to a brief description of it. 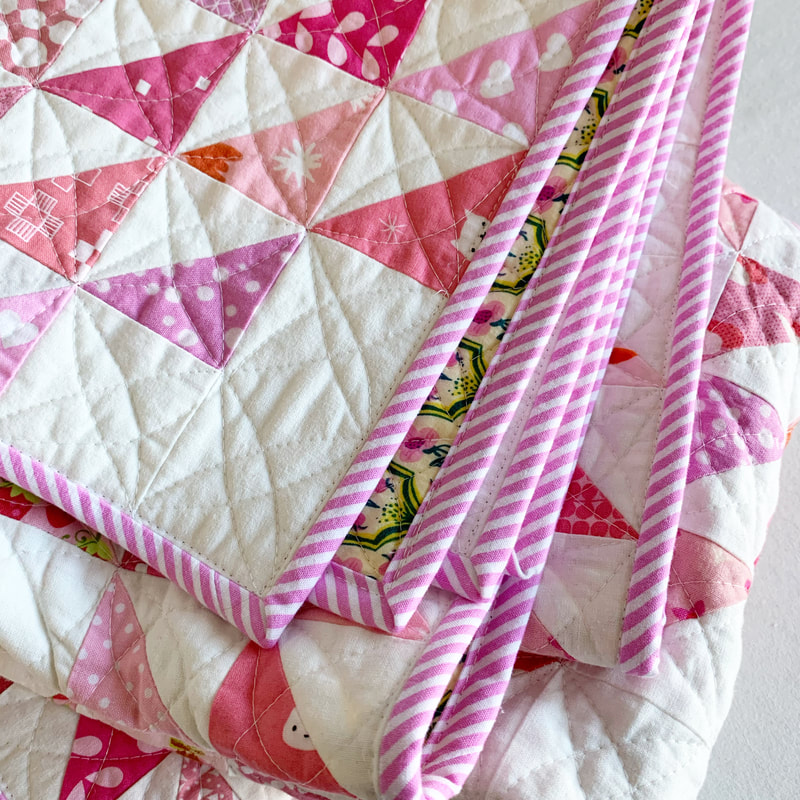 When it came time to bind the quilt, I realized that I didn't have anything left in my stash that was quite right, so I ordered this stripe (and waited and waited and waited for USPS to deliver it...) and it was totally worth the wait! The stripe is part of Andover's Sweet Shoppe Candy collection and is their Candy Stripe in Unicorn Pink. 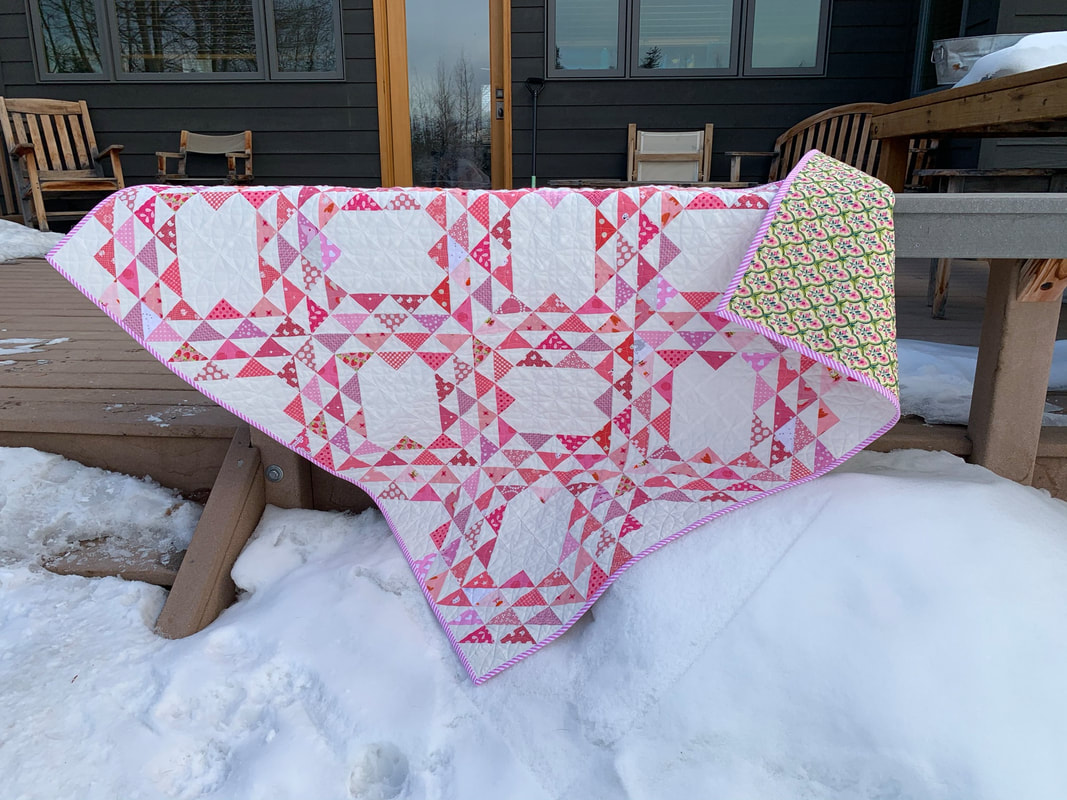 I am excited with how this baby quilt turned out and I am curious about making a larger throw quilt with a dark blue background and low-volume fabrics. For now, that idea will rest and percolate in the back of my head and this quilt is off to it's new owner. Quilt Stats: - 36 blocks made up of 216 half-square-triangles @ 2" x 2" finished and some solid background squares. The quilt is laid out 6 blocks across and 6 blocks down. - Blocks are 8" x 8" finished - Finished quilt size: 48" x 48" - Yardage: 2 yards of backing fabric and 1 1/2 yards of contrasting color fabric (pink)  One last thought for another Ocean Waves quilt: switch to HST that finish at 3"...keep the number of blocks and squares the same...and this is what you get!! This would finish at 72" square, which to me is a great size for a throw quilt. 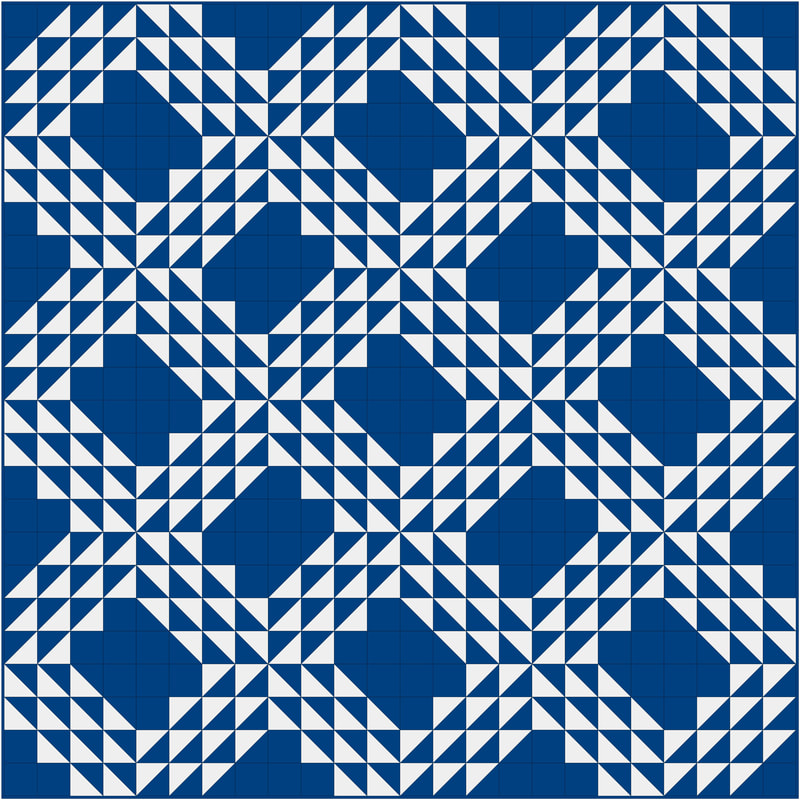 Back in February 2014, I saw a scrappy quilt in American Patchwork & Quilting that caught my eye. I pulled out the pages with the tutorial on how to make that quilt, and saved it - for 5.5 years to be exact! I loved the traditional feel of the blocks, but wasn't sure exactly what colors or fabrics I wanted to use. After a few wrong turns, I found this quilt, and knew I wanted to make mine Christmas colored (green circles and red lines). 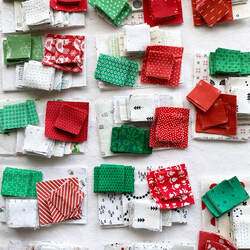 This pattern is an adaptation on the Burgoyne Surrounded block, and I love how changing the sashing simplified it so much. One change and such a large impact! I started cutting pieces for this quilt in the second half of 2019 and finished piecing it in March of 2020 (nothing like a pandemic to provide you with enough time to finish a quilt with one million pieces). 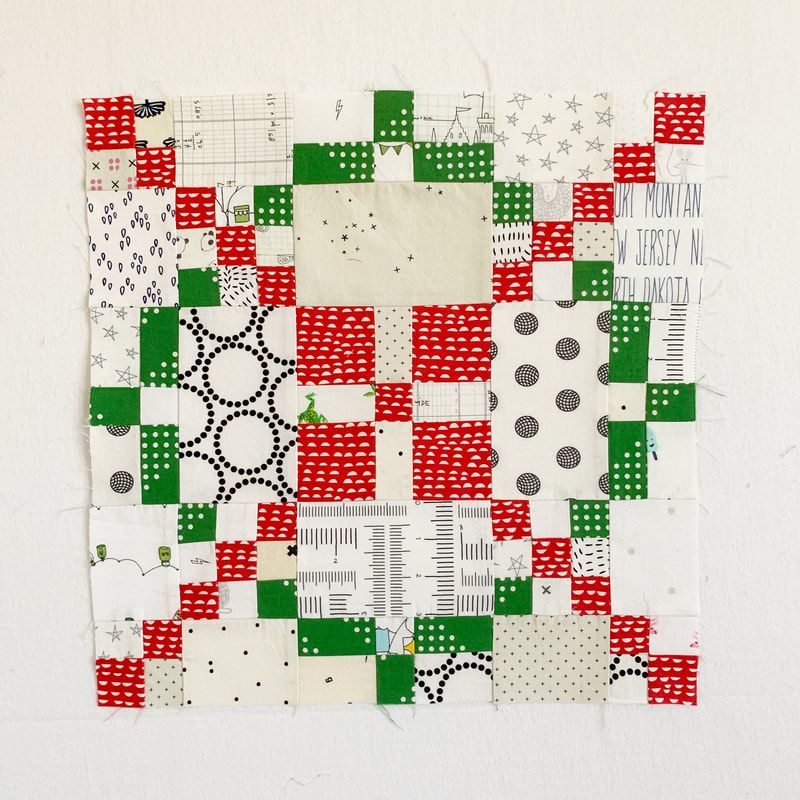 The "Tone it Down" block contains 97 pieces (oh mama!). The original pattern calls for 20 blocks and finishes at roughly 75" x 93". I edited mine to only be 16 squares so it finishes at 75" square. When you count the sashing in my version, that makes for 1,817 pieces in total in this quilt. This quilt has the most pieces of any quilt that I've every made. 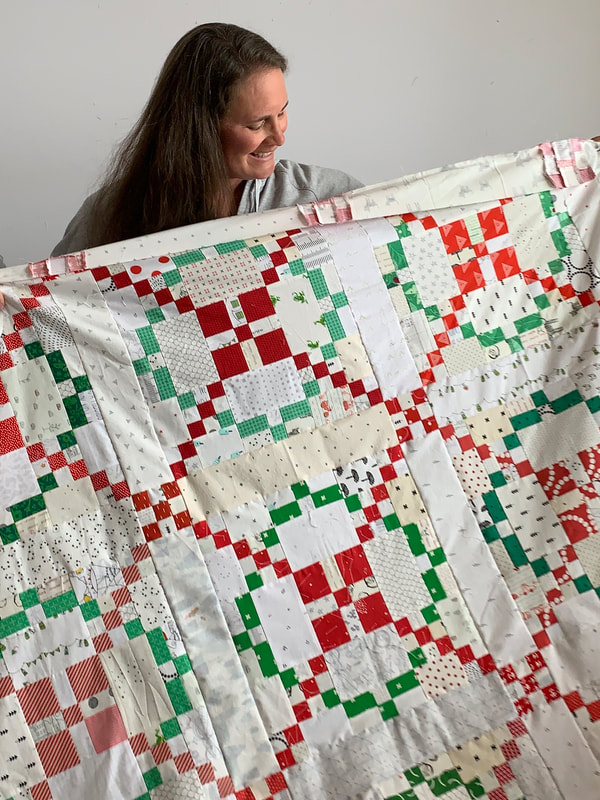 This was another quilt that required a ton of low-volume fabrics for the background. I pulled not only black-on-white fabrics, but also a few green-on-white and red-on-white cuts to round everything out. I backed the quilt in my favorite pistachio extra-wide minky and had it quilted by my local long-arm quilter with this snowflake pattern called "White Out" from Urban Elementz. 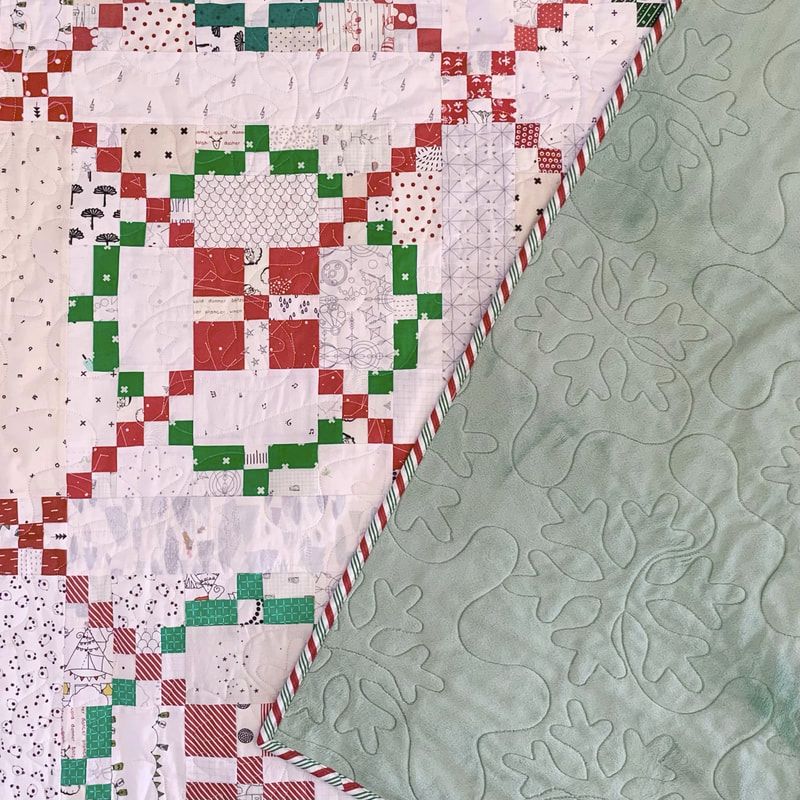 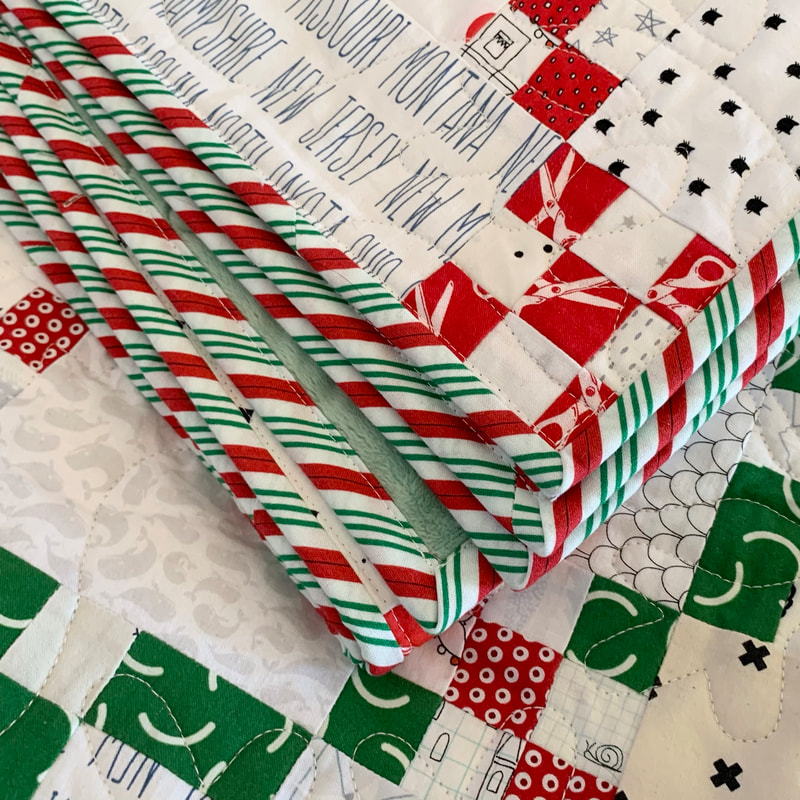 I bound the quilt with this fun red, white and green diagonal stripe from Connecting Threads (but I can't find it on their website currently). Striped binding are fun, and Christmas stripes are the best! 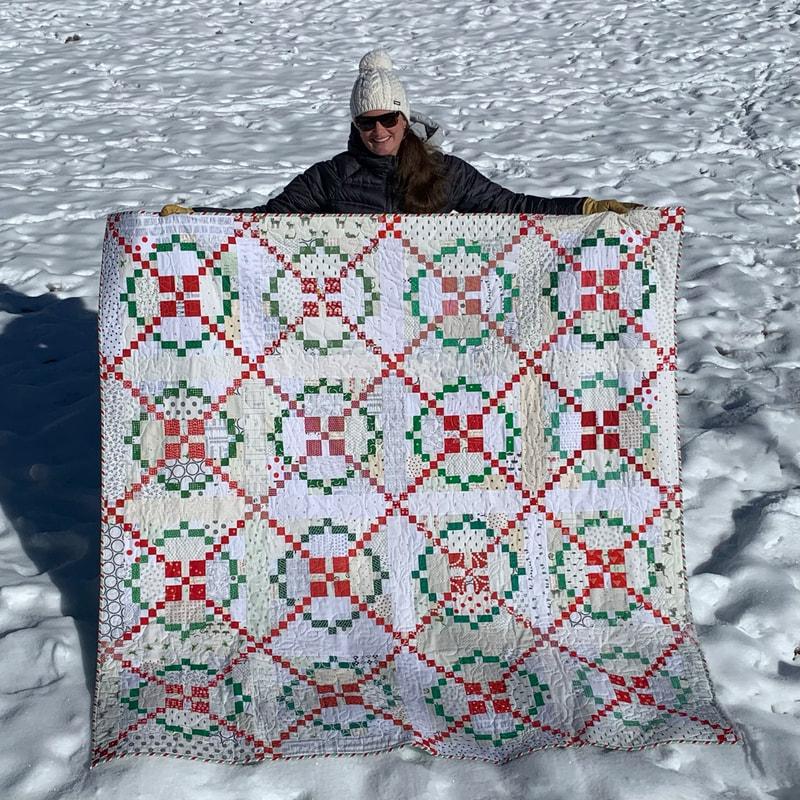 I had this quilt quilted back in July, and saved it to share here with you during the holiday season. I absolutely love holiday quilts - especially new ones. Last year I gifted my two scrappy holiday quilts (see them here and here). This one, however, I am keeping for mysel! This quilt feels somehow monumental and I look forward to years of enjoyment. 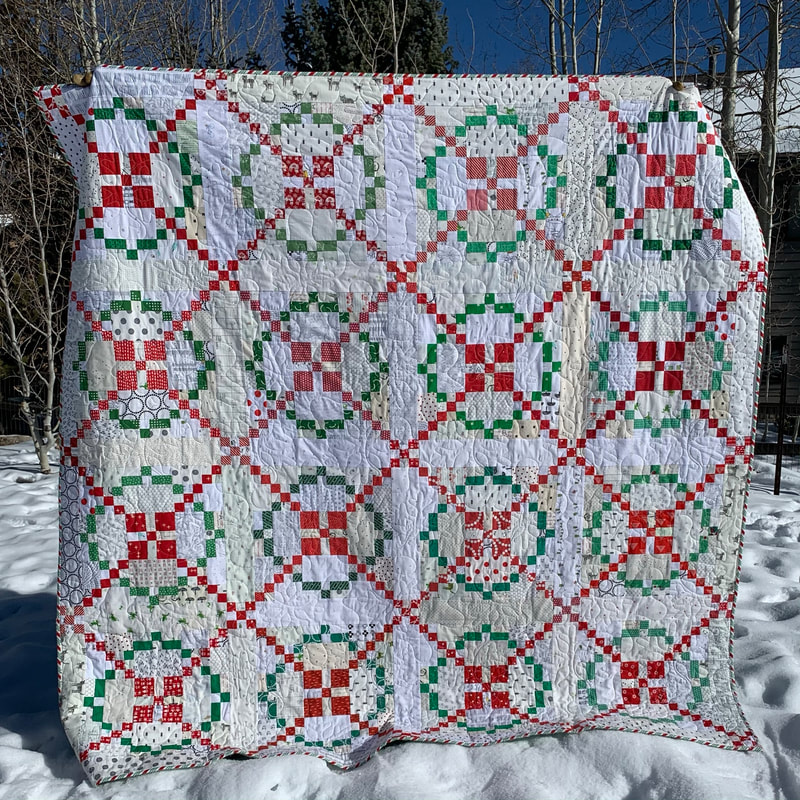 The good news is that the pattern is still available on the All People Quilt website. Click to purchase it: Tone it Down. You can see more of my in-progress pictures at #myrthstoneitdownquilt. You should also check out the #toneitdownquilt hashtag for lots of eye candy.
Thanks for stopping by! 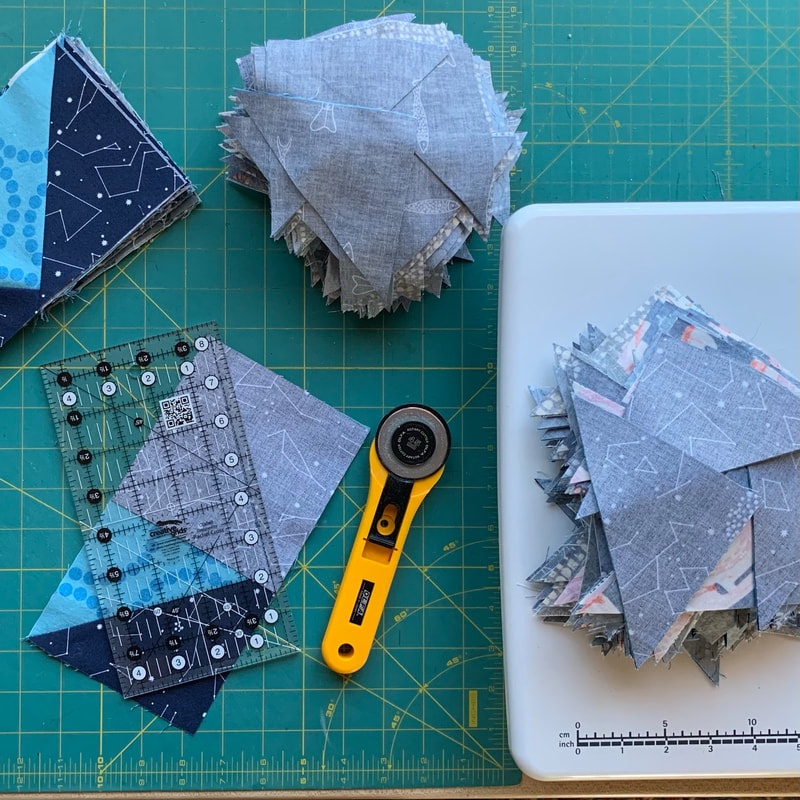 If you've made (or are making) my Blue Goose quilt, then you definitely need to make something with all those corner trimmed off half-square-triangles. Those 4" x 8" flying geese trimmings make fantastic 3.5" unfinished half-square triangles: 324 of them to be exact.
When I realized that I would have a lot of HST squares, I started looking for a block that wouldn't result in bulky seams (most of the seams nested in some way). The Annie's Choice block (above left) caught my eye, but the math didn't work quite right. (I had 324 blocks...that makes for a quilt 18 blocks x 18 blocks, but a 4x4 block doesn't go in to 18 evenly.) So I started doodling, added another row to the block, and came up with a block that was made up of 6 squares x 6 squares (the math worked beautifully)! I named it my "Shattered HST" block because when you put a few of them together in a quilt they start to look like shattered glass. Now I'm sure that I'm not the first person in all of quilting history to come up with that block design - but for now that is what I will call it. 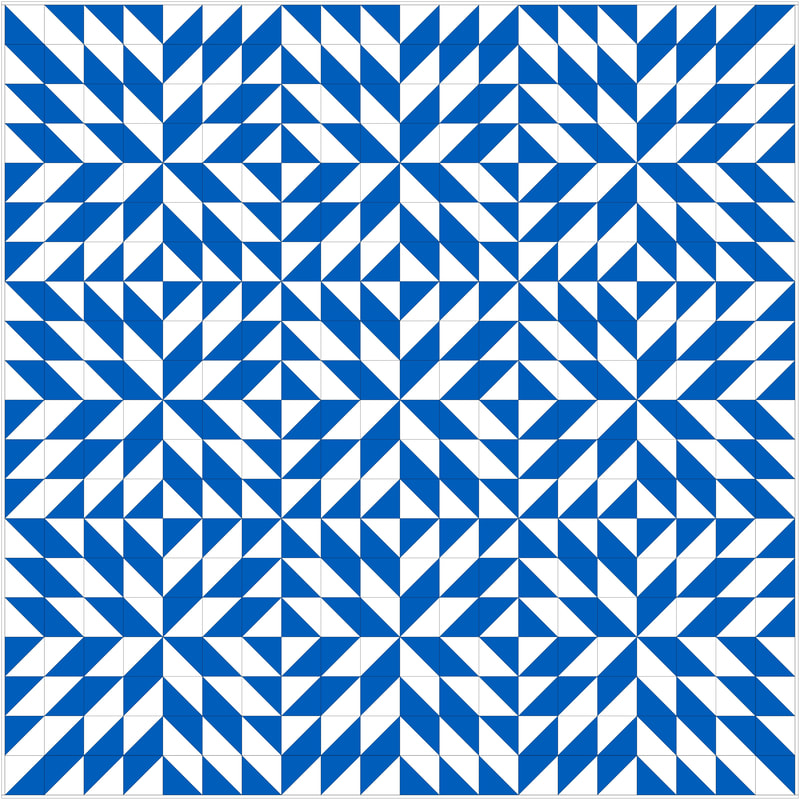 When I had all my squares laid out on my design wall, I realized that I wanted the quilt to be a little bigger. So I added an outer border of HST squares to get the quilt to finish at 60" square. That makes 400 HST squares for this quilt. My final layout is shown above.  I backed this quilt in my favorite silver minky and had it quilted with the "River Run" pattern again. As I said in my Instagram post, this quilt is so busy that the quilting would never show up on the front of the quilt, but I like the way it looks on the back.  As you may have read in my Blue Goose post, these quilts were made from the majority of my dark blue, light blue, and darker gray stash. I was happy that I found one last stashed gray piece that was long enough to make the binding for this quilt. 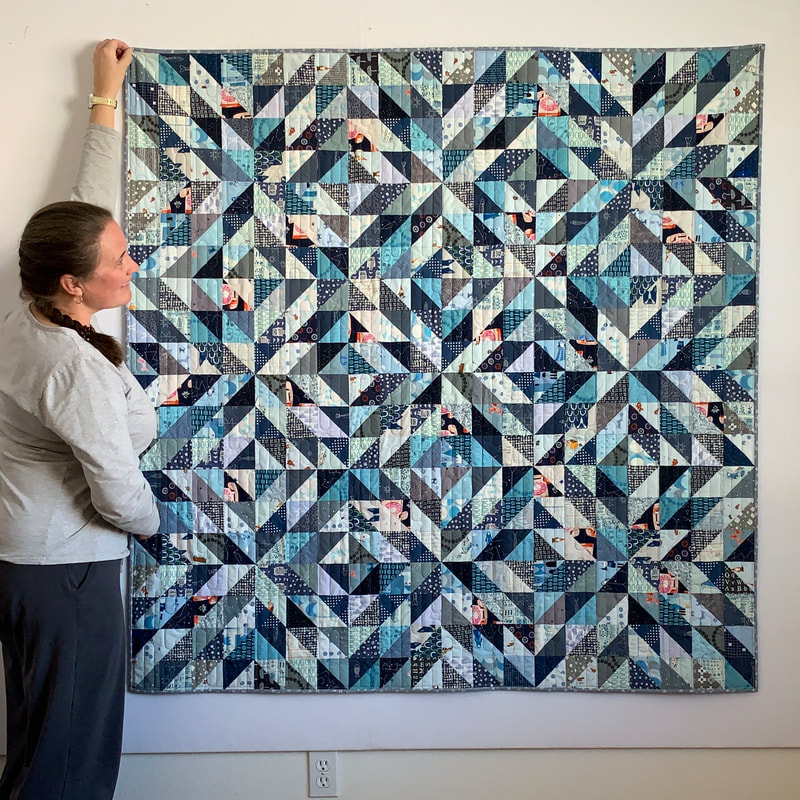 This quilt is crazy scrappy - and busy! But I love how it sparkles and has so many internal secondary patterns within the Shattered HST blocks. Can you see the radiating diamonds? Pinwheels in the corners where the blocks come together?
You can see more pictures of this quilt using the #shatteredhstquilt on Instagram. Thanks for stopping by! 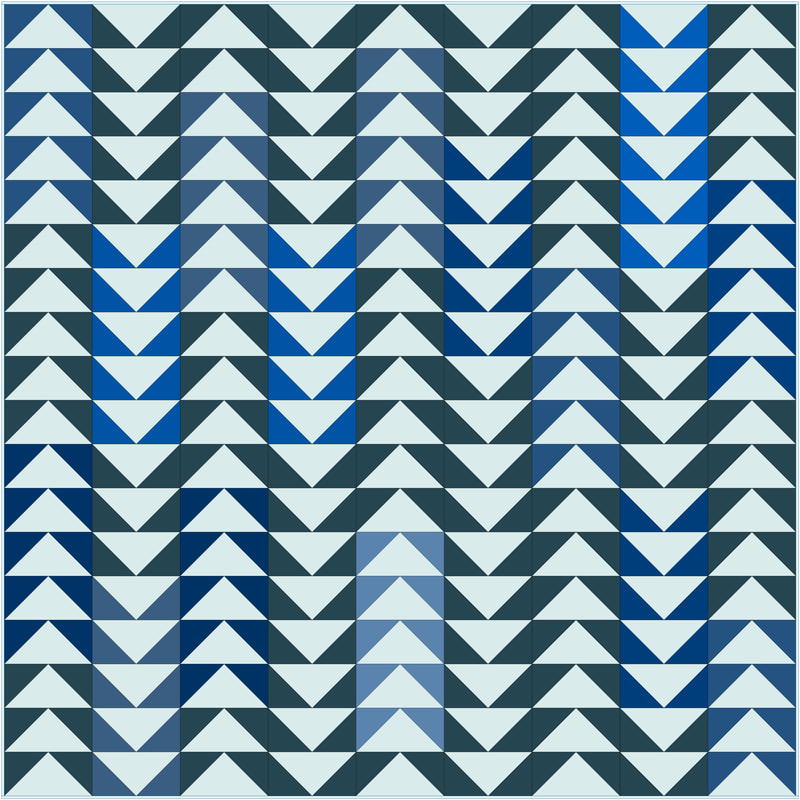 It was time for another big stash-busting quilt, and this time I went for my light and dark-tone blues (and had to throw in a few dark grays when I didn't have enough dark blues). I knew that I wanted bigger scale traditional blocks in repeat, and landed on the flying geese block, finishing at 4x8". I toyed with making the layout completely random, but settled on rows of blocks in alternating directions with clumps of blocks in the same background color. I have included a quick tutorial on how to make this quilt at the bottom of this post.  Before I began sewing my blocks, I laid out piles of my lighter fabric rectangles, and paired them up with darker squares. That way, I would have sets of flying geese blocks that had the same triangle and background. Sometimes I had more rectangles than squares, so in that case, I would make another pile of that rectangle with a new background squares. When I laid out the quilt, I kept the matching blocks together. Blocks that didn't have the same triangle and background would be put in their own group.  Once I had cut & sewn all my squares & rectangles (and trimmed them), they were all way easier to layout on my design wall than it would have been if I was trying to randomize the entire quilt. 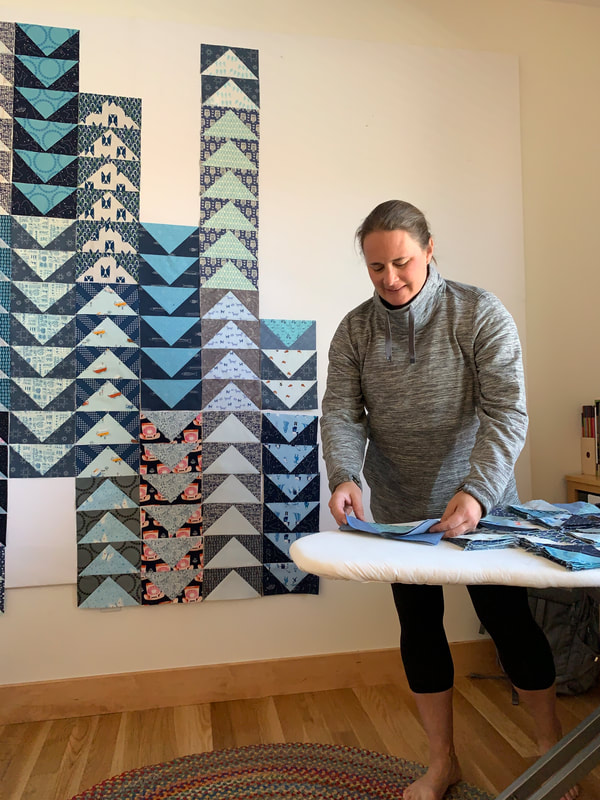 I wanted to back this one with minky because on a chilly CO day, nothing is cozier. I had my long-arm quilter quilt it using the "River Run" pattern from Urban Elementz. I wanted a pattern that wasn't too angular, so it wouldn't compete with all of the triangles, and this one was nice and linear, with just enough curves to make it interesting. 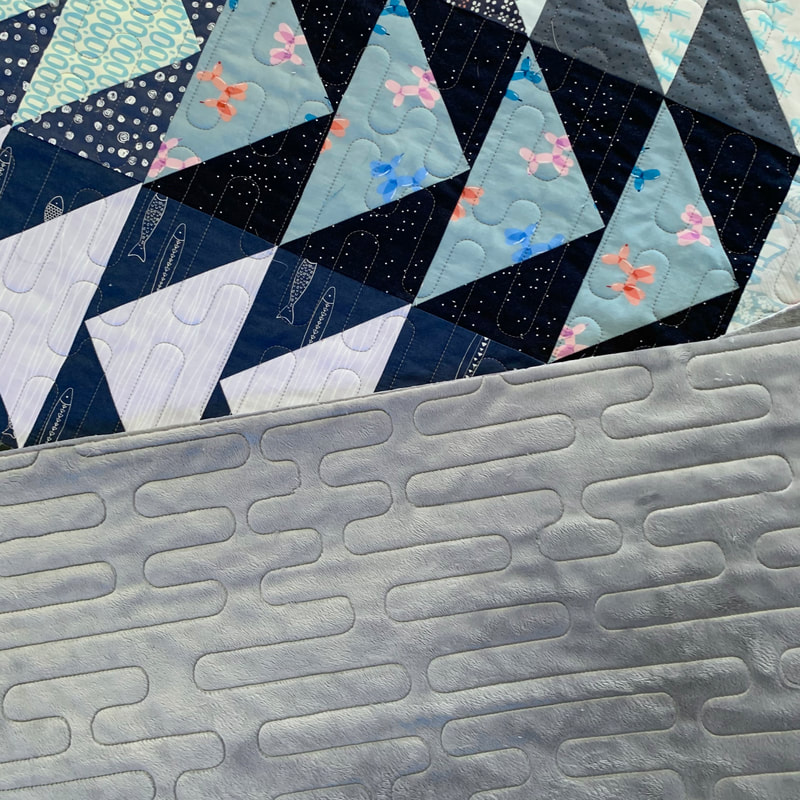 I bound the quilt with one of the prints that was left over from the quilt. I don't love when my binding fabric matches one of the fabrics in the quilt in a scrappy quilt (like below), but my options were limited, so I went with it. I'll probably be the one person that notices it - or is bugged by it. As my friend always says: Is it something you would notice if you were riding by on the back of a galloping horse? The answer here: No. 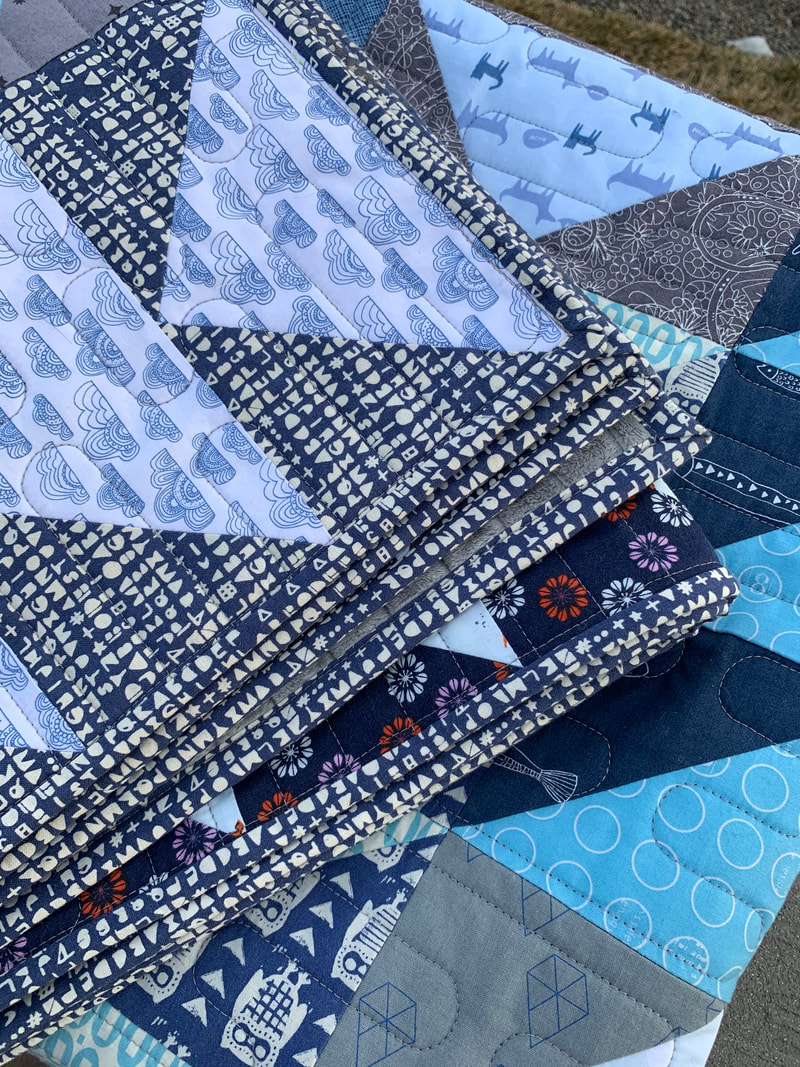 Tutorial for Making a Blue Goose Quilt: This quilt finishes at 72" square - a nice throw size. There are 162 blocks, arranged 9 across, and 18 down. You will need 3 yards of light blue fabrics, and 3 yards of darker blue fabrics. I used a total of 40 fabrics (20 light & 20 dark). Cut your lighter fabrics in 162 rectangles 4.75" x 8.75", and your darker fabrics in 324 squares 4.75" x 4.75". After your blocks are assembled, trim to 4.5" x 8.5". I alternated the directions of my columns of flying geese so that seams would be less bulky during assembly. Note: my design at the top of this post doesn't show actual block placement. In reality, sometimes I had groups of 6 matching blocks, sometimes there were only 2 matching blocks. Whatever I had that matched got put together in the end. You can see more pictures of my Blue Goose quilt at #bluegoosequilt  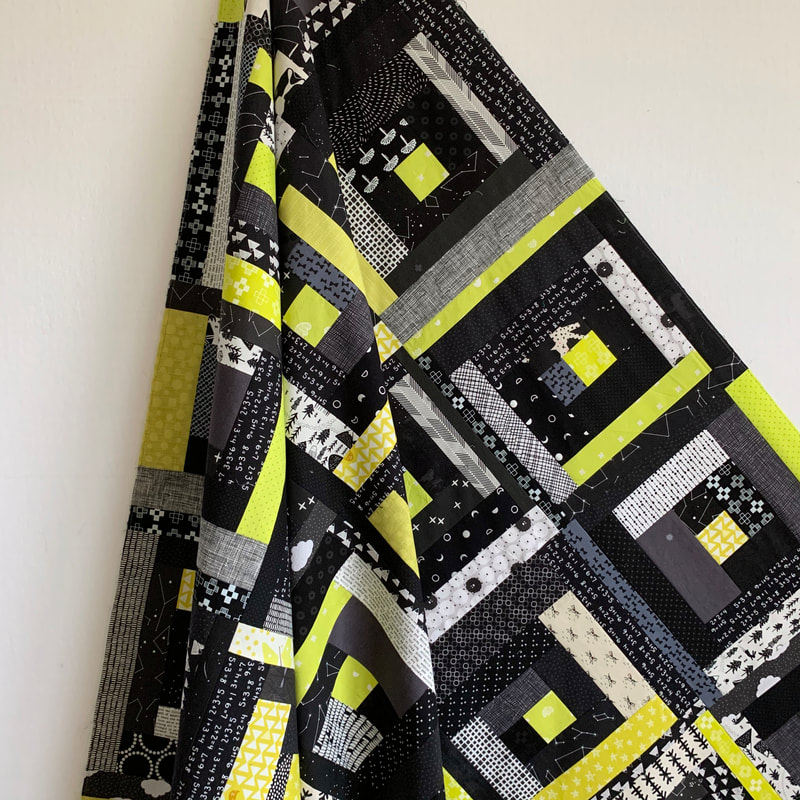 COVID log cabin quilt #3! (See the other two here and here.) I am loving the mindless straight stitching required for improv log cabin blocks - and loving how they use up so many scraps. The black scraps for this quilt came from my Little Improv Tents quilt. I made those blocks large, and trimmed 1-2"+ off of all 4 sides, so there were lots of black scrap strips left over. After making my spring green log-cabin quilt (which was mosly low-volume fabrics with a few punches of color), I wanted to try making the opposite of that quilt: mostly dark with a few pops of white or color. The final inspiration for this quilt was all the bees that fly around in my gardens in the summer. Hence the name: Bee Wild (because for me, this color combo is wild.) 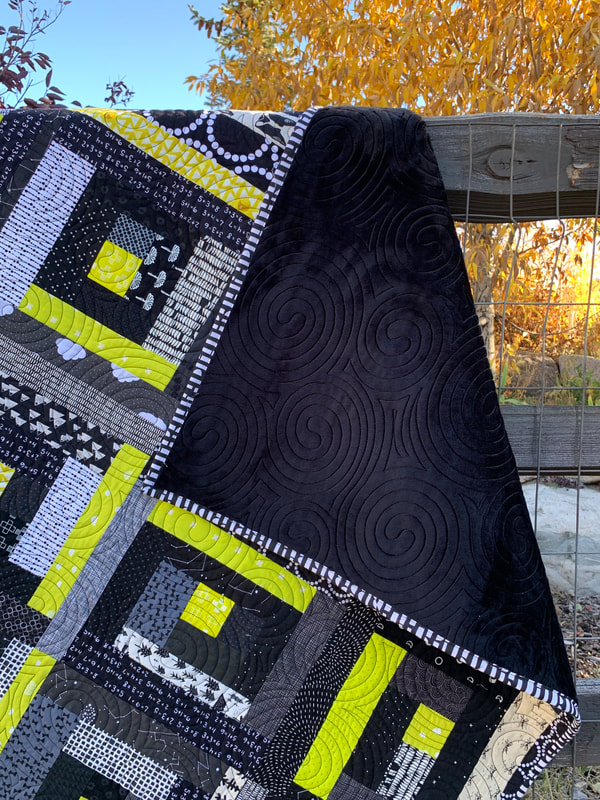 When it came time to choose a quilting pattern for this guy, I knew that I wanted something non-linear and I landed on this "Dizzy Izzy" pattern from Urban Elementz. I think that the quilting looks fantastic on the front of the quilt - and totally wild on the back. I can't put my finger on exactly what it reminds me of, but it's something like a zebra + 80's + Elvis or maybe John Travolta? I'm not sure, but it works. 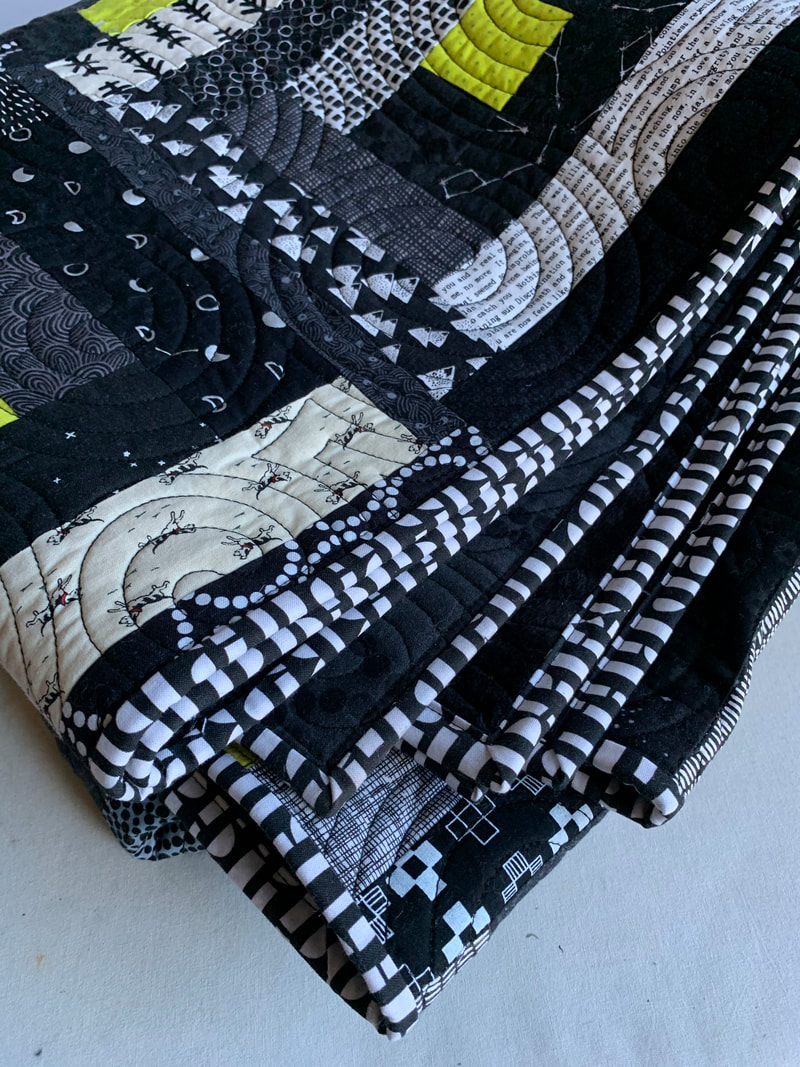 I bound this quilt in an older Ellen Baker (The Long Thread) black/white print - maybe from a "paper cuts" collection? This quilt is another one with 12" blocks, and a 5x6 layout. That means 30 blocks, and a quilt that finishes around 60" x 72" - that seems to be my sweet spot these days. 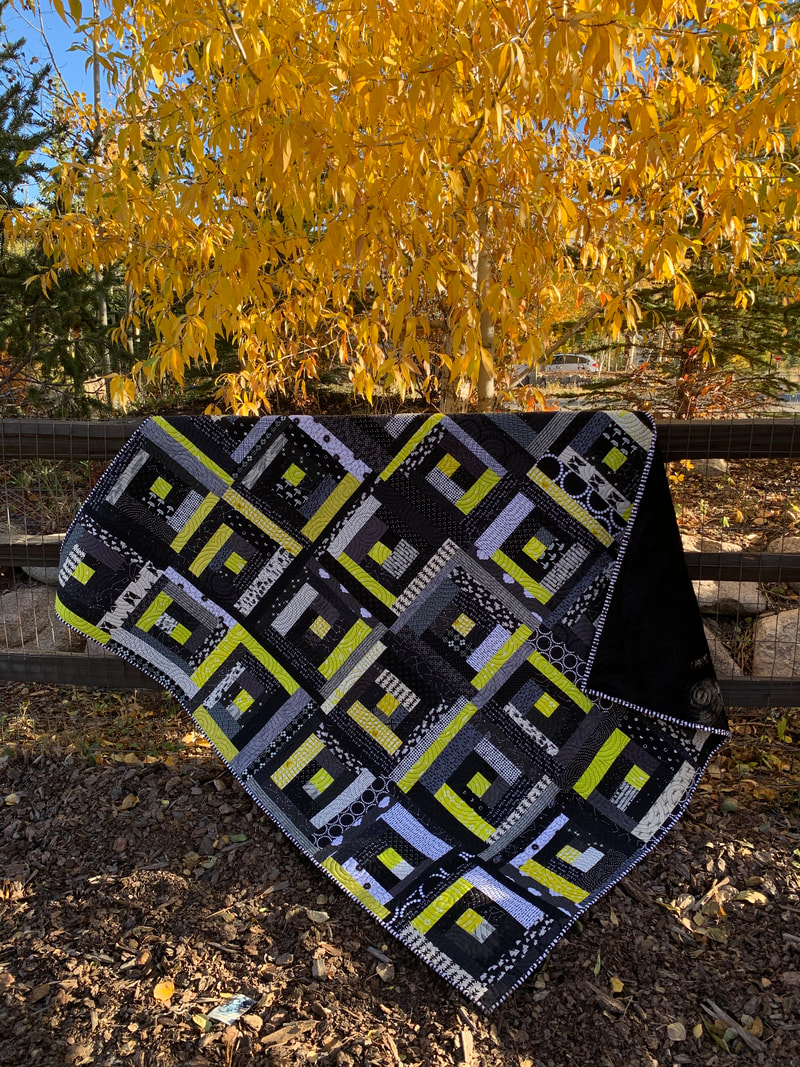 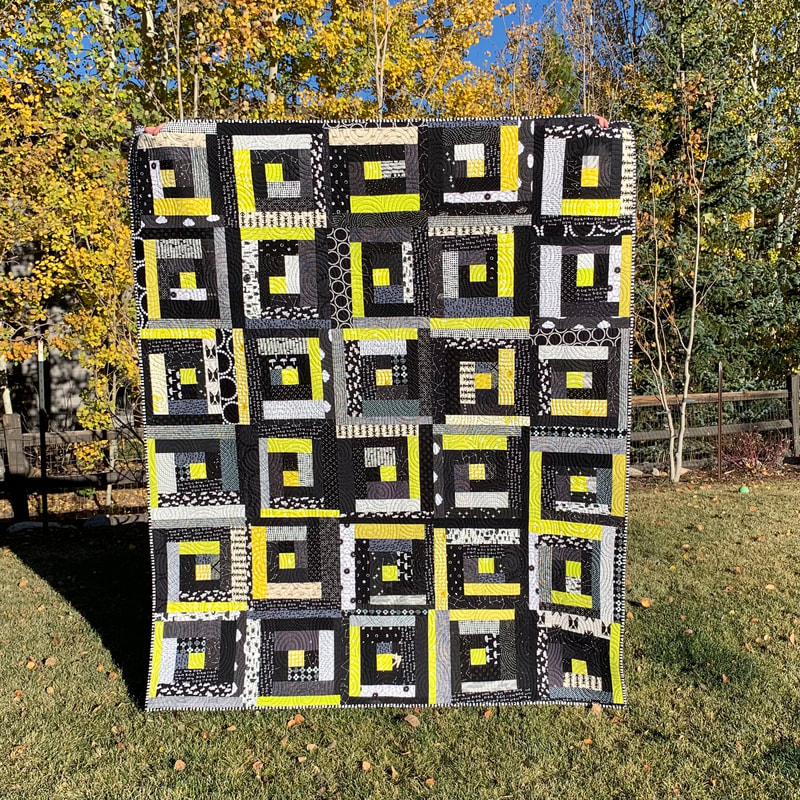 |
Archives
November 2023
 |


 RSS Feed