|
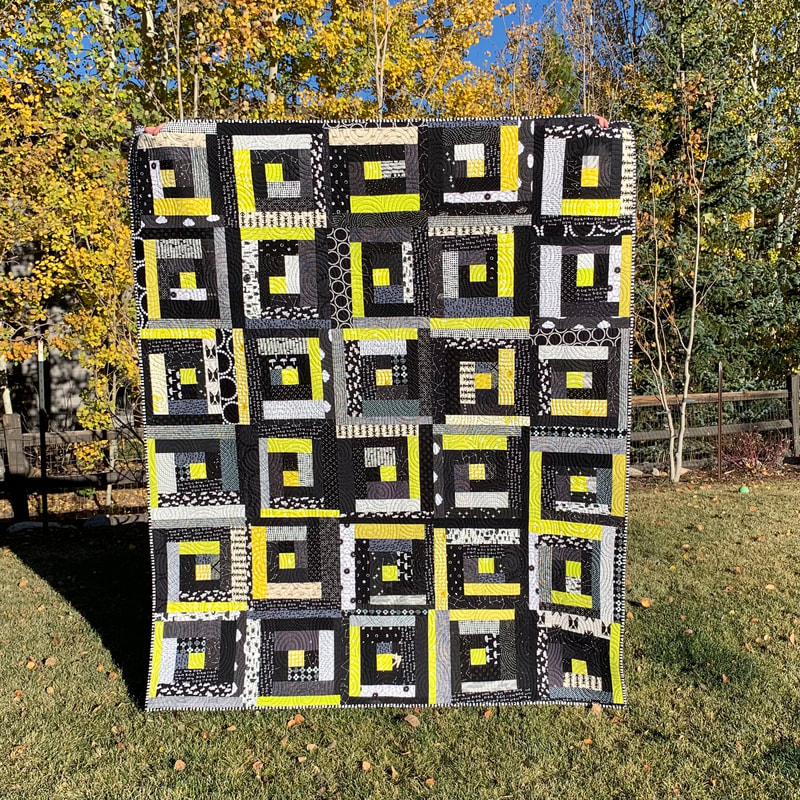
I have been wanting to make or design (and make) a medallion quilt for a little while now. I had been playing around with designs and finally settled on the design below and decided I would sew up a top at my April 2023 Quiltn' Sisters retreat. 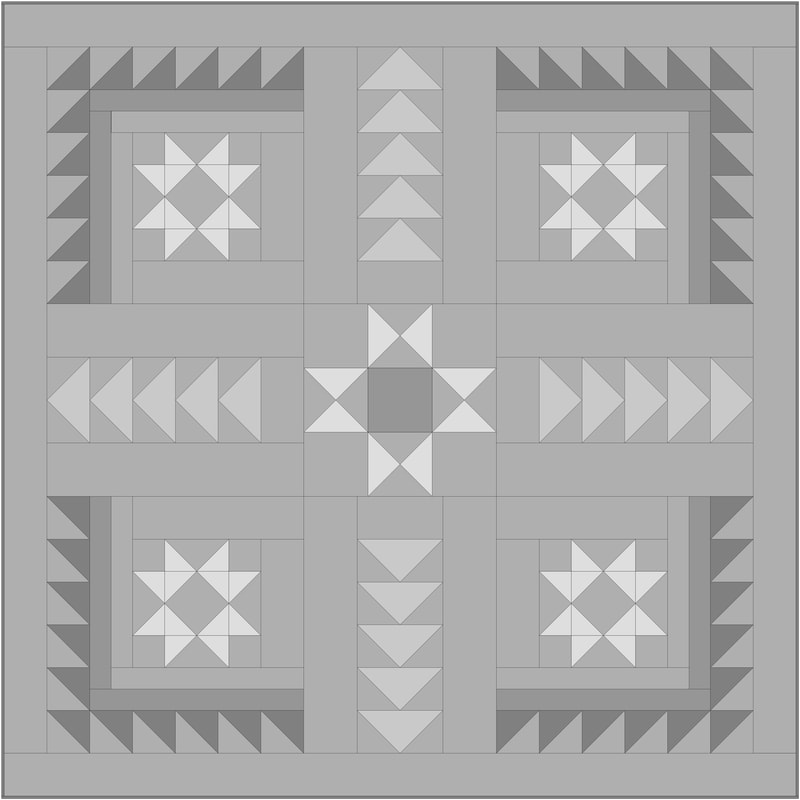 I debated about how I would use color in the quilt, and settled on the idea of not using any color at all. Instead, I used two Michael Miller solid fabrics: black and charcoal. I love how soft Michael Miller solids are. 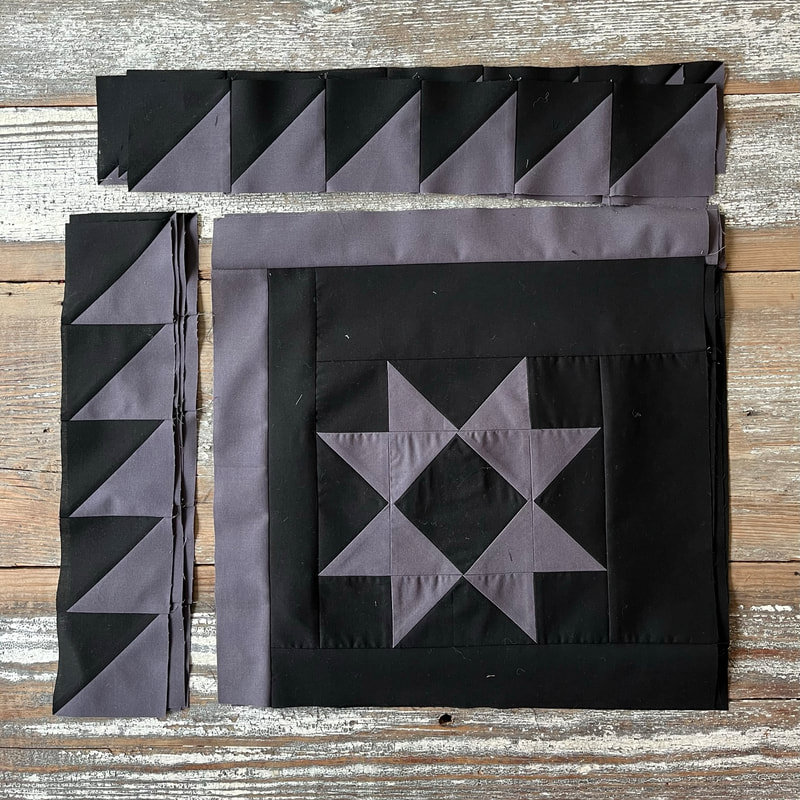 So is this a medallion quilt? I'm not sure. It's more like a quilt with four quadrants or blocks with some flying geese sashing. Whatever you want to call it, it is unlike other quilts that I've made or designed before. 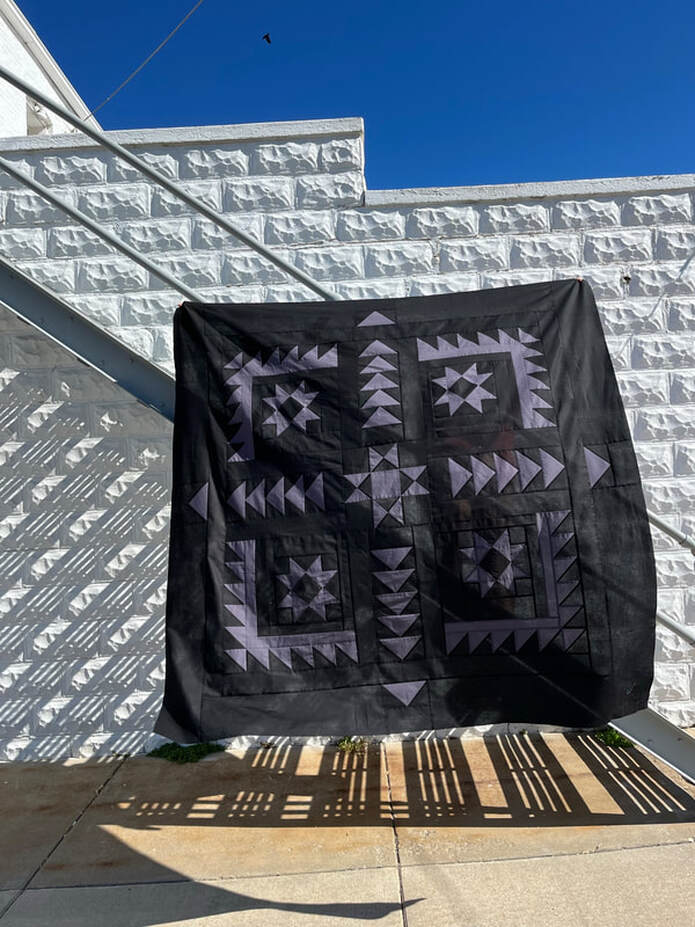 When trying to photograph the quilt, I realized just how thin those soft Michael Miller fabrics were! For that reason, I decided to use black batting for the first time. The batting I used was Quilter's Dream Poly Select Midnight Batting and is a little thicker than the Warm & Natural batting that I am used to using in quilts. 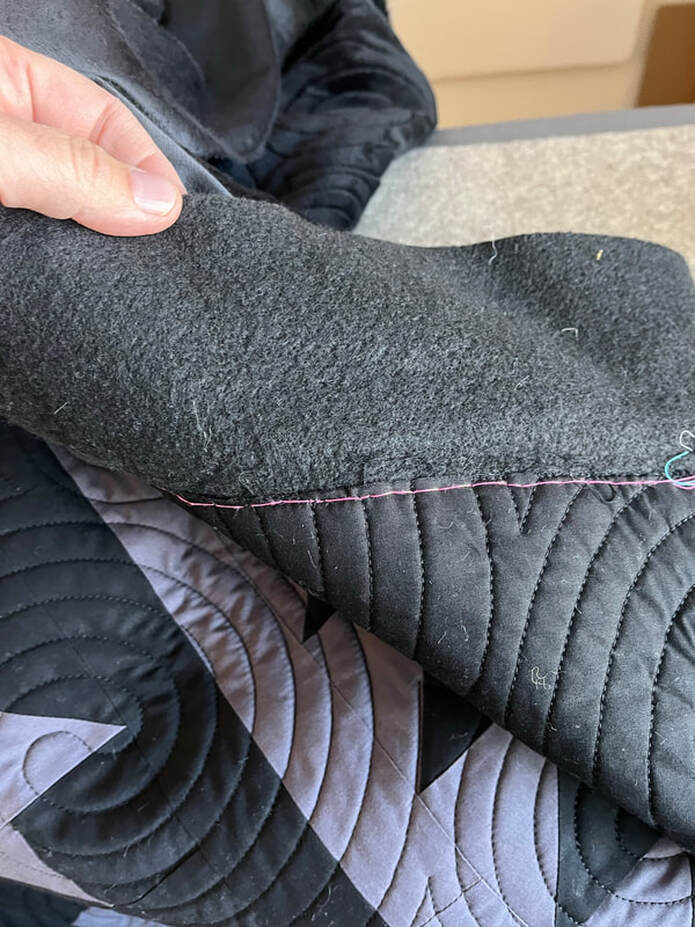 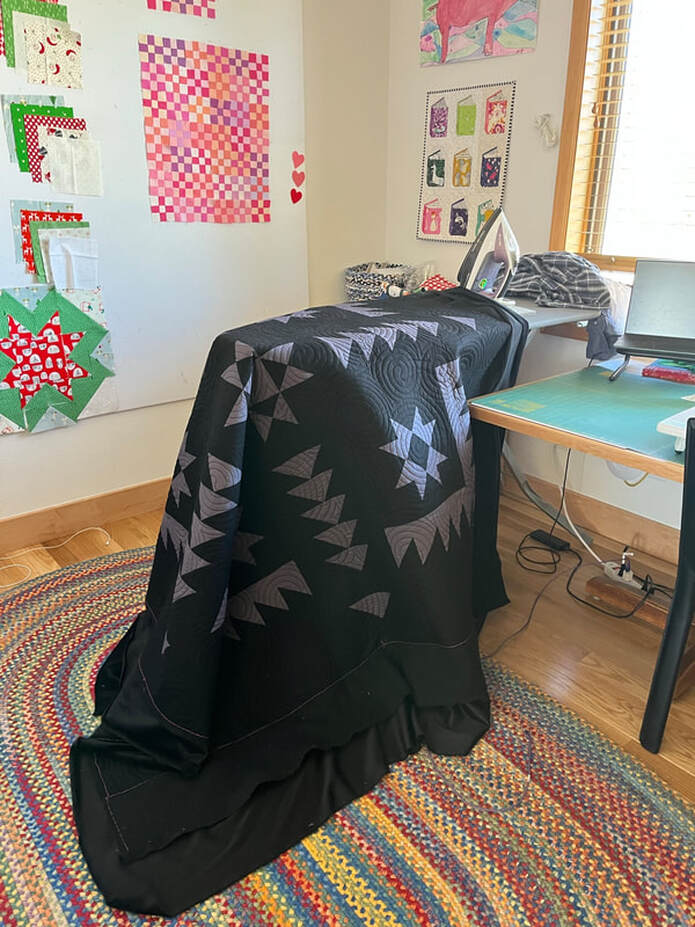 I had the quilt quilted by my long-arm quilter with the Dizzy Lizzy pattern that I've used a couple of times in the past (you can see one here and here and here). I love the texture (visual & physical) that it adds to a quilt. 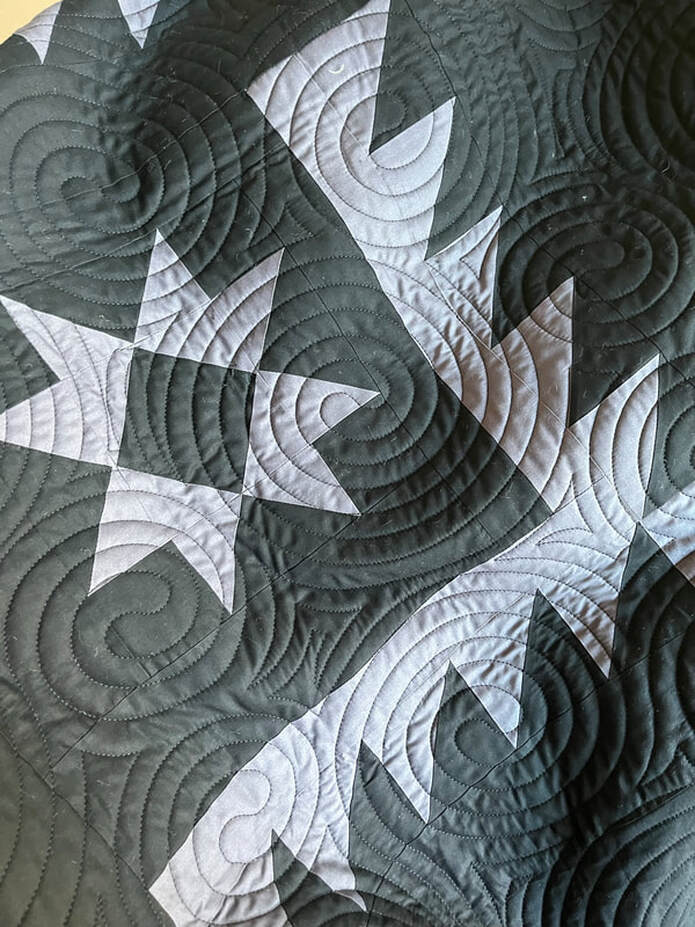 I bound the quilt in "Plum" from Michael Miller. Just a little bit of color in this quilt. 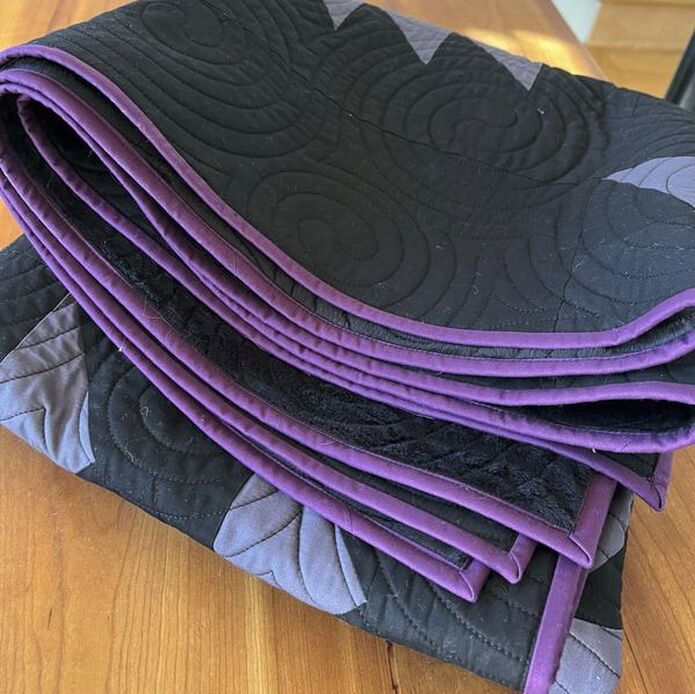 The quilt finishes around 66" x 66". 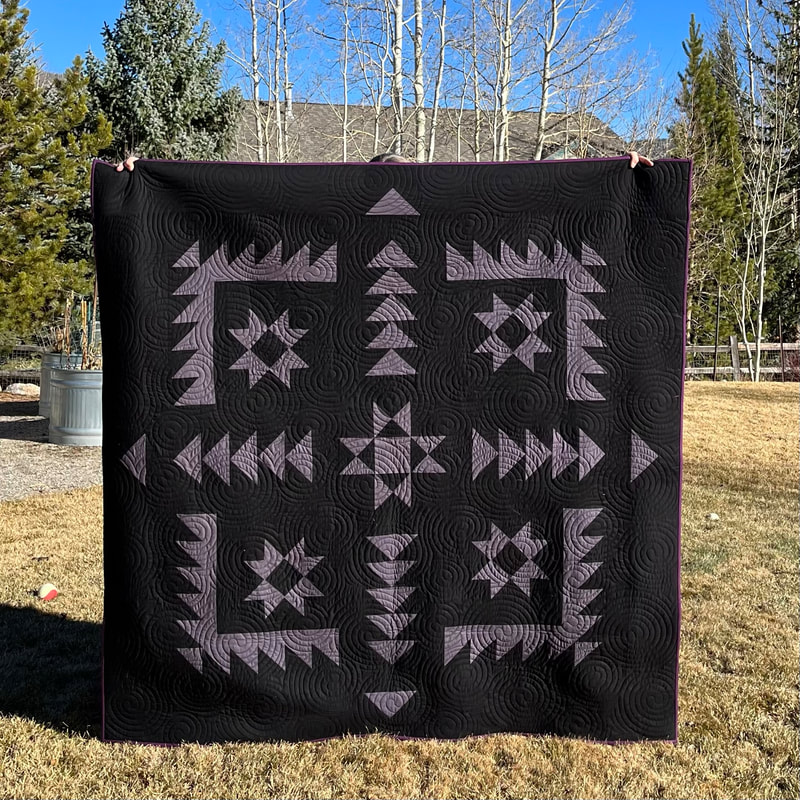 Thanks for stopping by!
1 Comment
I recently posted a picture on Instagram of a baby quilt that I finished. I like to use a hashtag to keep track of quilts that I made each year. This year it's #handmademyrth2023. For fun I took a look at my hashtag and was slightly shocked to see that there were only 4 finished quilts that I've shared this year (and 2 were only baby quilts). But then I remembered that I have 2 quilts that I hadn't shared. Why? Because back in May when this quilt was finished I decided to write a tutorial for it. Finishing that tutorial (and posting the quilt) has been on my list of things to do for 5 months. And today I sat down and finished it! You can find it here. 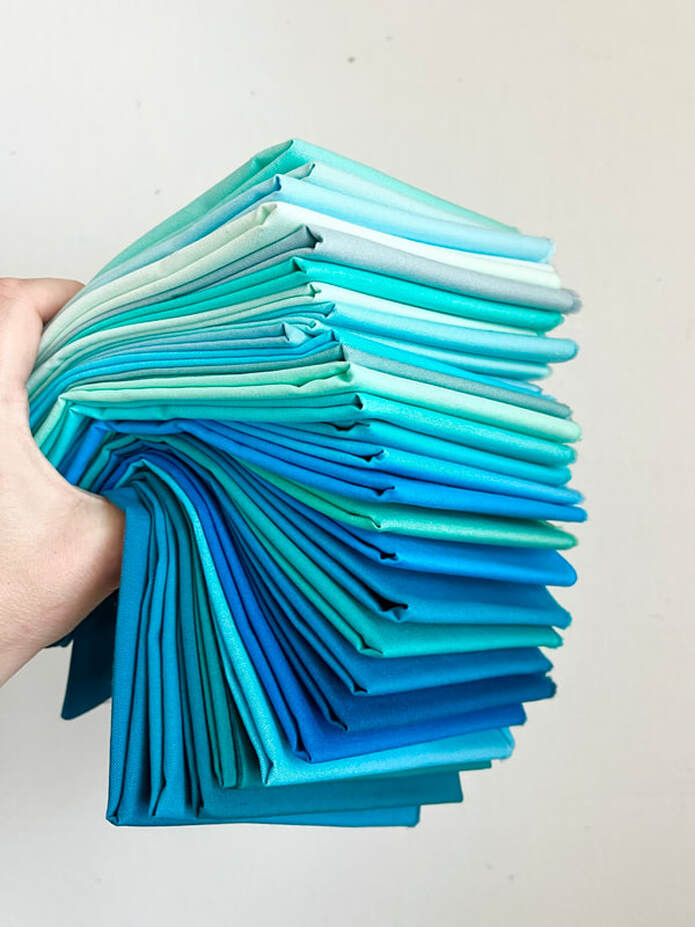 This quilt came to be because I wanted to use up more of my Kona cotton solid fatquarters that I got as part of a subscription a few years ago. I pulled this pile of FQ from a couple of different bundles. You can find a list of the colors in the tutorial. Below you can see the rough idea that I drafted in EQ8 to get an idea of yardage & number of blocks needed. 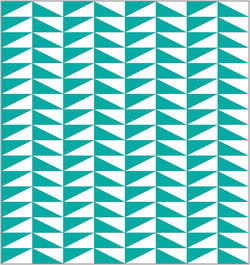 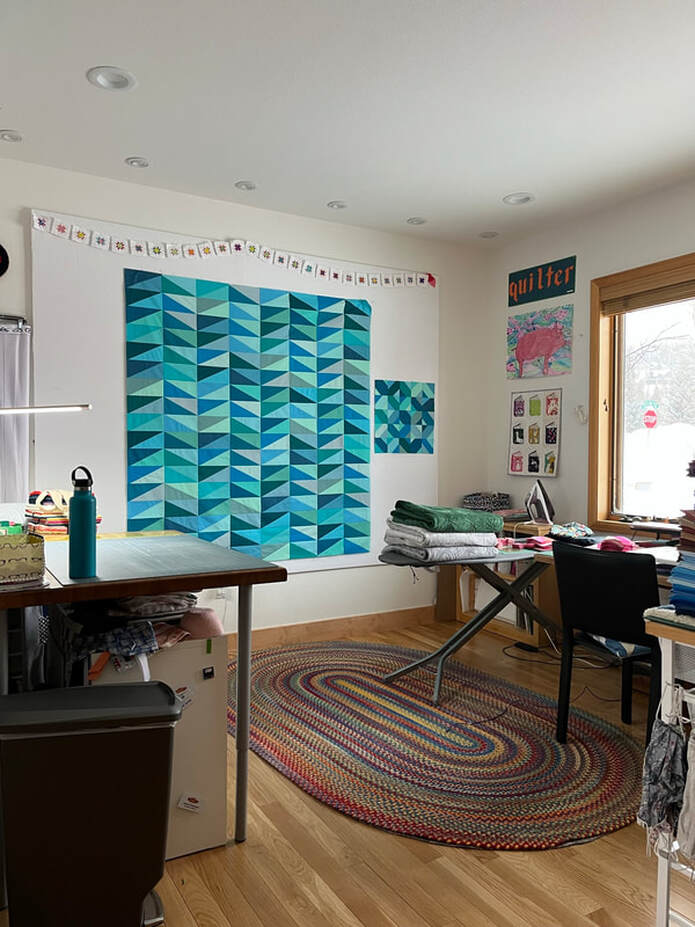 Looking back through photos, looks like I started and finished this guy back in February 2023! 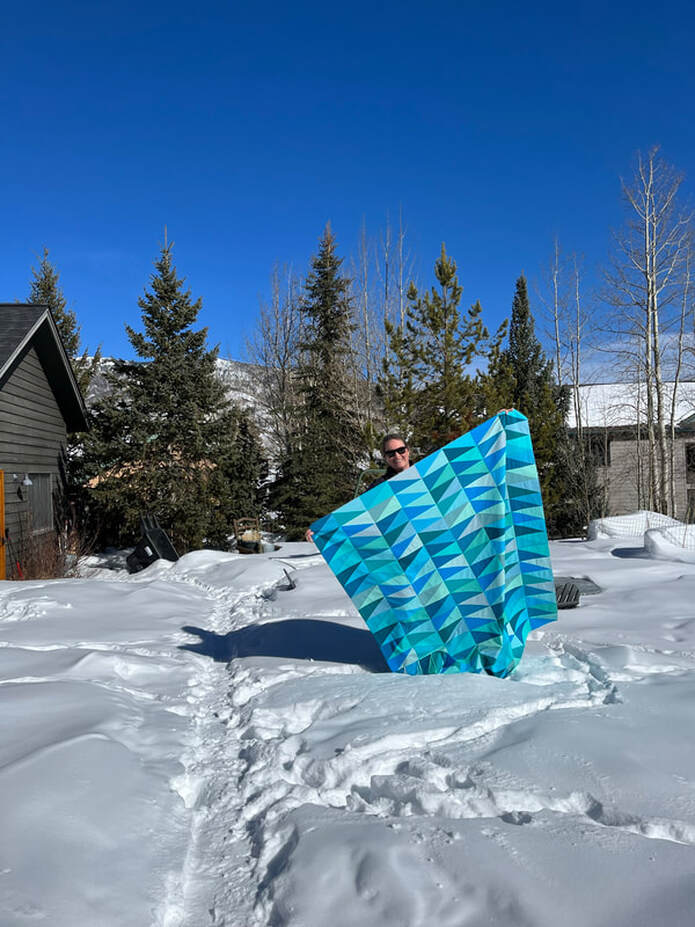 I backed this quilt in Minky Luxe which has a 12mm pile and makes for a super silky quilt. My long arm-quilter quilted it for me with a design called "River Run #3" from Urban Elementz. 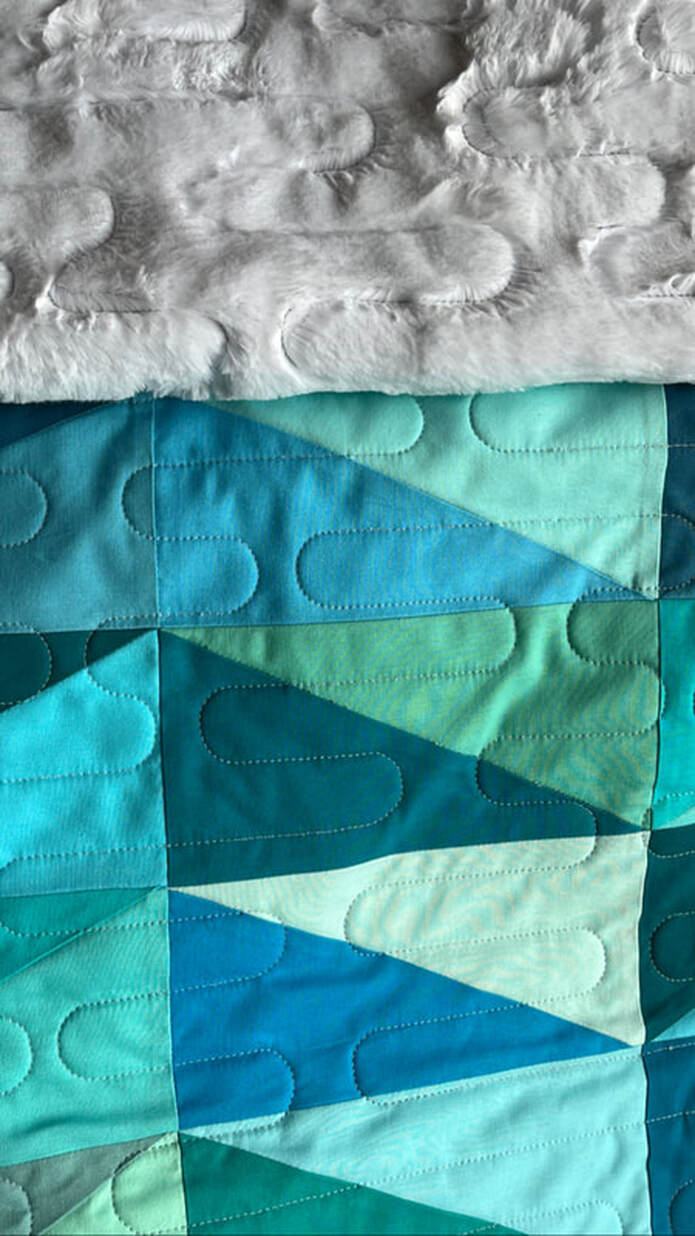 Here you can see the difference between regular minky (3mm pile) in black and the Minky luxe (12mm) in white that I used. 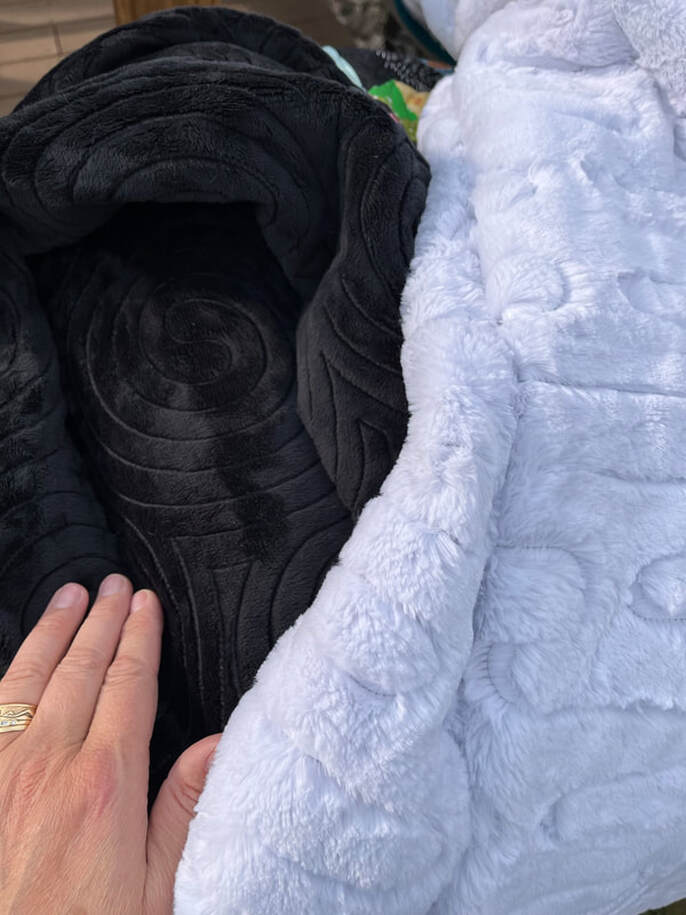 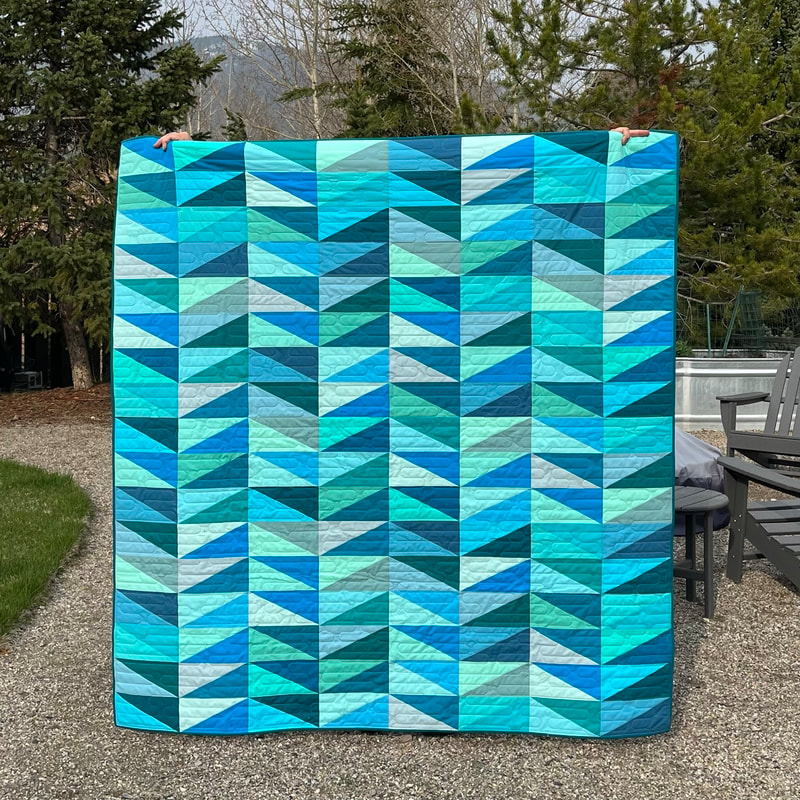 A new tutorial has been added to my website to help those who are interested in making a similar quilt. You can find it here. The tutorial has all of the quilt details.
Special note regarding my tutorials: Some people ask why I post free tutorials and patterns, and the answer is that I do it for many reasons. 1. Because I find it to be a good mental challenge to teach myself to do the things involved in writing a tutorial. It takes website design skills, along with quilt math, and some graphic design skills (to make the diagrams). 2. I like having my tutorials as a reference for future quilt projects. I have sometimes gone back to see how I made a quilt when I want to remake it. 3. I don't feel that the things I'm posting are super complicated, original or unique. Therefore I don't believe that they should be sold. Now I realize that this is controversial, but this is how I feel . I don't believe that it is right for people to sell "patterns" for traditional blocks that have been around for years. I understand that it take my time to put them down in works and diagrams, but as I said above, I like the challenge. Thanks for stopping by! I had never noticed a "kite in a square" block or quilt until I had a gift certificate to use and decided to search for "bloc loc" rulers in the store's website. I think that the bloc loc rulers are quite handy and when I saw this new-to-me one, I decided to treat myself. I got the set of rulers that make a block that finishes at 3" square, but there are many sizes for sale here on their website. 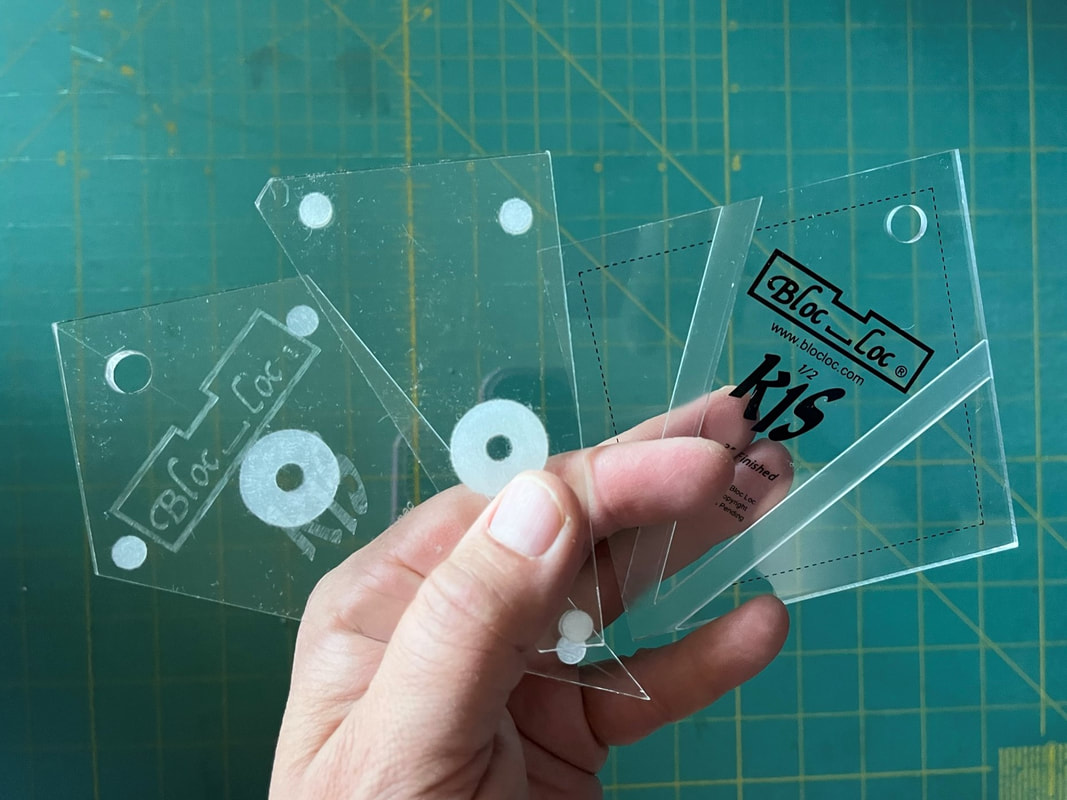 Fast forward 2 months, and I finally settled on making my kites black or dark gray, and the triangles bright colors - all very scrappy of course. After lots and lots of cutting (with the help of ctting templates that came in the bloc loc ruler pack), I had used all scrap pieces for the triangles. However, I did have to cut in to some stashed black fabric after I ran out of black scraps for my kites. 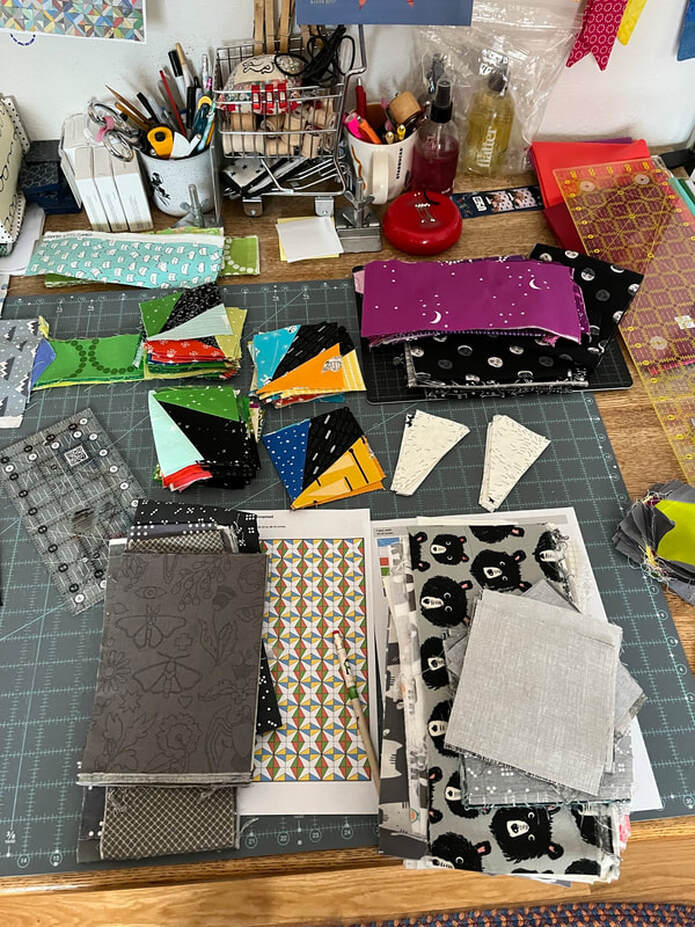 Once I had the blocks made and trimmed, I laid them out on my design wall. I documented this part of the process with a reel on my Instagram account. You can see it here. I really like being able to use my design wall for scrappy quilts. I can lay everything out and then more easily see if blocks need to be rearranged. From there I usually web-piece the quilt top together all at once working in columns. If you are new to the concept of web-piecing, you can check out some highlighted stories on my Instagram here. 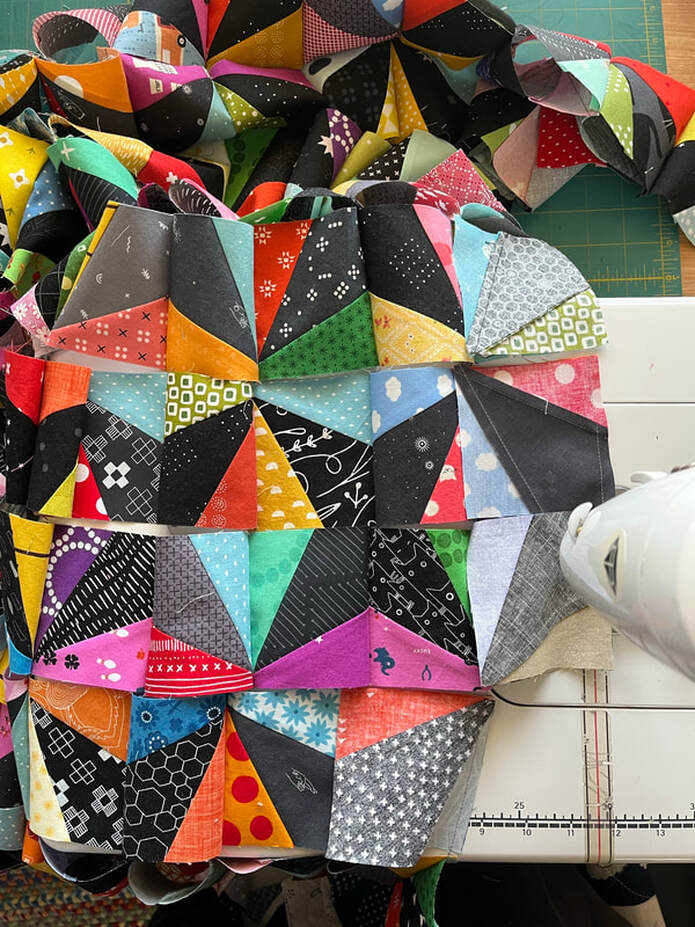 There wasn't an easy way to nest the seams on these blocks. I lined the blocks and seams up the best that I could, knowing that with 3" blocks I really wouldn't notice whether seams were perfectly lined up or not on this quilt. The points of the kites made for corners of blocks were a total of 12 seams came together. That meant that there was a lot of fabric in those intersections. So I after I assembled the quilt top, I gritted my teeth and pressed all the seams open. 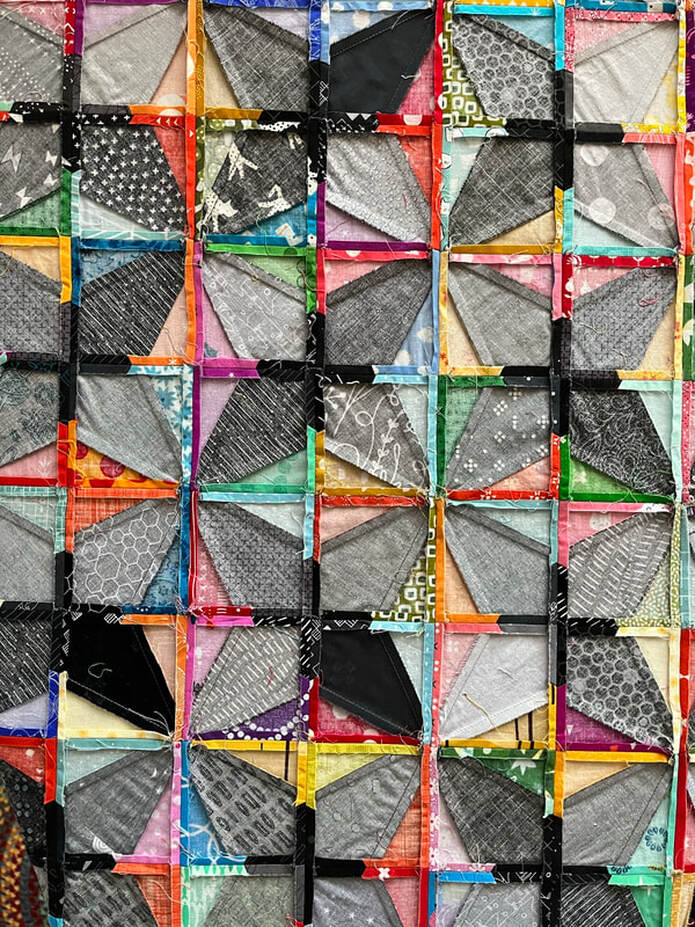 I finished the quilt top at the end of January 2023. 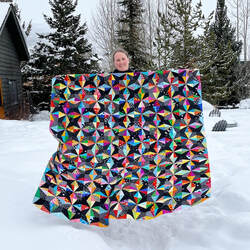 Like most of the quilts that I've been making for myself lately, I chose to back it in minky and had it quilted by my local long-arm quilter. I went with the "dizzy izzy" quilting pattern from Urban Elementz. 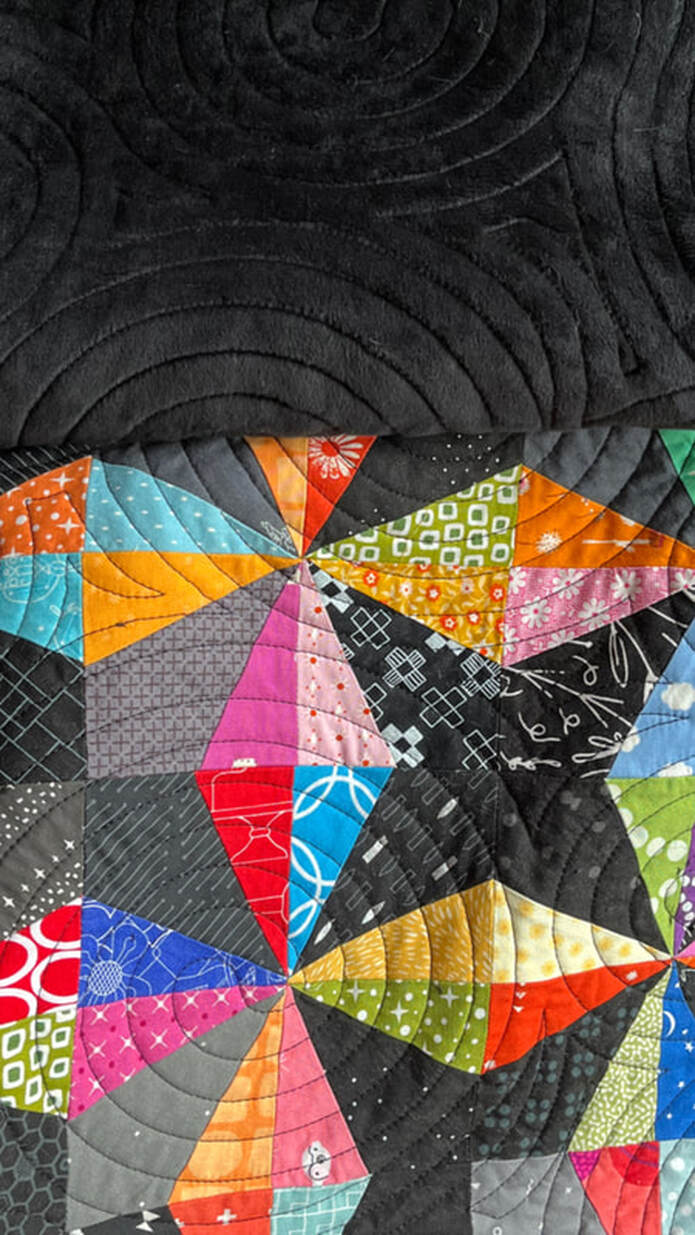 This quilt has 440 blocks laid out 20 blocks wide and 22 blocks tall. With the blocks finishing at 3" square, that makes this quilt roughly 61" x 67". There is no "pattern" for this quilt, should you choose to make something similar you will need 440 kite pieces and 440 of each triangle piece that goes on either side of the kite (880 total). When I laid the design out in EQ8, it estimated that I would need roughly 3 5/8 yards of fabric for the kite pieces, and 3 yards of fabric for the triangle pieces. 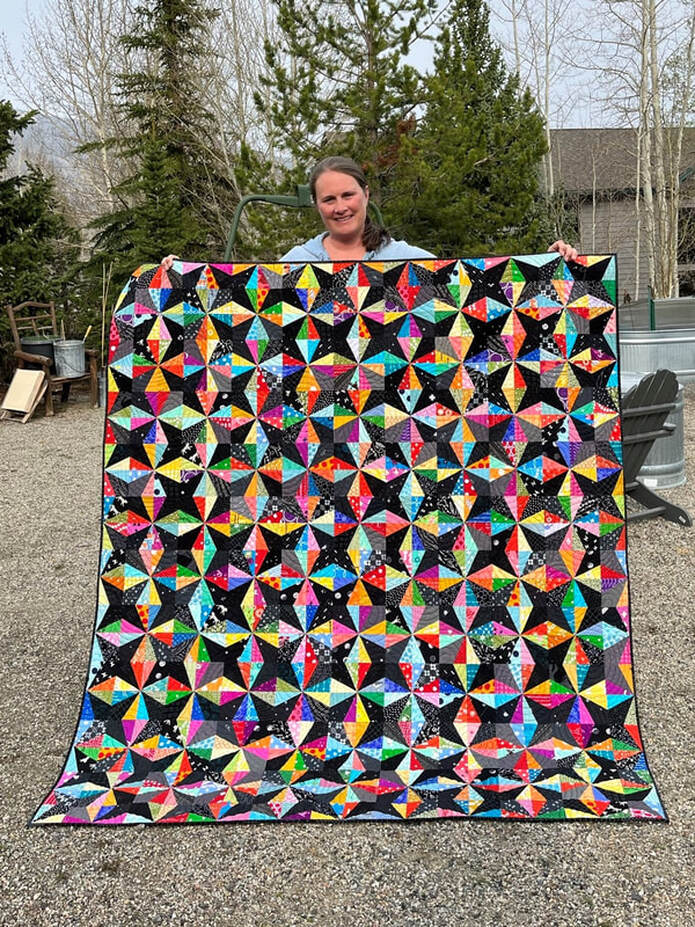 This quilt is destined for our basement movie room. It is going to be great for snuggling and also for camouflaging food and other dirt that it is sure to accumulate in this house. If you want to stop by you can check out the hashtag that I used for this project: #kiteinasquarequilt on Instagram. Thanks for stopping by! 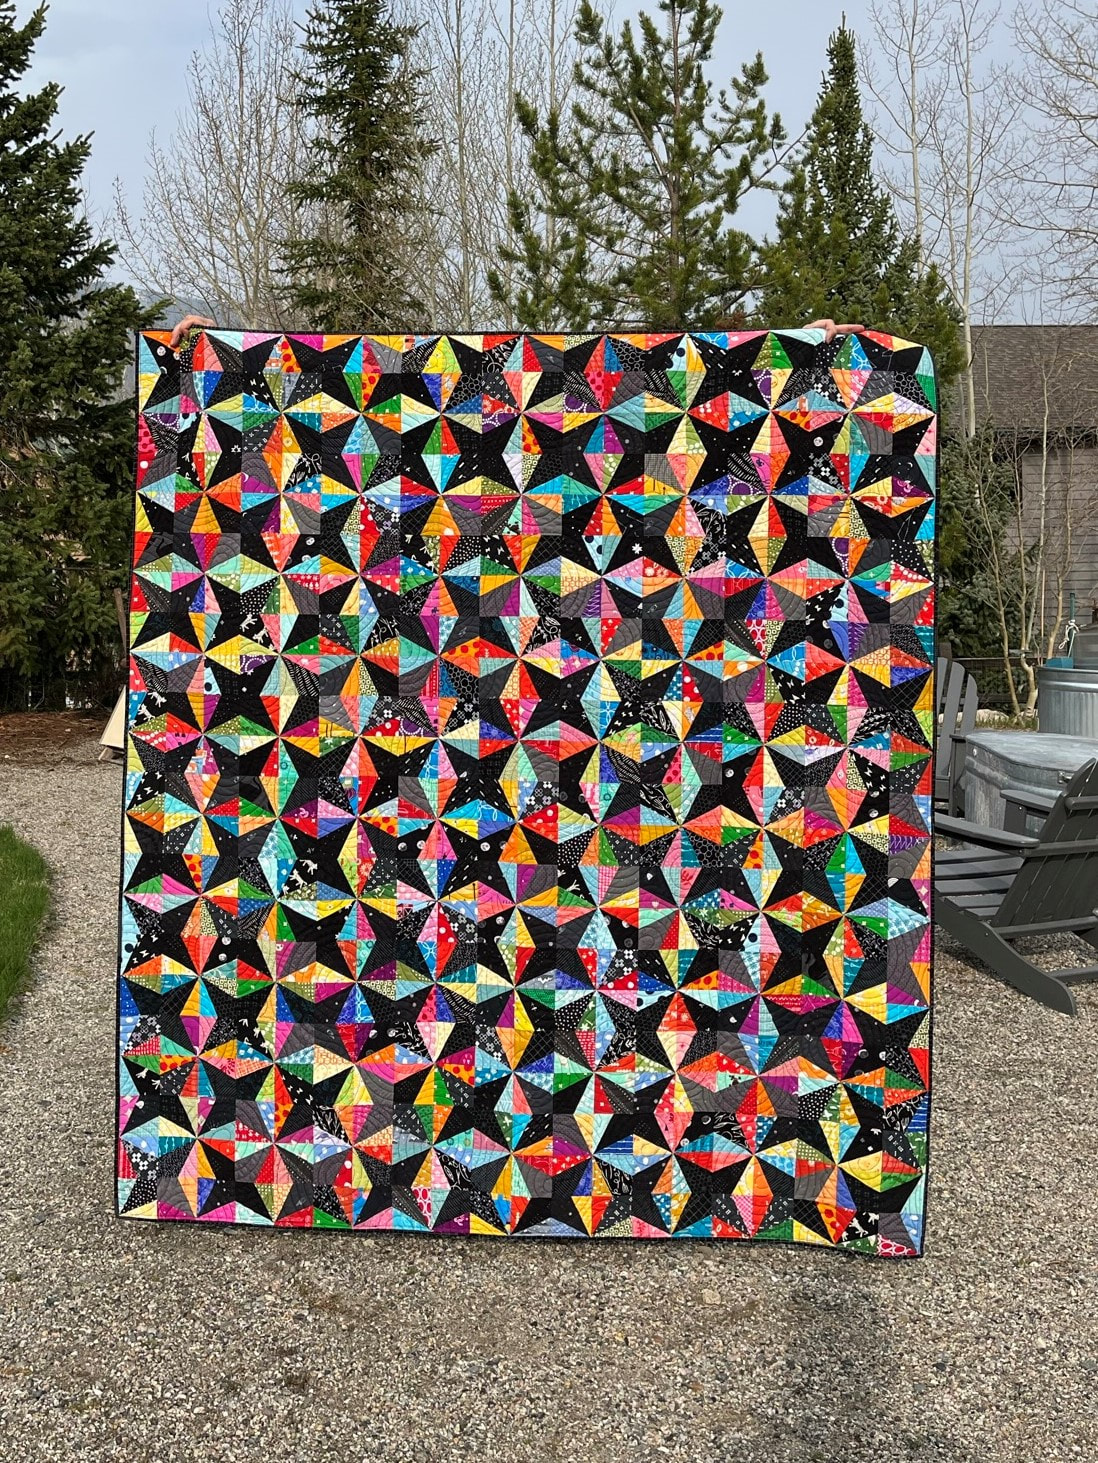 Last year I was watching "The Let Down" on Netflix (which I really enjoyed) and a work of art above their bed kept catching my eye. After some research, I learned the image was available as wallpaper and fabric from this Australia website, but I never was able to determine the original artist. Rather than buying the wallpaper or fabric, I decided to make my own quilt inspired by the design.  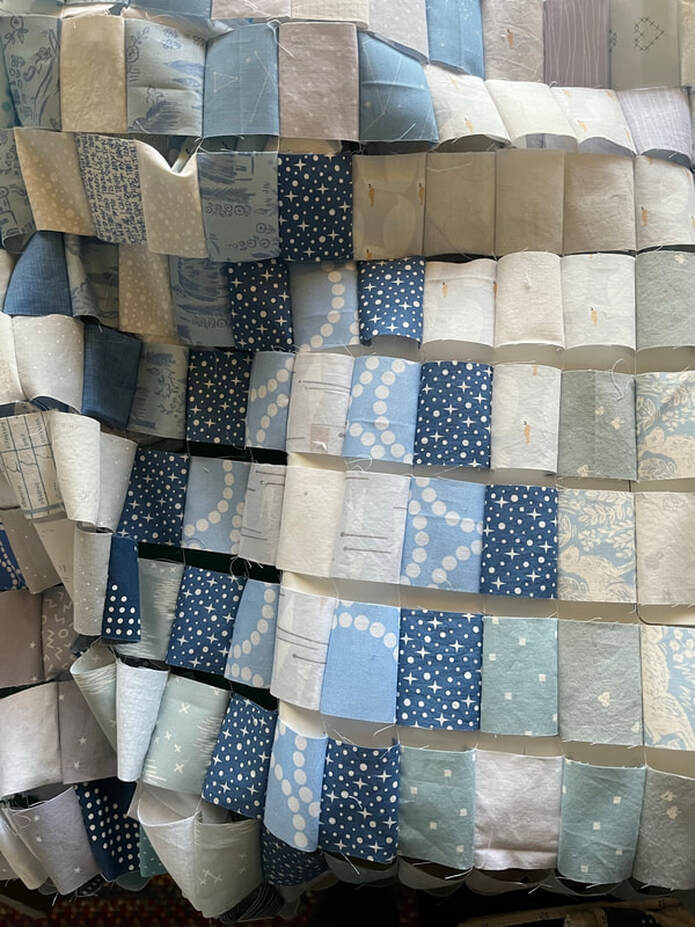 I used 2 1/2" squares picked from my scrap square boxes and cut from stash. I laid the whole quilt out on my design wall and then web-pieced it all at once. 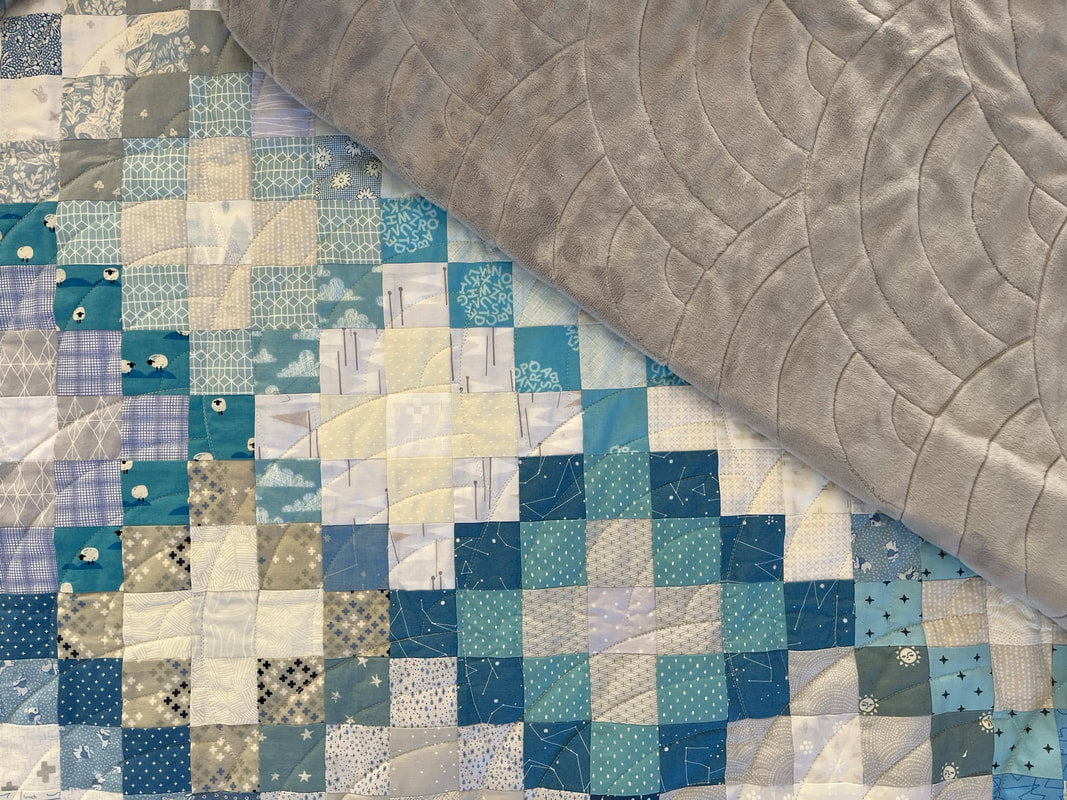 I backed the quilt in minky and had it quilted with a traditional baptist fan pattern. There isn't a pattern for this quilt, it is similar to this quilt and this quilt that I made. This version is a little different since the squares forming the lattice-like pattern aren't all dark. I loved how the original watercolor has those main squares go from dark to medium to almost indiscernible, but you can still pick out the main pattern. This pattern has 30 squares across, and 35 squares down. That means it contains 1,050 squares that finish at 2", and the quilt finishes at 60" x 74". 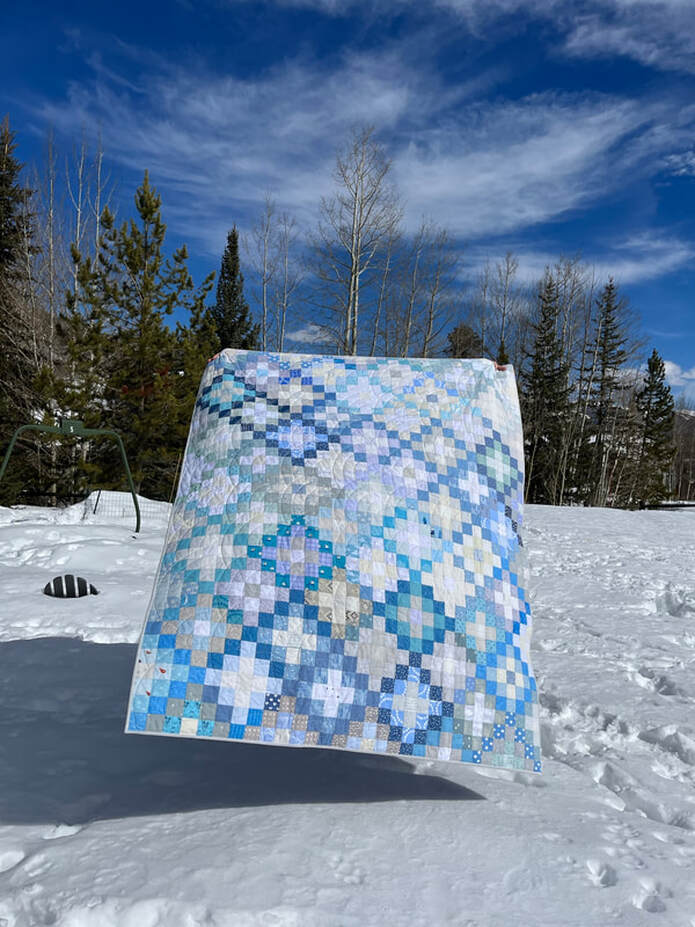 You can see more pictures of the quilt in progress on my instagram account and under #ombrechainquilt
October 2021 was my Quilt n' Sisters retreat. This year we went to Lancaster County, PA. Whenever we get together, we do a fun swap. The swap gifts have been getting bigger and bigger - at least one person always brings a quilt to gift. Over the years, I've been lucky enough to receive 2 quilts in our swaps. This year I decided that I would make a quilt for the event. 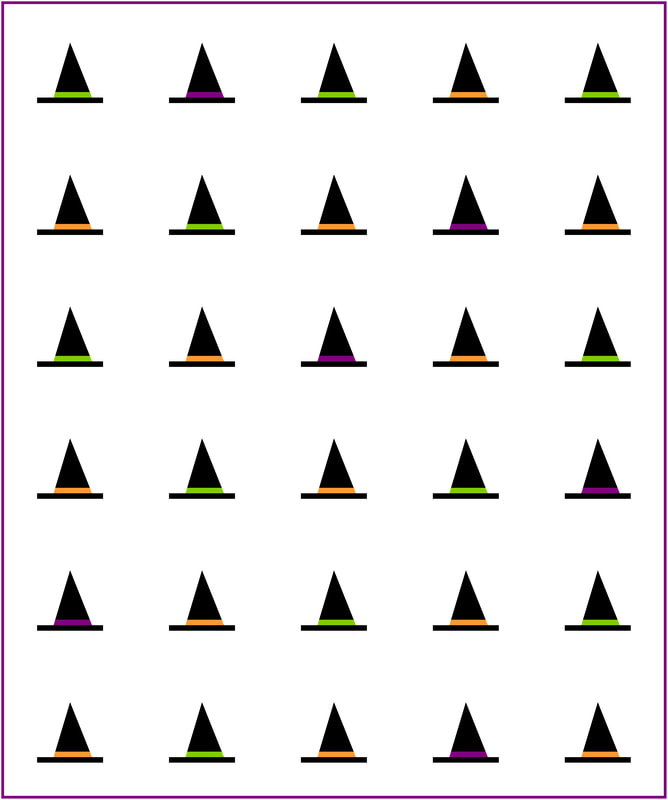 Given the time of year, I quickly settled on the idea of making a Halloween witch-hat quilt. Two years ago, Polkadot Chair released her Halloween Haberdashery quilt and I decided to make an improv version of that. In my version, I wanted hats with bigger brims, and more variety in their placement within the block and in their shape. Above is where I started...but things evolved a little bit in the layout process. 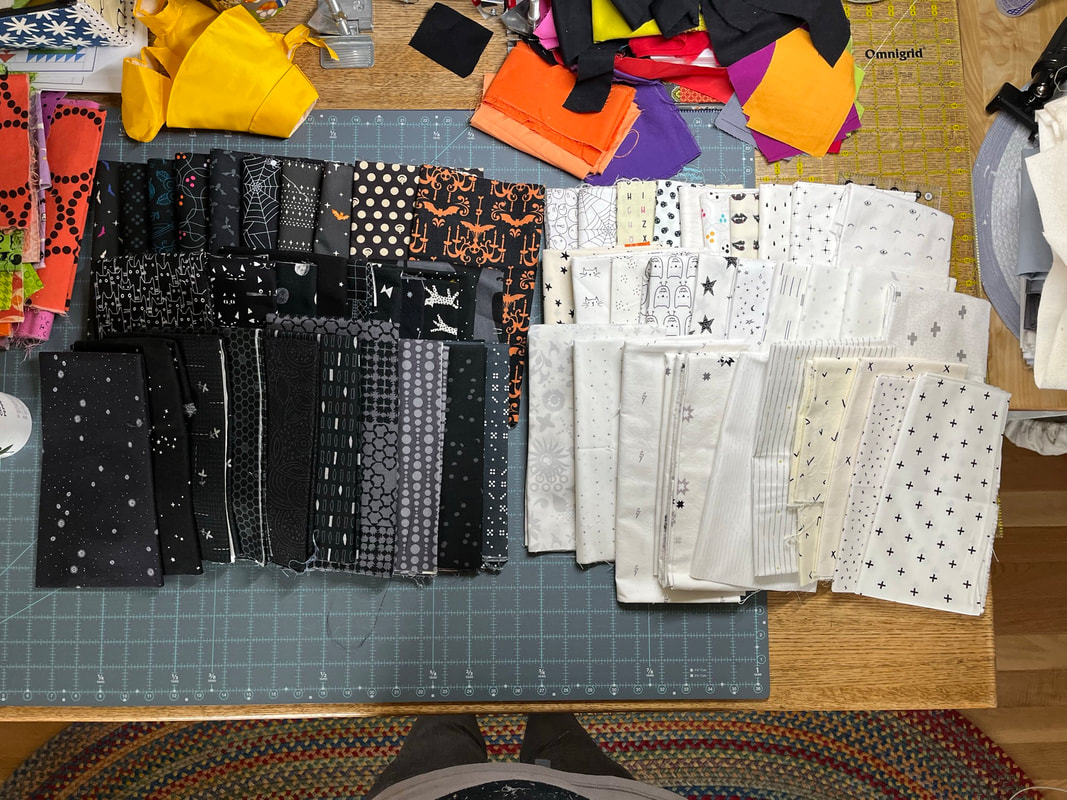 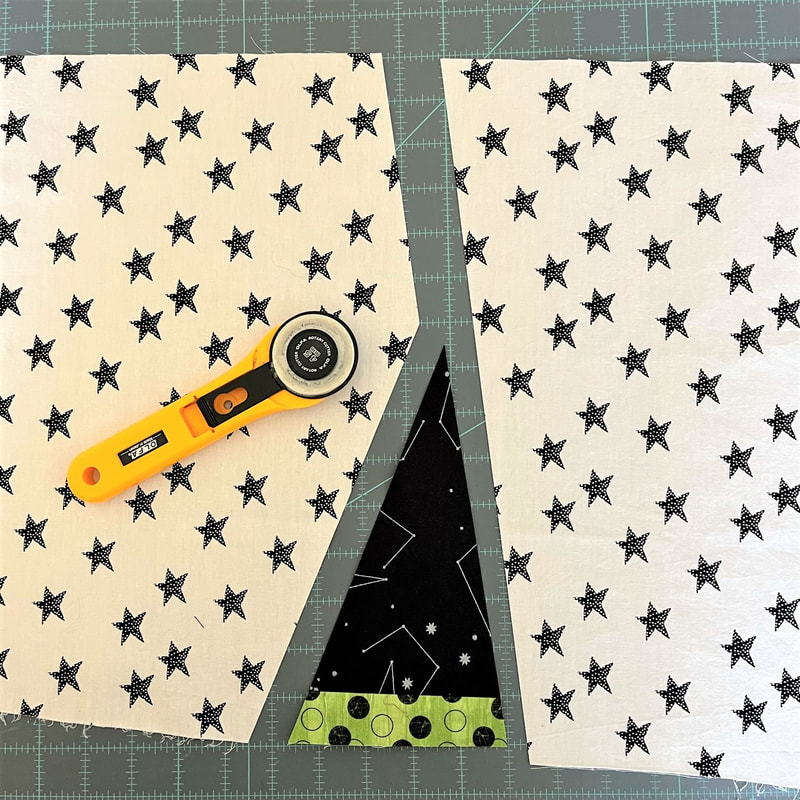 The construction of these blocks was very similar to my little improv tents quilt: triangles on a big background. These hats would just have a hat band and brim instead of a tent door. I planned to use one fat quarter per block for background. Around this time, I decided that I really was going to like the quilt and wanted one for myself...so I decided to make two: one to swap and one to keep for myself. 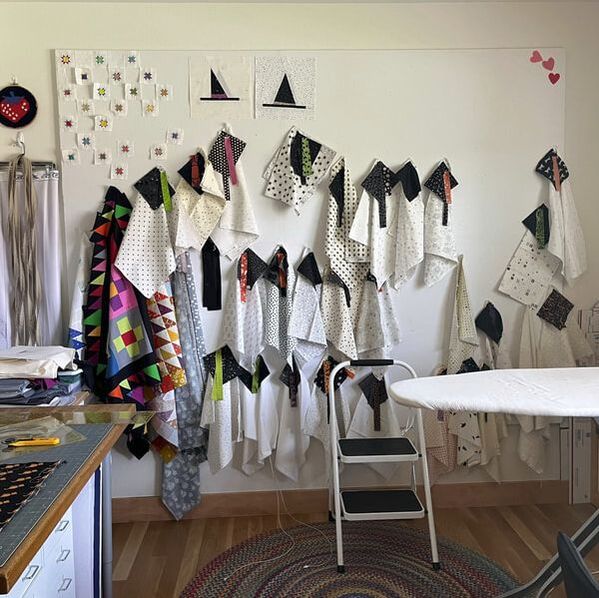 I made a few blocks to test my construction method, and then pinned combinations of backing + hat + band fabrics to my design wall to make sure that I liked my combos. 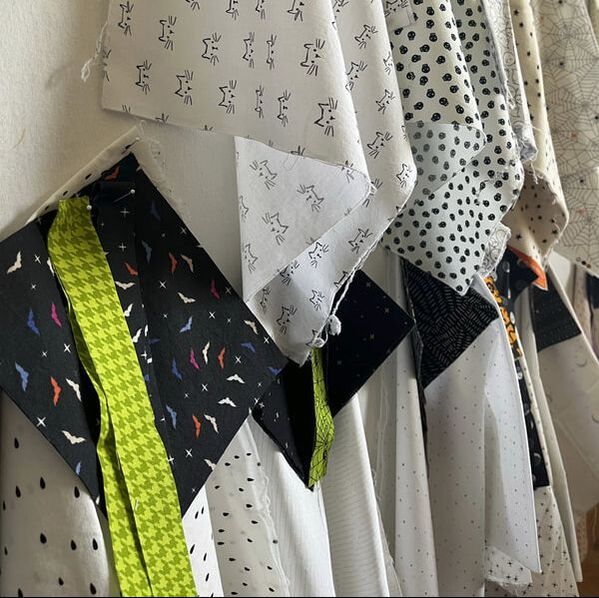 As more and more blocks began to accumulate on my design wall, I decided to go with a staggered layout. 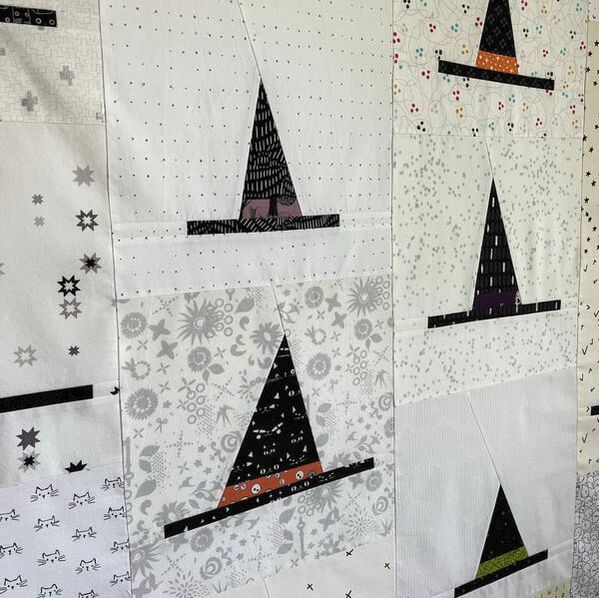 I backed the quilt with minky and had it quilted with a spiky design. For binding, I went with a black and white print from Carolyn Friedlander. 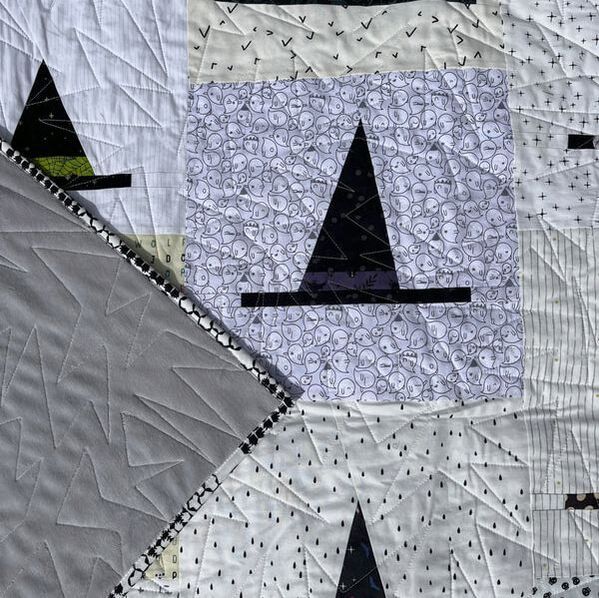 This quilt finishes at 60" x 72". The blocks were trimmed to 12.5" square (unfinished) - 28 blocks per quilt. I had a lot of fun using bolder than normal low-volume prints for backing, along with seasonal prints that I've been collecting.  The house next door to our retreat Air BNB was a funeral home and was prefect for lots of Fall quilt photos. Love the little owl serving as gate-keeper too! For lots more retreat pictures, check out Quilt n' Sisters on Instagram. 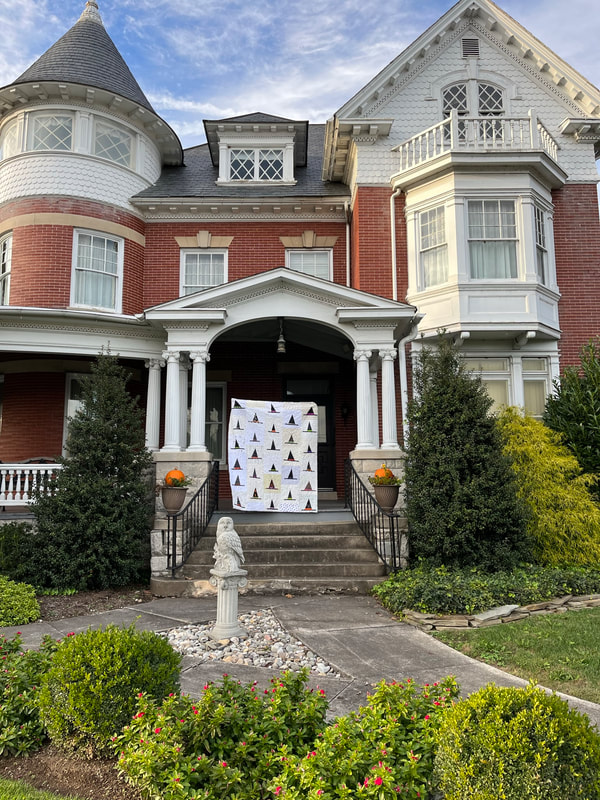 In the colder months, I like to have seasonal quilts out in my living room. I've got a lot of Halloween quilts, Christmas quilts, and even a few Valentine's Day quilts. However, I didn't have anything to have out between Halloween and December 1 (I don't do Christmas until Thanksgiving is over). So at my last sewing retreat in April, I decided to make a few quilts to fill that hole.
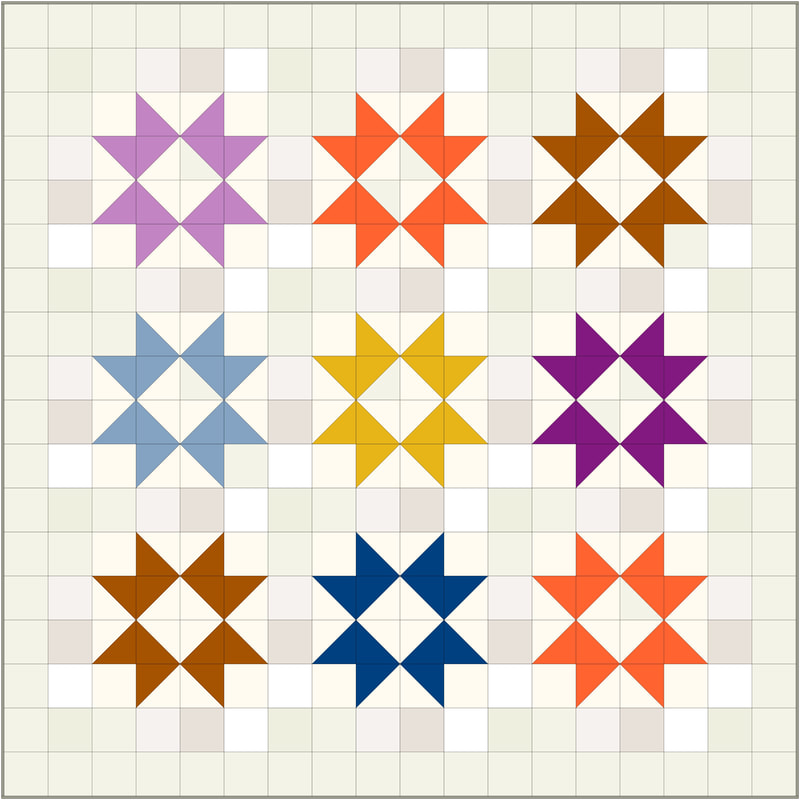
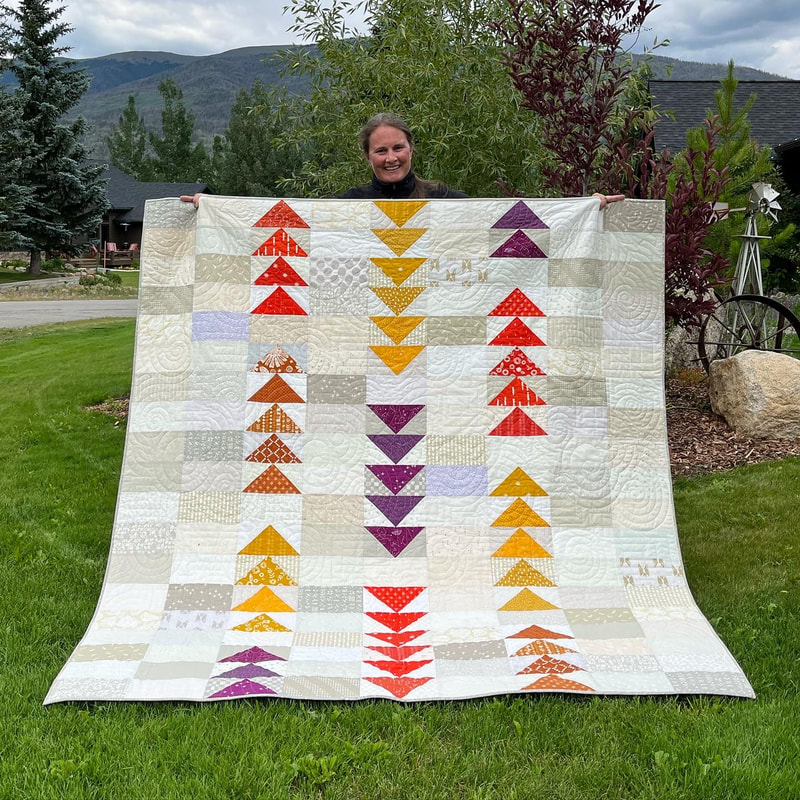
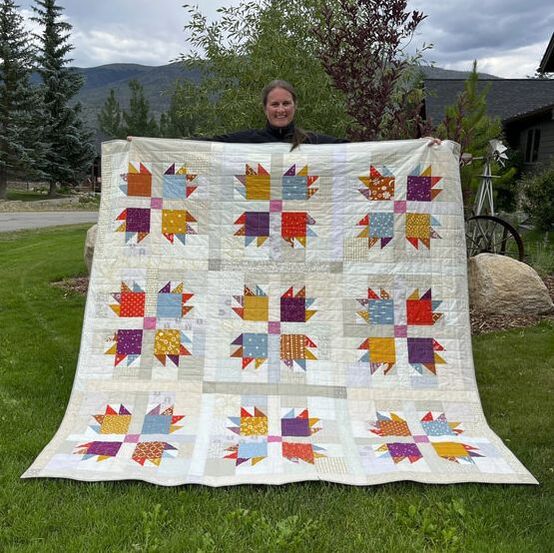
I chose these three patterns which are all made up of traditional blocks done in a scrappy way. Going Places: this pattern is a minimalist layout of larger flying geese blocks combined with lots of "blank" background squares. The flying geese in this quilt finish at 4" x 8". This is the second time that I've made this pattern. I wrote up a tutorial that can be found here. Bear Paw: I've been wanting to make another bear paw quilt for a while. I made a big scrappy double-bear paw quilt back in 2017, and more recently I started (and then abandoned) a bright bear paw quilt made with solid fabrics. For this quilt, I knew that I wanted a 3x3 layout of blocks + sashing, and a quilt that finished roughly around 70x70. To make that happen, I had to make blocks that finished at 22.5". That is a really funky-sized block and took a lot of quilty math and brain bending. Ribbon Star: This quilt is very straight forward and is made of HST and background squares. At this time I am not going to write up a tutorial, but I will say that my squares in this quilt are 4.5" x 4.5" unfinished and the quilt finishes at 72" x 72". From that info and the diagram above you can totally figure out how to make one of these for yourself!  I used the same fabrics for these quilts - and most of the colors are ones that I never normally use. I do like how they turned out tho.
Here they are all finished! I haven't had much sewing time at all this summer, but I'm happy to have these to be able to put out this Fall!
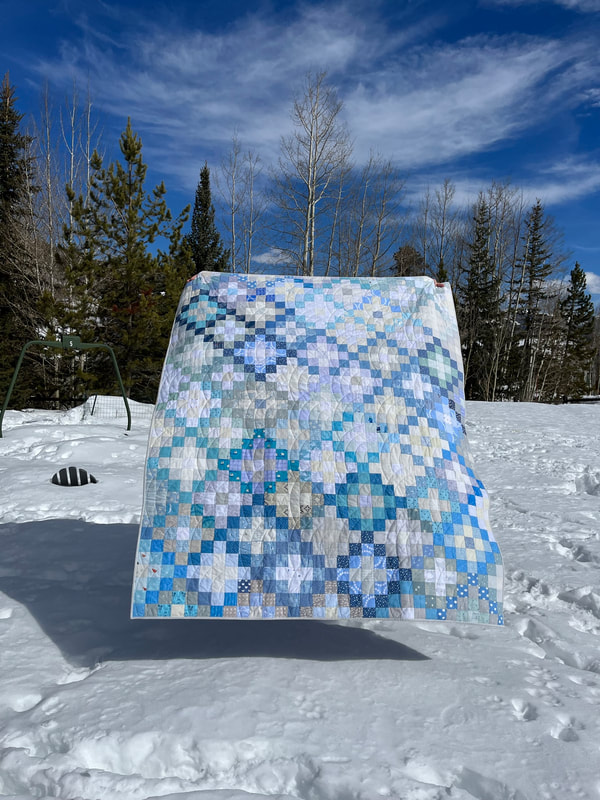
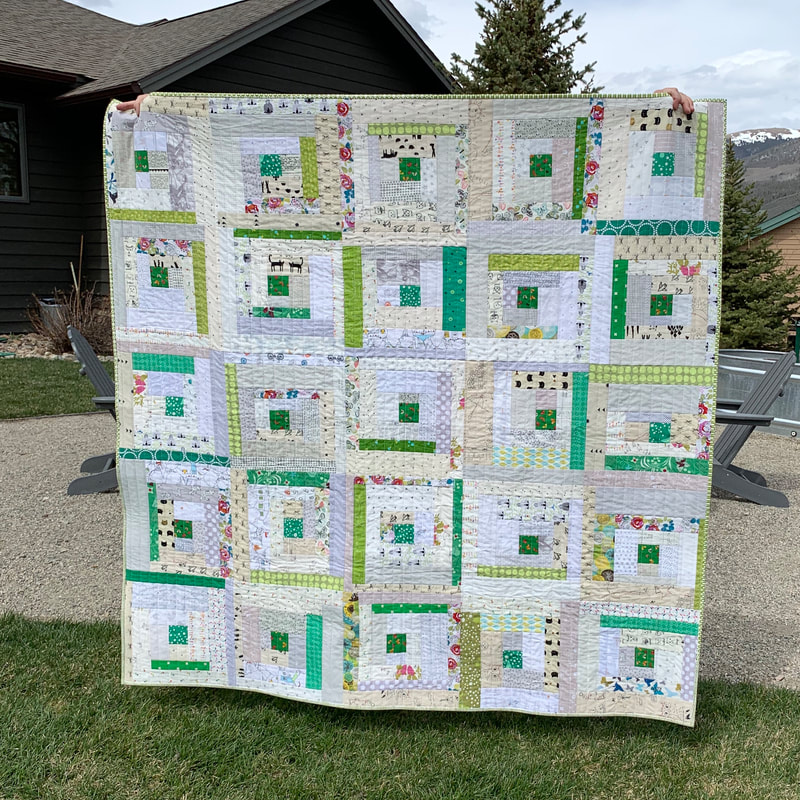
Thanks for stopping by! We finished out 2021 with most of my family being sick over the holidays, so when I was faced with a new year...I didn't know what to think. I couldn't think of any goals or things that I wanted to accomplish. I just wanted life to go back to "normal." I wanted to make a quilt that was as comfortable and comforting as an old pair of jeans. So I got out my blue scraps...again...and started on yet another log cabin quilt. 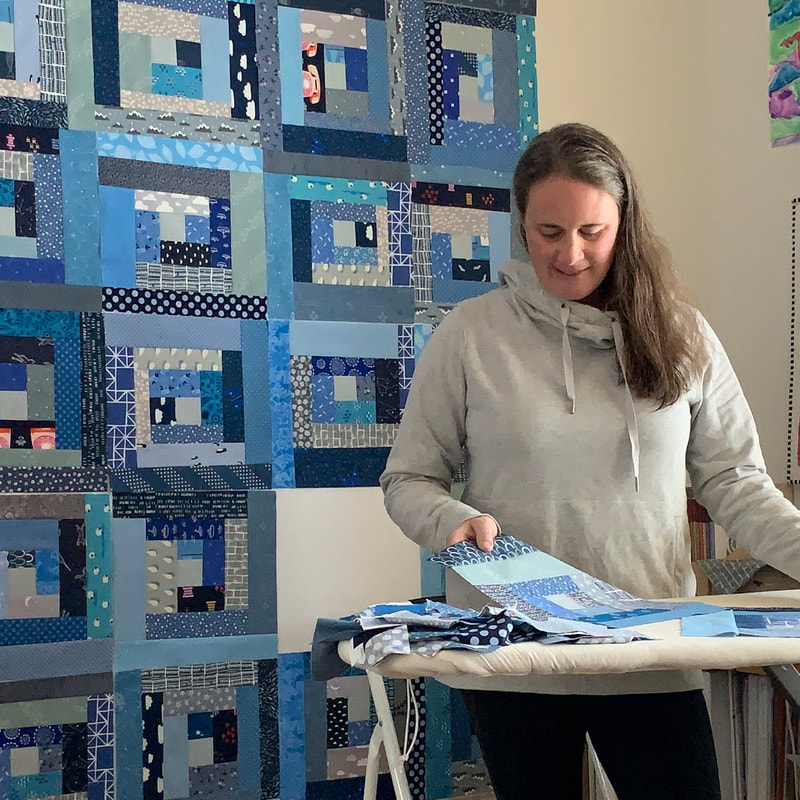 This quilt is the third blue log cabin quilt that I've made, and the 8th log cabin quilt that I've made in the last 2 years. When COVID started, I started making a log cabin quilt because I wanted a mindless project - and it was great! I could sew away while my kids walked in and out of my sewing room with distance-learning school questions. It was so great that I made more and more of those log cabin quilts.
This time around tho - it wasn't as enjoyable making the blocks. When the quilt was done, I didn't love it. It didn't have the magical feel that I was going for. Instead it felt uncomfortable - it was so similar to so many quilts that I've made that it actually gave me a very weird disquieting feeling to look at it.
Even tho finishing the quilt wasn't very exciting, I did finish it and had it quilted by my long-arm quilter. I went with a navy blue minky for the backing because it is hard to find wide-back gray minky these days. The highlight of the quilt is that I got to bind it with some binding that a friend made for me as a gift. 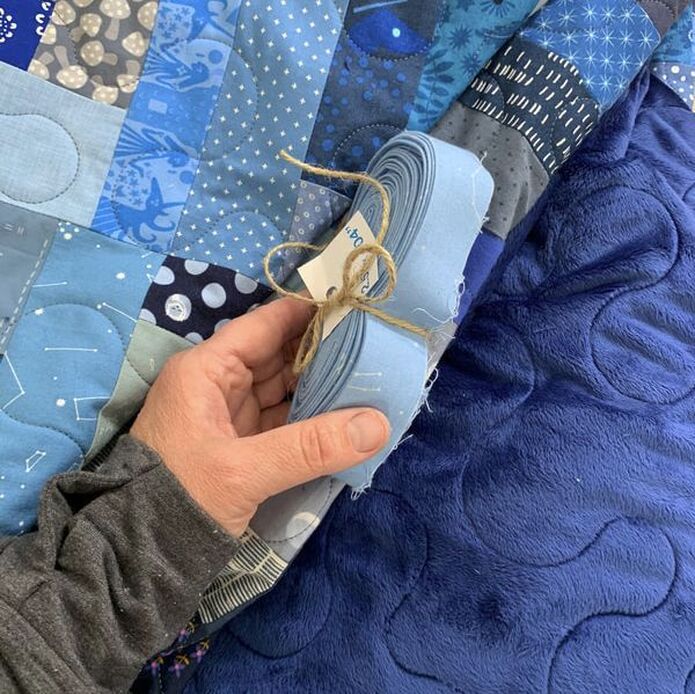 This quilt was made for our living room couch - for snuggling. I made it a little larger than my other log-cabin quilts. This one has a 6 x 7 (42 blocks) layout using 12" blocks. It finishes at 72" x 84". Maybe one day it'll become a favorite. For now, I think that it signals the end of my log-cabin quilting making phase. For a while at least. 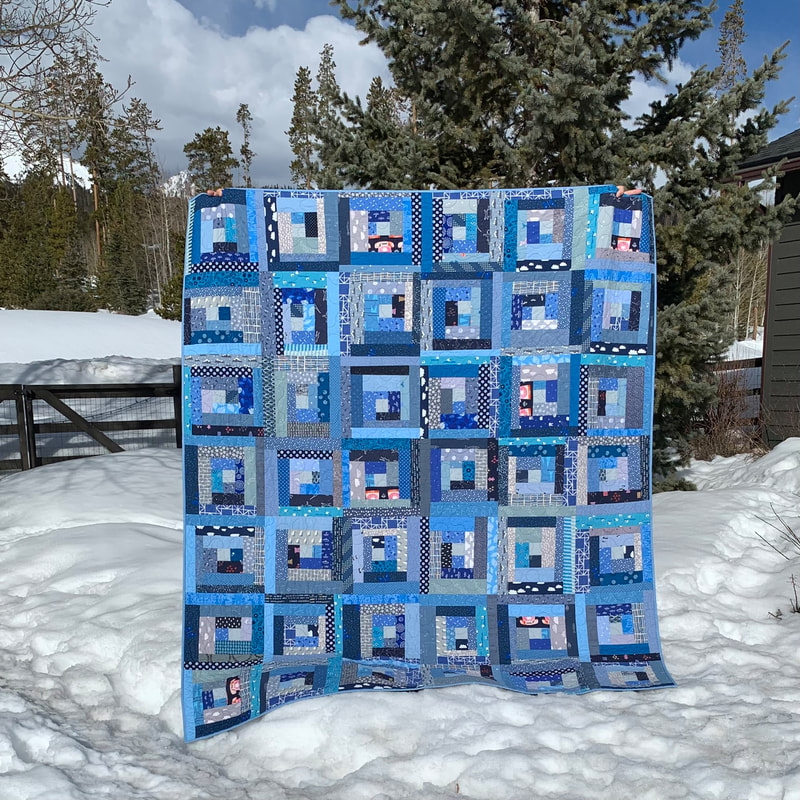 I love it when people say that they would love a new quilt for their birthday (or Christmas!). So when my sister said she wanted one, I got to work on another gray and blue quilt. I gave her this one last year, and wanted the 2021 version to coordinate. 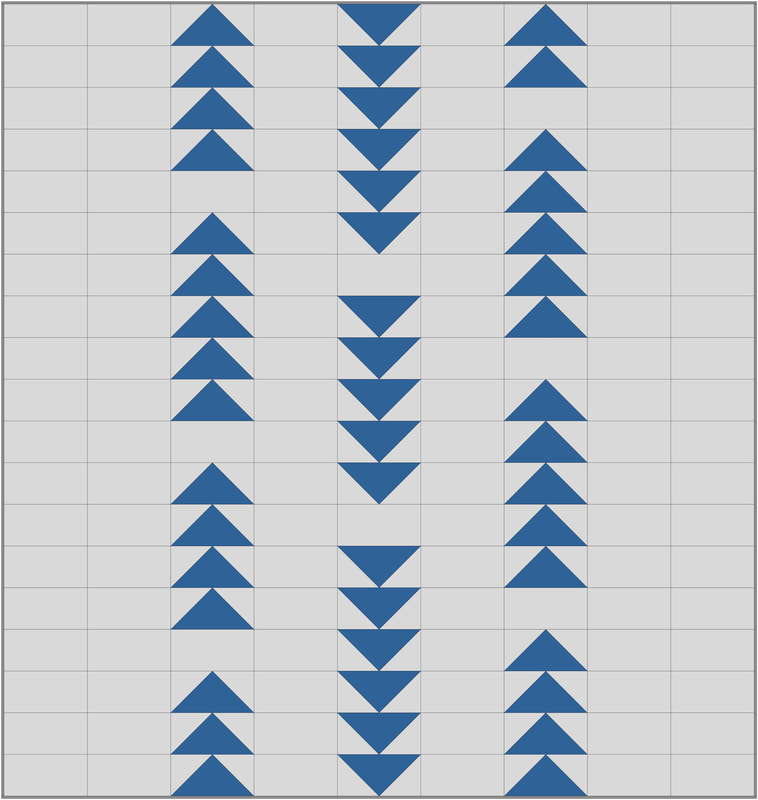 The original design doesn't look like much, but I used lots of different fabrics for the background and geese, and to me, that makes the quilt come alive. (Anyone see where my layout differs from my pattern? Hint: upper right corner. I just flip-flopped the placement for a goose block and a blank background block. )  I backed this quilt with minky and had it quilted by my long arm quilter using a pattern from Urban Elementz called "Malachite." I settled on that pattern because it looks like a topographical map to me: it looks like my geese are flying over a topo map! 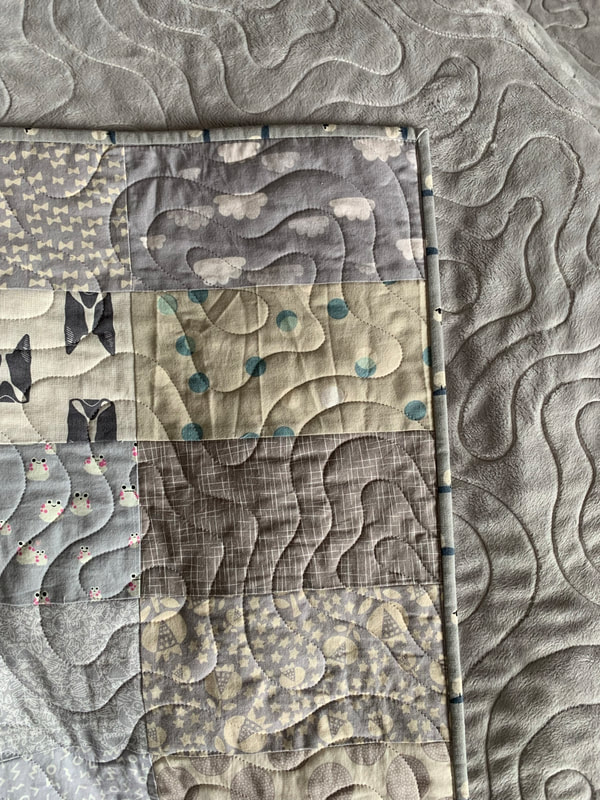 I love how this quilt turned out! It finishes around 72" x 76", and I wrote up a quick tutorial for it. You can find that tutorial here. Thanks for stopping by! 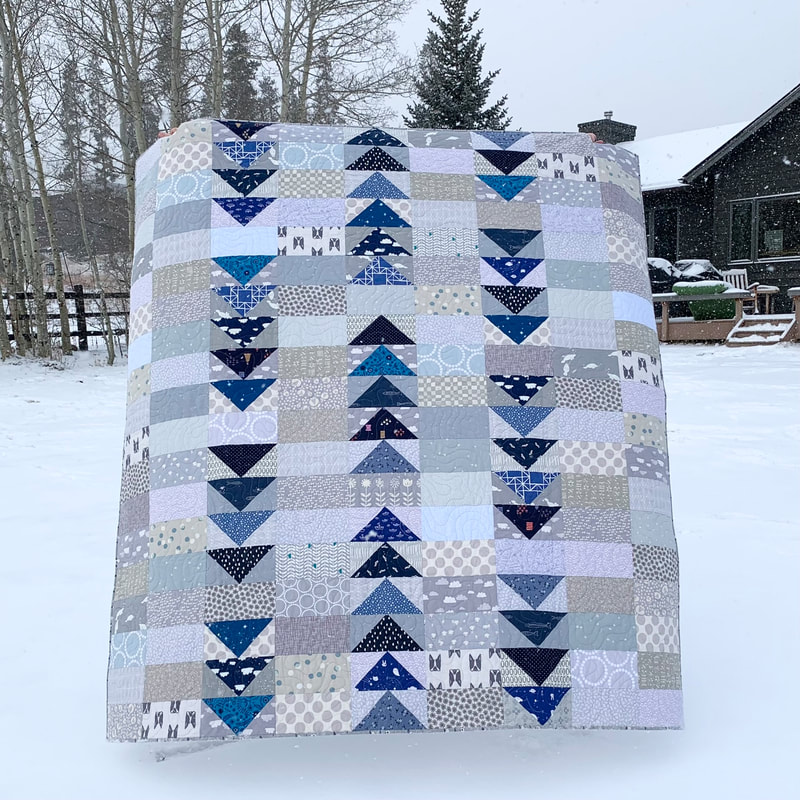 Remember when I made the pink ocean waves baby quilt and said that I wanted to make a big version? Well I made it - I just made it in yellow, not blue! The first one I made used squares that finished at 2", and just by making the squares 1" larger, you can end up with a throw-sized quilt. 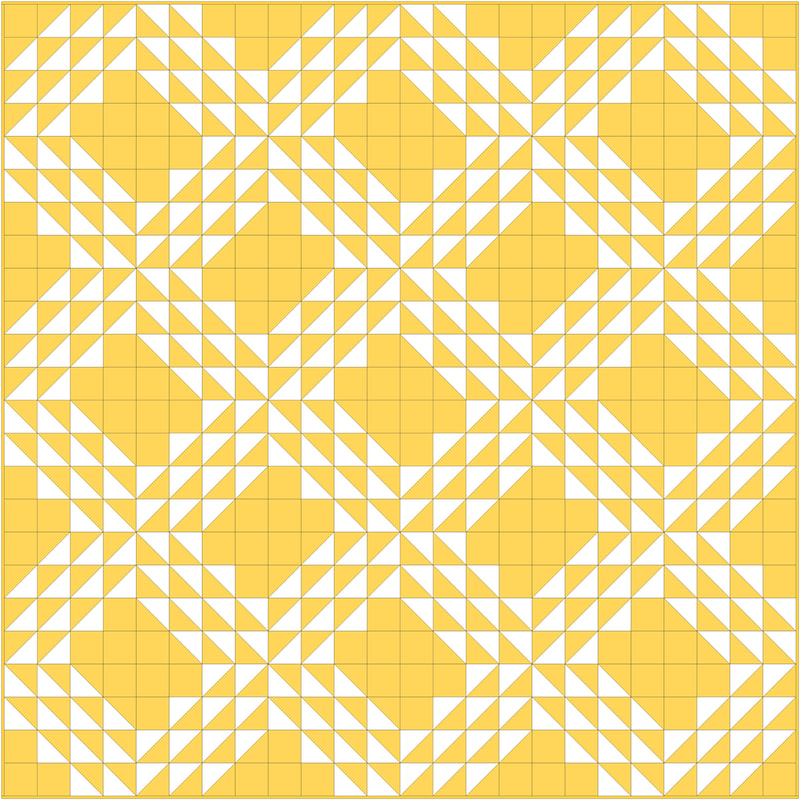 I pieced this version of the ocean waves quilt with ALL 3.5" unfinished squares and half-square-triangles, which made it possible to web-piece the quilt. It also made the scrappy background nice and evenly scrappy - without any of the larger rectangular background pieces typical in the Ocean Waves block. 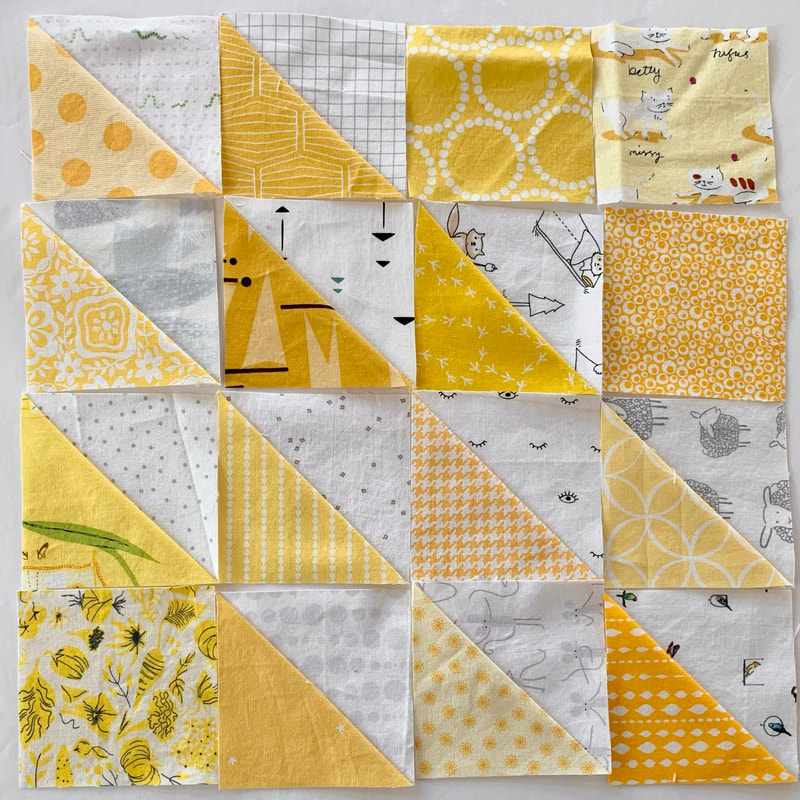 As is the case with all of my scrappy quilts, my design wall played an integral part. It takes a lot of time to lay out all of the squares, and to make sure that similar fabrics aren't placed too closely to each other. 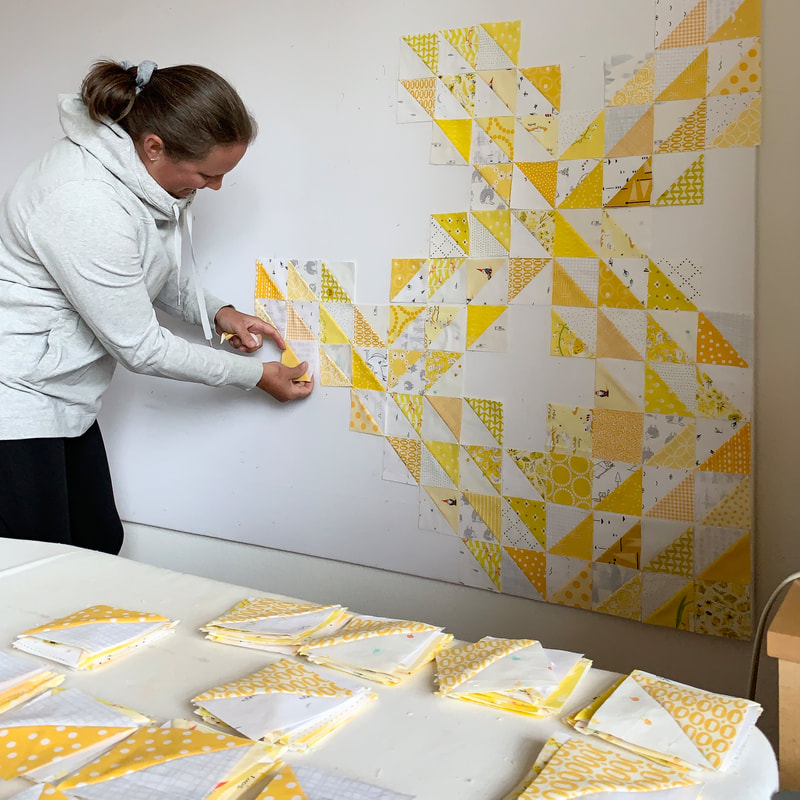 I pieced this quilt over the summer and it feels so bright and sunny! I backed the quilt with "Amber's Posy," a Liberty lawn floral print. I wanted a light and bright multi-color print to back this quilt. 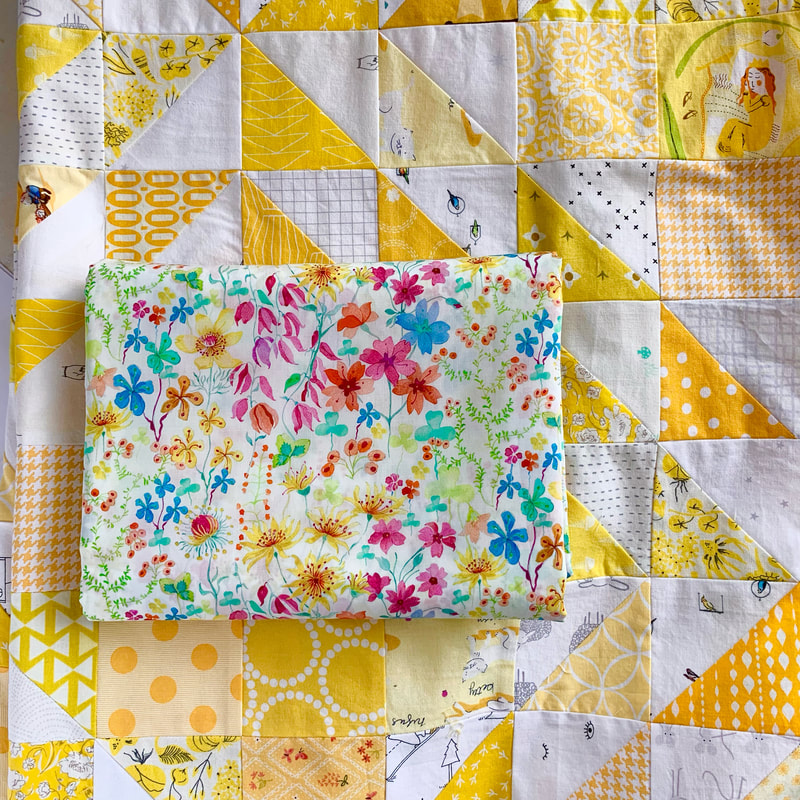 As a treat to myself, I had this quilt quilted by my local long-arm quilter. I wanted a loopy pattern and the quilter nailed it.  It felt a little weird to be taking pictures of my summer quilt in late October with patches of snow on the ground, but it'll be amazing to pull this one out of storage in June! Quilt Details: This guy has 36 blocks and finishes at roughly 72" x 72". There are 12 HST and 4 solid fabric squares per block. If you do the quilty math: that makes for 432 HST and 144 squares. Thanks for stopping by! 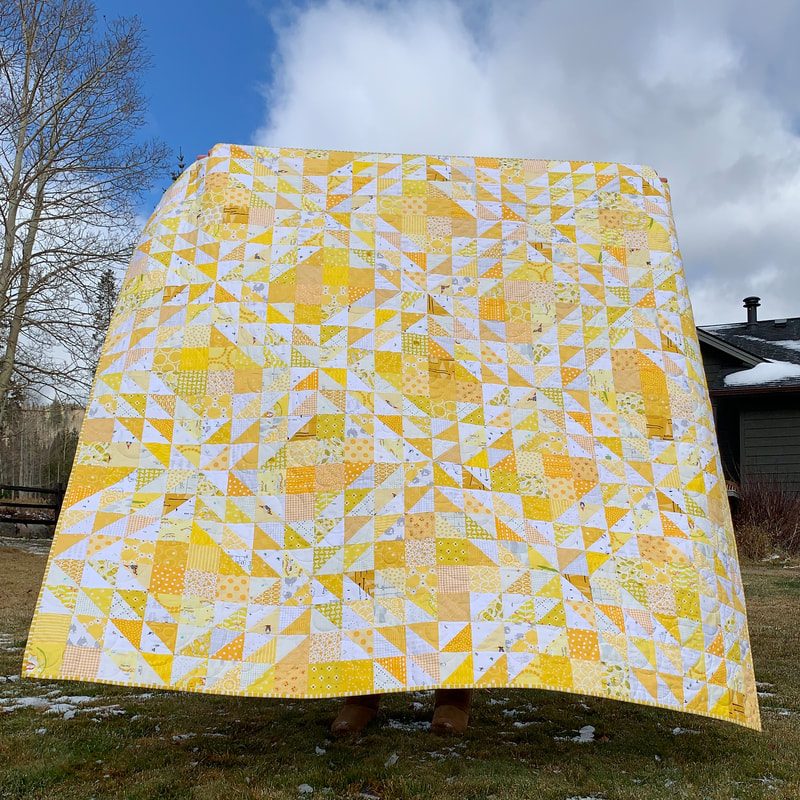 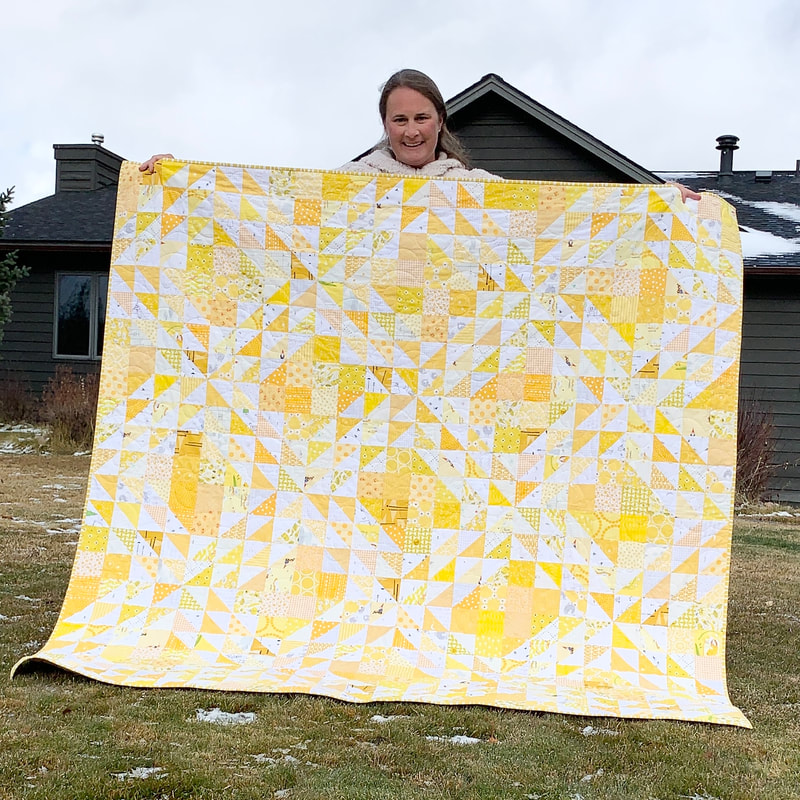 Second set of commissioned twin quilts! I had a lot of fun working through the design process with these guys. I started off with a very complicated busy design, slept on it, and then edited heavily in the morning. Below on the left you can see the start of my design (marker, tape & paper), and on the right is where the design ended up (EQ8). I love the final design!
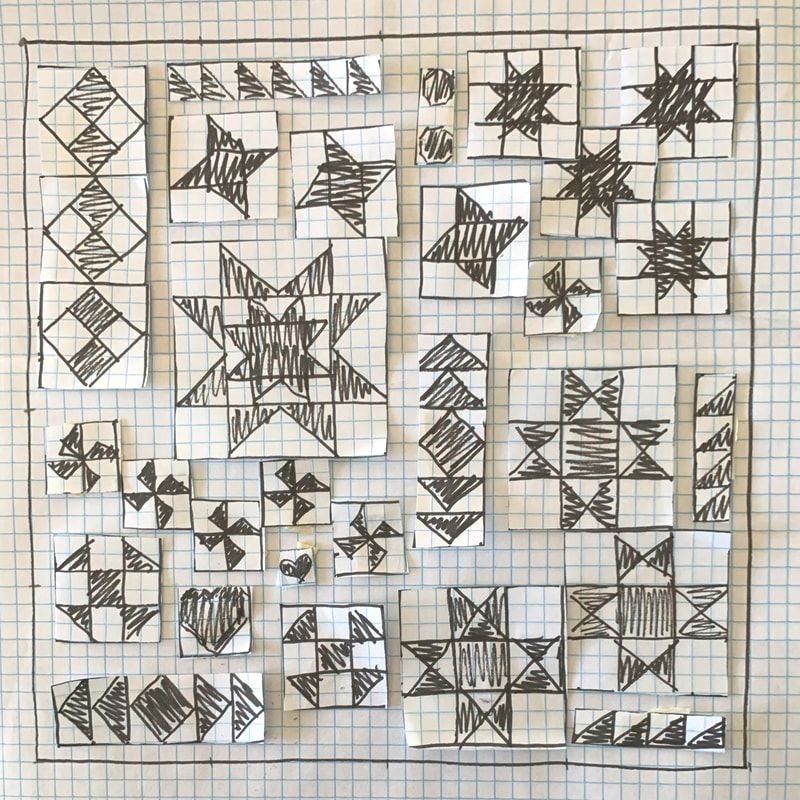
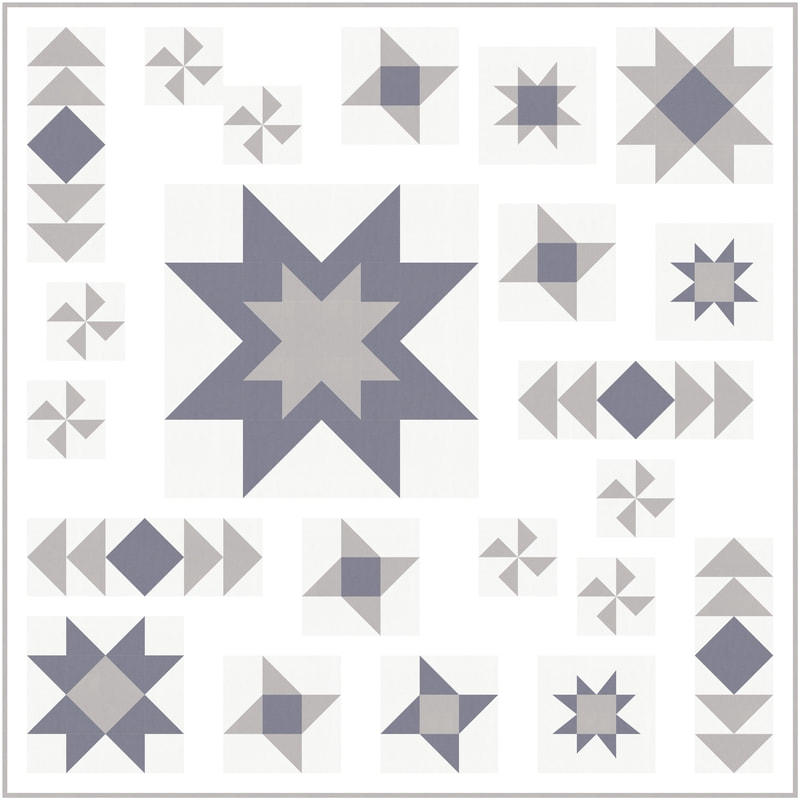
In total, there are 6 different blocks in this quilt; measurements and piecing instructions are saved in my story highlights on Instagram. (Click here to see my highlights.) You can also check out #stellarsamplerquilt for more pictures of the quilts. 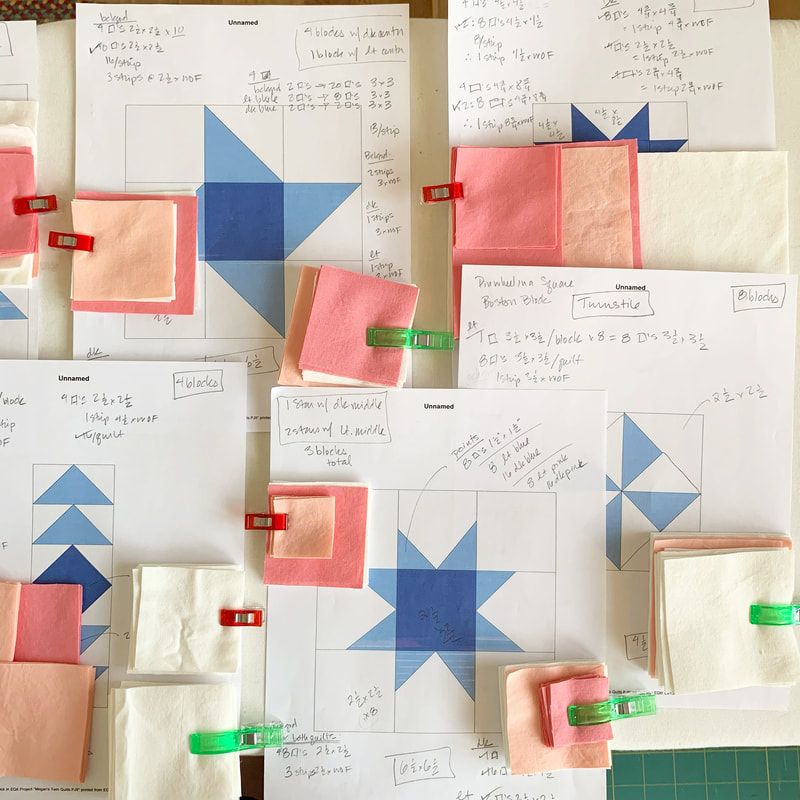 I cut all the fabric pieces at once and worked hard to keep all of the pieces for each block organized. Once the tops were pieced, I backed them with pink and blue fabrics from designers who now work for Ruby Star Society, and quilted straight lines. 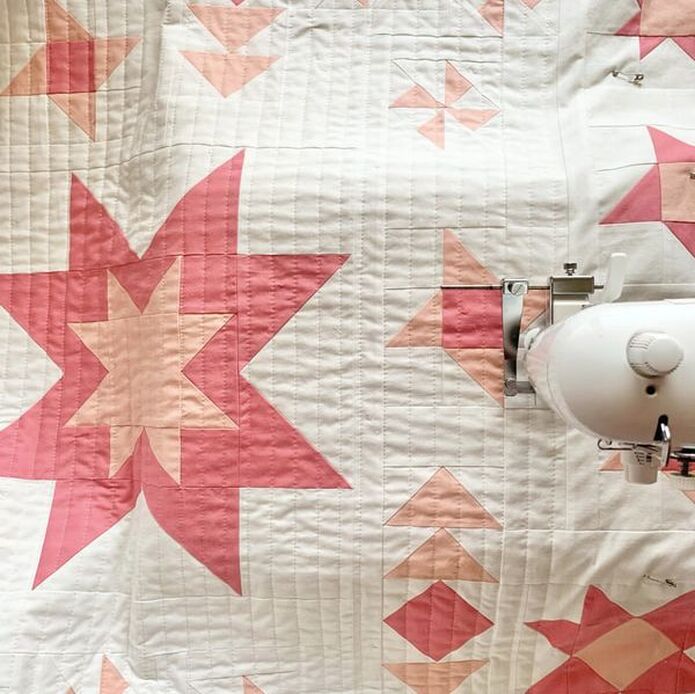 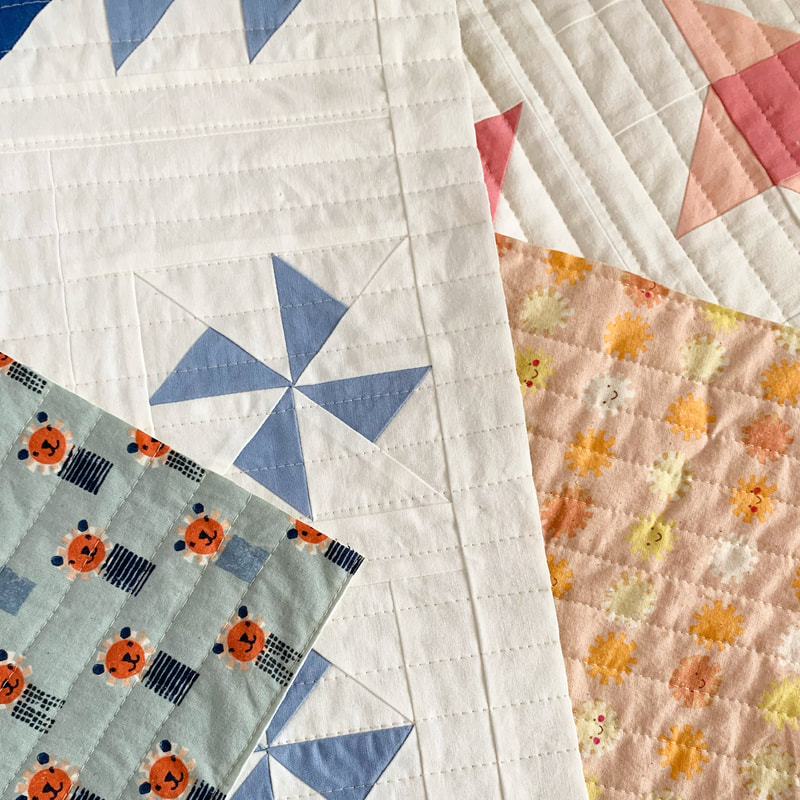 I bound the quilts with a small gray striped print from Figo Fabrics. 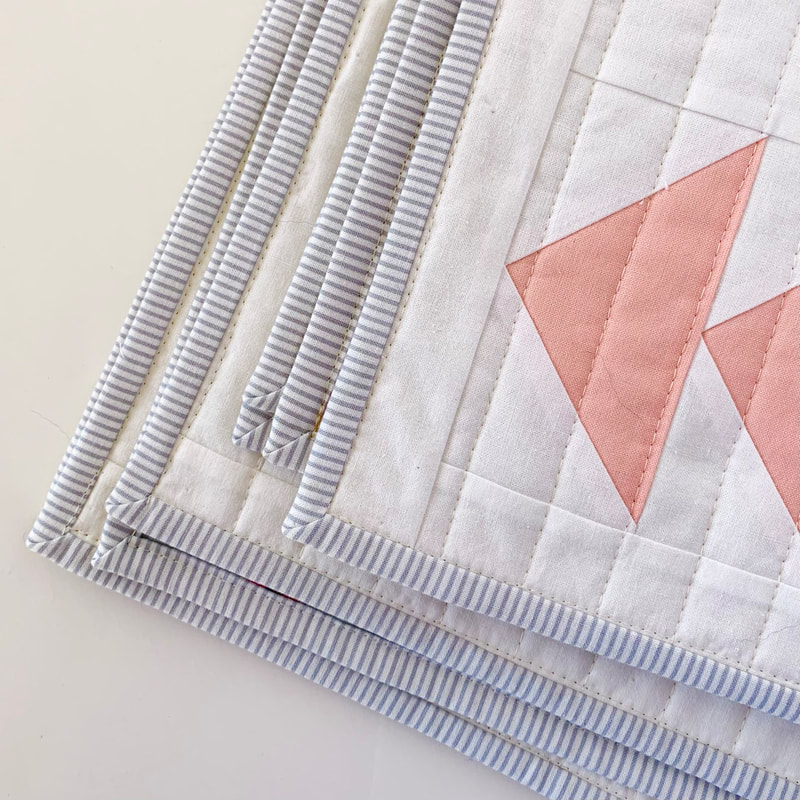 These quilts will soon be off to new twins and I hope that they get lots of use and love - as always! 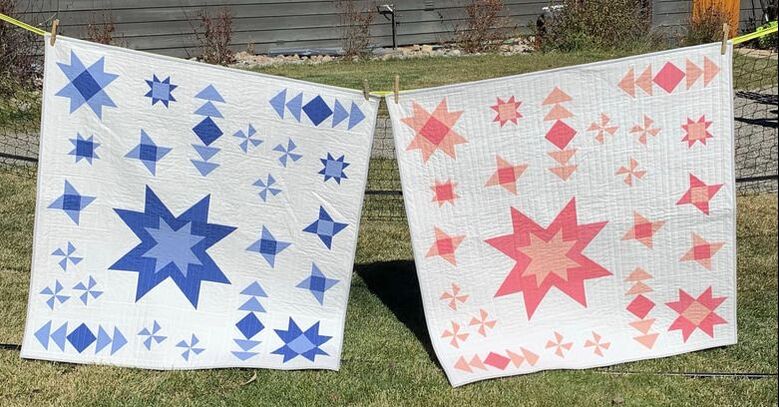 Quilt Details: These quilts finish at 40" square. All solid fabrics are Kona solids from Robert Kaufman. For the blue quilt, I used Candy Blue & Regatta. For the pink quilt I used Melon & Peach. The background fabric for both quilts is Snow - a slightly off white fabric. 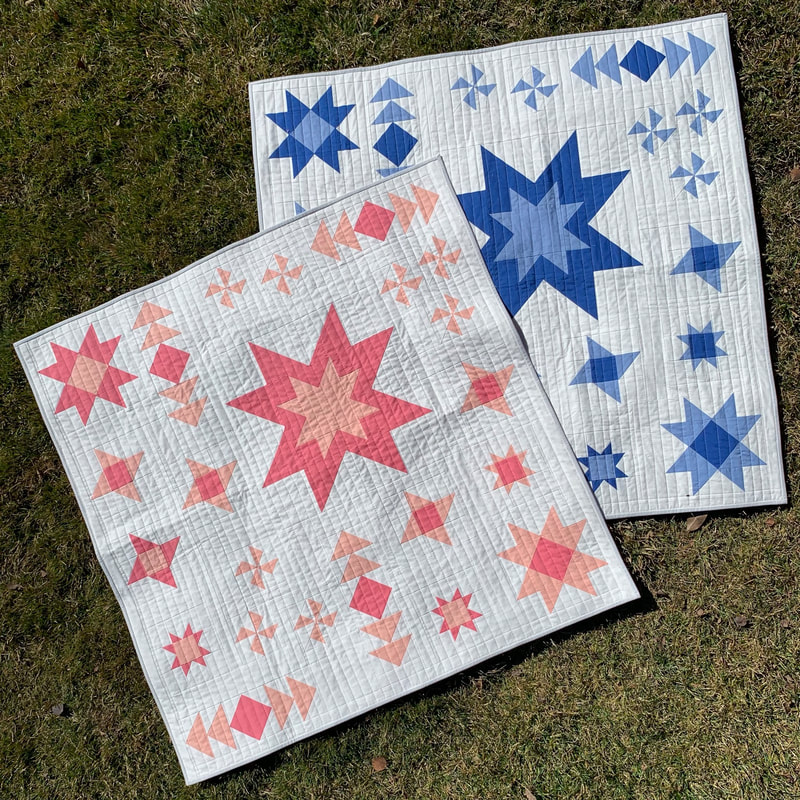 |
Archives
November 2023
 |

 RSS Feed