Scrappy Goose Quilt Tutorial
|
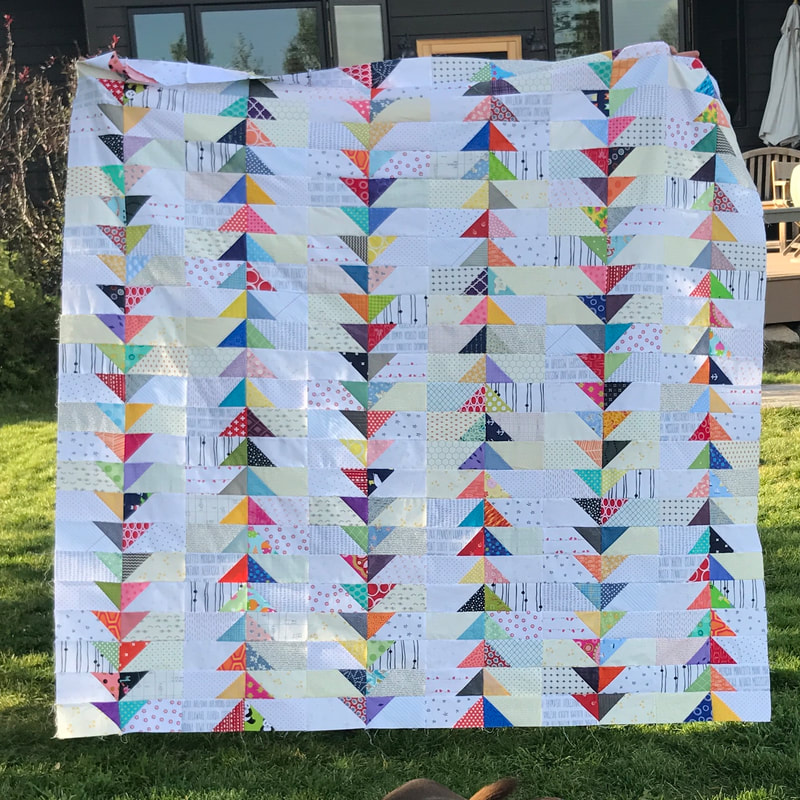
Tutorial for My Scrappy Goose Quilt
You can either click the link above for a PDF version of this tutorial, or follow along below. This quilt finishes at 72” x 72,” and is a great scrap buster! It uses 3 ½” squares of colored fabric, and 3 ½” x 6 ½” rectangles of low-volume fabric (or any background fabric). The directions are written for very scrappy “geese” and backgrounds pieces. In my quilt, I used up lots of my 3 ½” squares that I cut from my scraps, and I cut the 3 ½” x 6 ½” background rectangles from larger scrap pieces and stash fabric. If you make a project using this tutorial, please remember to tag it #scrappygoosequilt – I always love seeing work inspired by things I’ve made. |
|
Cutting Instructions
You will need to cut the following from scraps:
Prepping Your Fabric Pieces
On the back of each of the colored 3 ½” squares of fabric, draw a line from one corner diagonally to the opposite corner.
Piecing the Goose Blocks
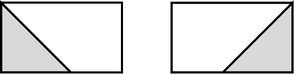
To make each “goose” block, place a colored 3 ½” square right-sides together with a 3 ½” x 6 ½” background rectangle. Sew directly on the line, and then press. Trim the seam allowance. You will make 144 blocks with the triangle on the left side, and 144 blocks with the triangle on the right side (see diagram below).
**You should keep these cut-off triangles and make another scrap quilt from them!**
You will need to cut the following from scraps:
- 288 colored squares at 3 ½” x 3 ½”
- 288 background rectangles at 3 ½” x 6 ½”
Prepping Your Fabric Pieces
On the back of each of the colored 3 ½” squares of fabric, draw a line from one corner diagonally to the opposite corner.
Piecing the Goose Blocks
To make each “goose” block, place a colored 3 ½” square right-sides together with a 3 ½” x 6 ½” background rectangle. Sew directly on the line, and then press. Trim the seam allowance. You will make 144 blocks with the triangle on the left side, and 144 blocks with the triangle on the right side (see diagram below).
**You should keep these cut-off triangles and make another scrap quilt from them!**
Laying Out & Piecing the Quilt
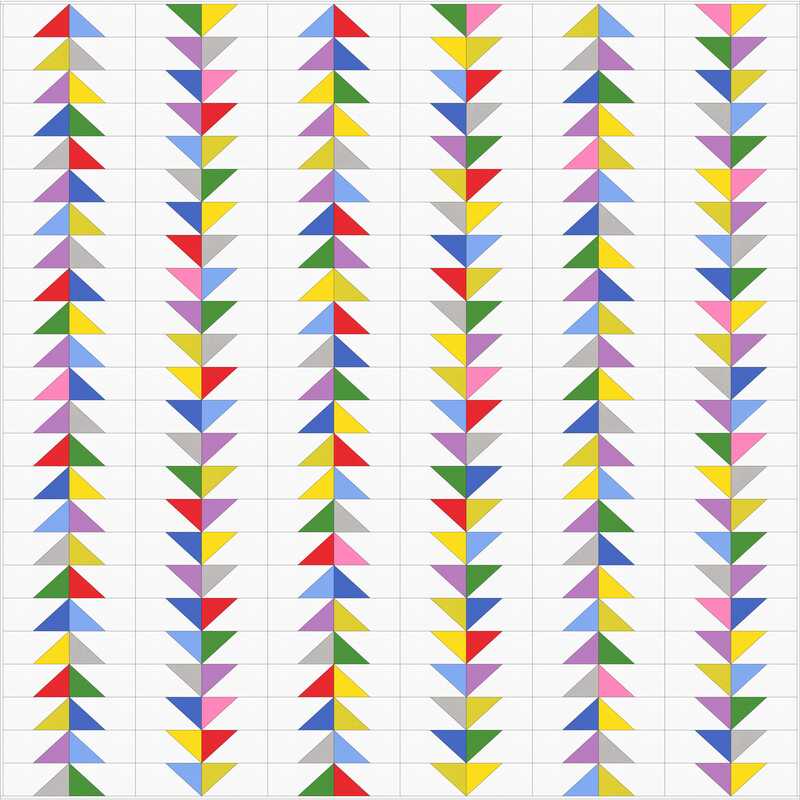
Lay your blocks out according to the diagram at the right. You will have 12 blocks across, and 24 blocks down. I chose to alternate the directions that my 6 rows of geese are flying, though you could also have them all going the same direction. You are now ready to sew your blocks together. Sew your top any way you choose, though I always find “Net-piecing” to be the quickest and I love how it keeps all my rows in order. If you aren’t familiar with net-piecing or web-piecing, google it! There are many good tutorials out there.
Lay your blocks out according to the diagram at the right. You will have 12 blocks across, and 24 blocks down. I chose to alternate the directions that my 6 rows of geese are flying, though you could also have them all going the same direction. You are now ready to sew your blocks together. Sew your top any way you choose, though I always find “Net-piecing” to be the quickest and I love how it keeps all my rows in order. If you aren’t familiar with net-piecing or web-piecing, google it! There are many good tutorials out there.